The following documentation will cover the implementation of the SentinelOne (S1) antivirus (AV) solution with Frame. We will cover two main areas of S1 integration.
- The Console
- The Agent
We will focus on how to deploy SentinelOne antivirus to a Frame DaaS/VDI environment and how the items mentioned above can impact Frame’s normal operation. In this guide, we will review the console and main areas of focus relevant to Frame and provide a set of detailed steps to take when integrating S1 with the Frame Platform. This guide will also cover any known issues to date with S1 and the Frame Platform, with recommended actions (where applicable) and troubleshooting steps.
For more information, please see Security Basics about AV software on Frame.
Console Review
The SentinelOne console is the area where you access, set up, and configure S1 for your environment. There are several sections detailed below where we will focus on the settings that can impact or are needed for Frame. There are many areas within the S1 console that you can configure. For the purpose of this document we will focus only on the areas where Frame integration needs to be set up or the configuration reviewed. The main console is accessed via a site-specific URL for example:
https://euce1-100.sentinelone.net/login
All S1 site URLs are specific to a customer site. They are listed as examples and any S1 URL based documentation references will be the same. The site name in front of .sentinelone.net in the URL will be different and specific to your S1 account and environment.
Site
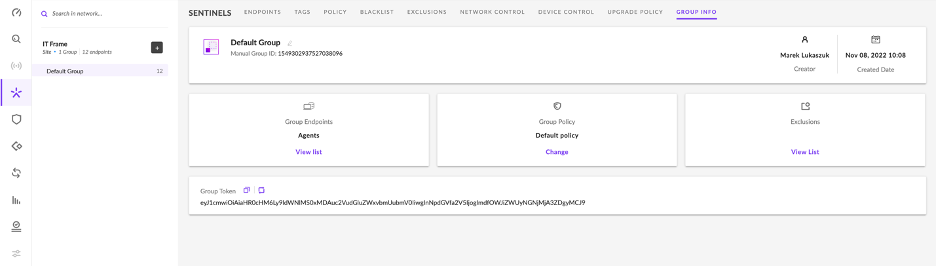
Each Sentinel One deployment will have at least one site that has at least one group or multiple if needed. Secure tokens are assigned to sites. In the example shown within this documentation we are using a single site and a single group dedicated to the Frame environment.
Example Site: IT Frame
Example Group: A single group -- for simplicity, we named ours Default Group.
Groups
Within a site, there are two types of groups:
- Static group: manually created
- Dynamic group: created based on a certain set of conditions
Groups can use filters to determine their endpoint membership from a variety of options. Some examples are machine name, IP address range, and operating system. Each group has agents, policies, and exclusions that are configured to it for the endpoints it manages. Each group has a token that is used for assignment during agent installation, by default a site token and delivered but if you need to deliver a group specific token, that too can be set.
For Frame deployment, it is typically recommended to use a custom Static group with only Frame endpoints present, and filter on Machine/Hostname or IP Address to track group membership. The filter will depend on the use case for Frame and any specific design requirements. Whether you use a dynamic or static group is your choice and really depends on the needs of the environment and how you wish to manage and filter on the Frame endpoints with S1.
Policies
Policies are what controls the S1 agents' virus and malware detection, and the actions of certain features as a result of scans or alerts.
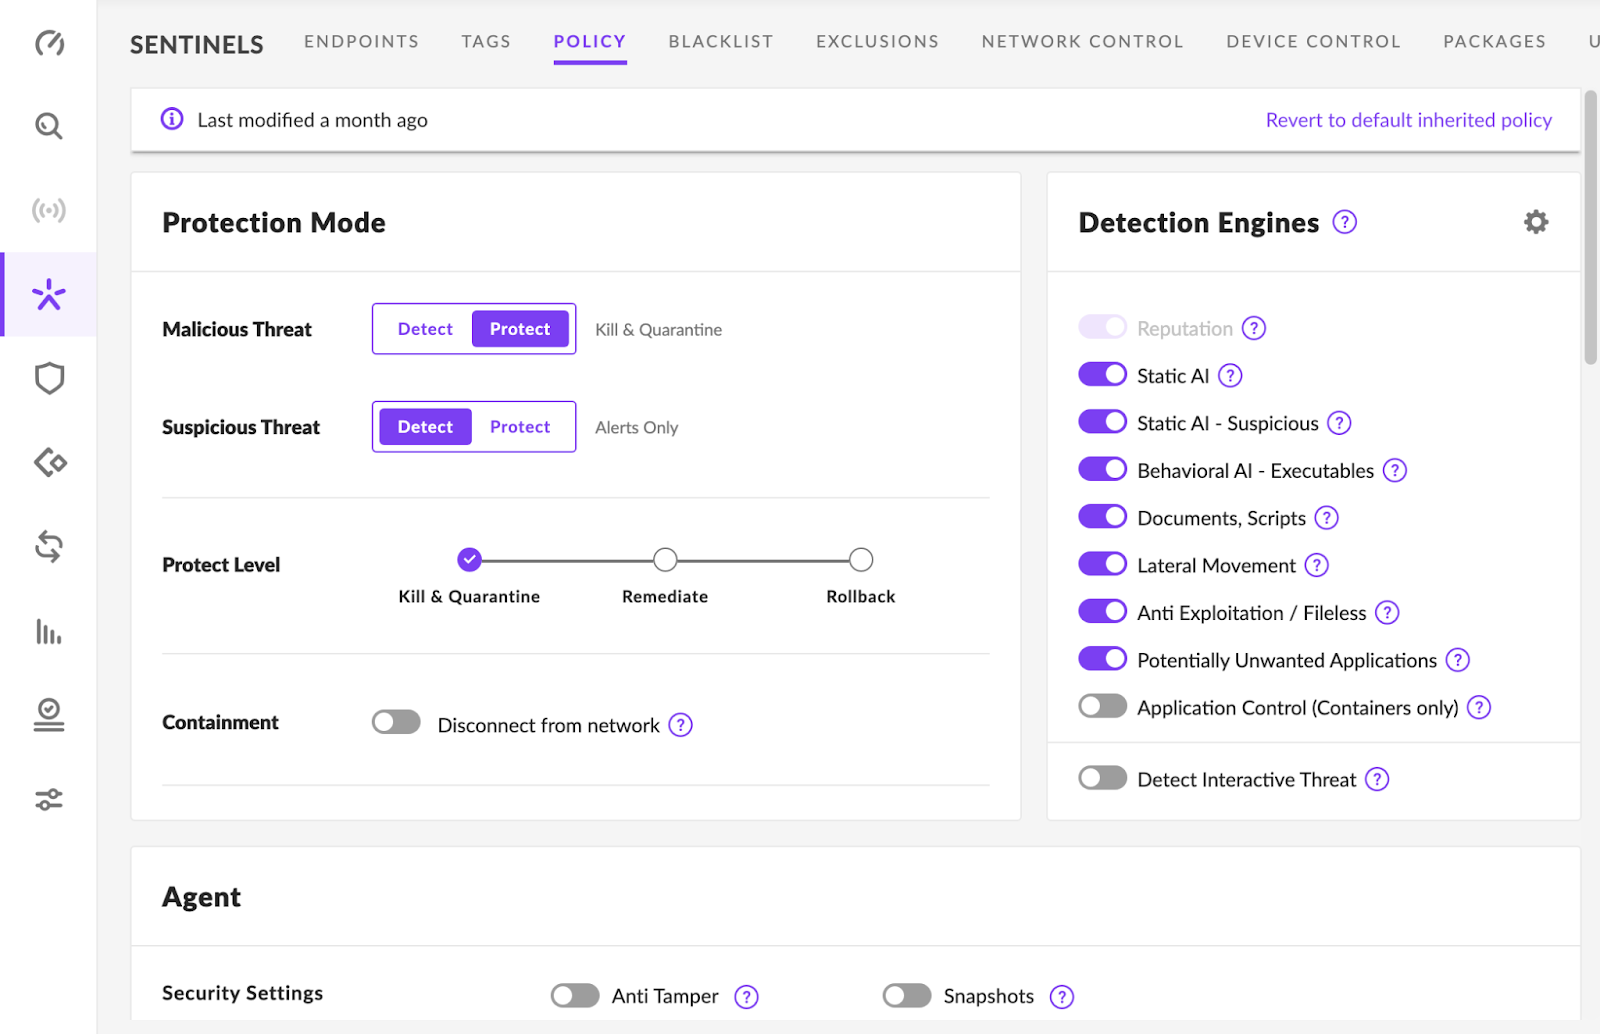
To enable an agent, in the policy, set Malicious Threat to Protect to kill and quarantine. Set Suspicious Threat to Detect for alerts on suspicious items. The Agent UI can be hidden as well as shown in the image below:

The following configurations are to be set for integration with Frame.
- Disable
- Anti Tamper (During publish only if possible)
- Scan New Agents (Do scheduled scans in off hours)
- Snapshots (N/A to Frame)
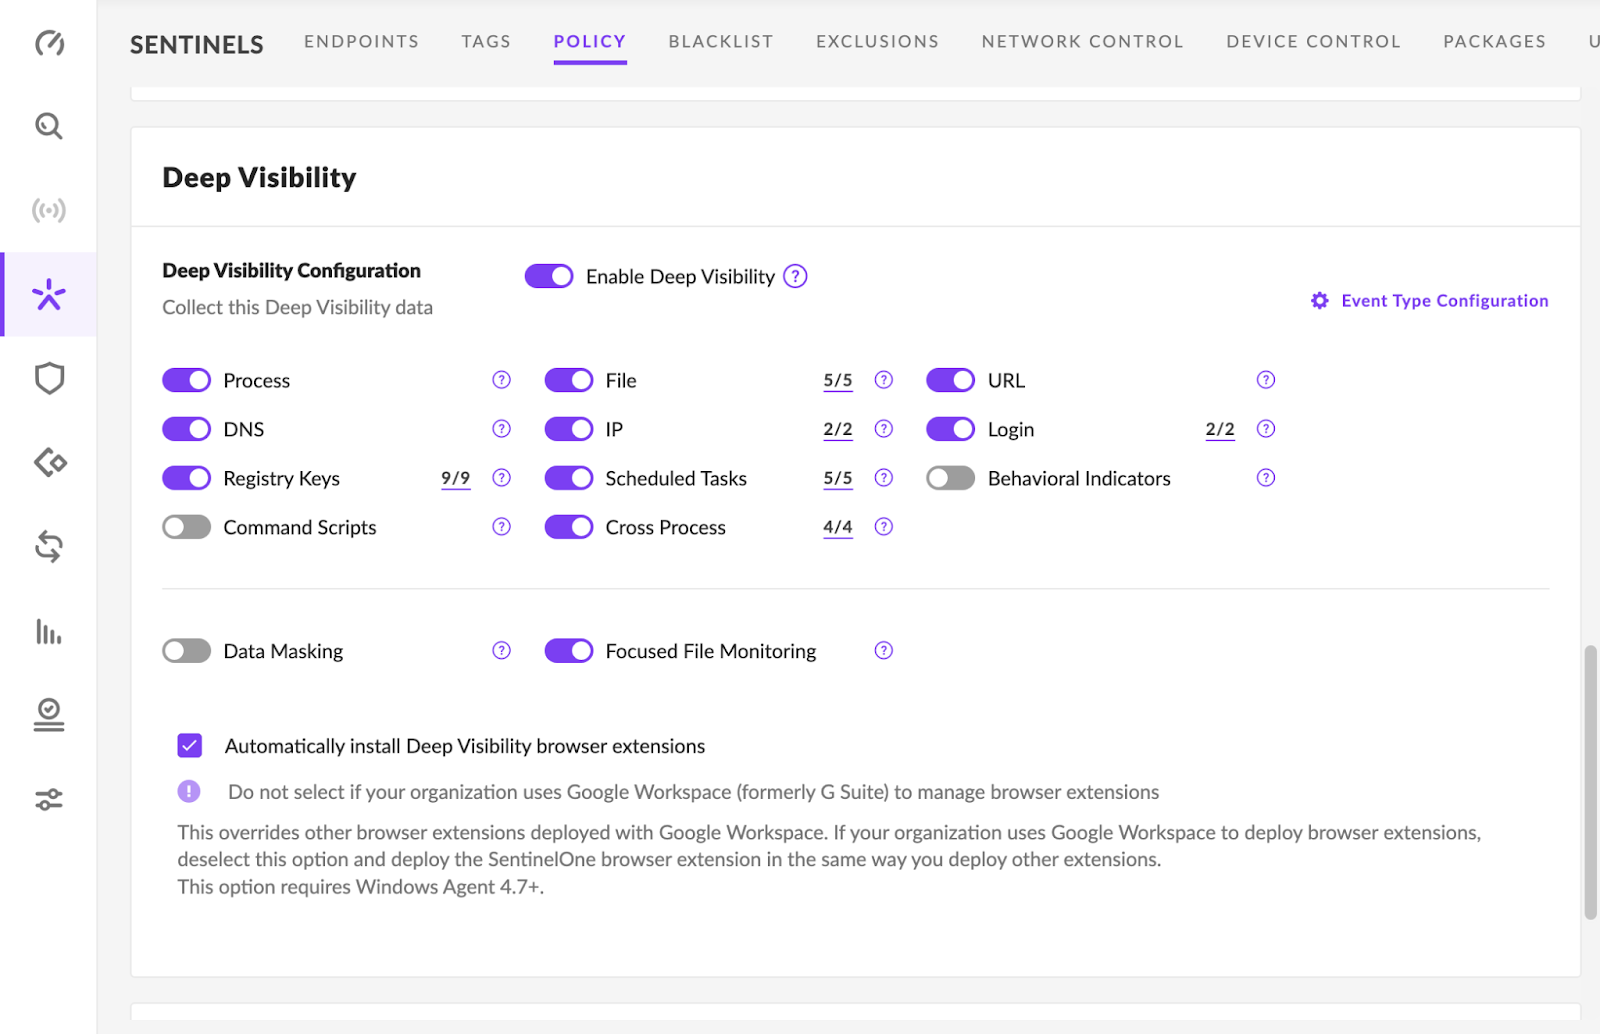
Deep visibility can be on; however, there are areas where Frame may cause an alert, if enabled. The items were tested for Frame as shown in the image below:
Exclusions
The exclusions are what S1 is configured to bypass or not scan. Some examples of the Frame-recommended exclusions are as shown in the image below:
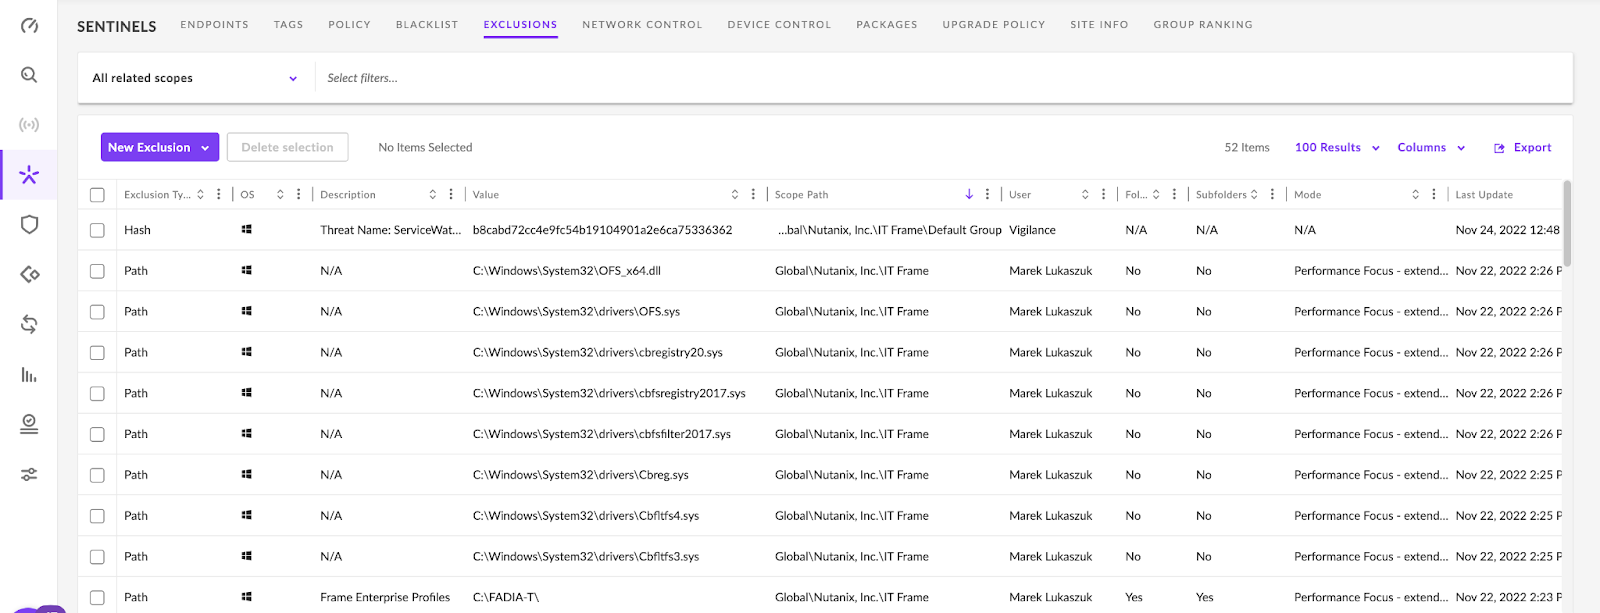
The exclusion type typically uses a directory path or file path.
Use a \\ or / for subdirs in the directory path AT THE END, to have S1 exclude the directories or files within the specific path up to that \\ or /.
For more info, check out our recommended exclusion rules.
Exclusion Rules
Any anti-virus software used on Frame-managed workloads must be configured to allow the following directories and associated sub-directories:
C:\ProgramData\Nutanix\Frame\- Contains libraries and utilities for Frame Service, Server, and logs (FGA 8.x).C:\Program Files\Nutanix\Frame\- Contains Frame Service and Xi Server executables which provide communication to the Frame Platform for orchestration (FGA 8.x).C:\Program Files\OFS\- Contains Frame file system driver and control application.C:\OFS\- Contains Frame file system driver components.
If you intend to use Enterprise Profiles, please allow the following folders and files:
Folders:
C:\Program Files\ProfileUnity\and all subfoldersC:\Windows\Temp\ProfileUnity\C:\FADIA-T\C:\ProfileDiskMounts\
Files:
C:\Windows\System32\drivers\Cbfltfs3.sysC:\Windows\System32\drivers\Cbfltfs4.sysC:\Windows\System32\drivers\Cbreg.sysC:\Windows\System32\drivers\cbfsfilter2017.sysC:\Windows\System32\drivers\cbfsregistry2017.sysC:\Windows\System32\drivers\cbregistry20.sysC:\Windows\System32\OFS_x64.dllC:\Windows\System32\drivers\OFS.sys
Please ensure that antivirus Tamper protection is disabled during the publishing process.
Packages
The packages are the actual client or endpoint agents that get delivered or installed to the endpoints being monitored. Each package is a specific version and is for a certain OS type (Mac, Linux, Windows, etc). Choose the appropriate one for your OS and download it for setup within the Frame Sandbox which serves as the gold image for a Frame account. We will provide additional detail later in this document.
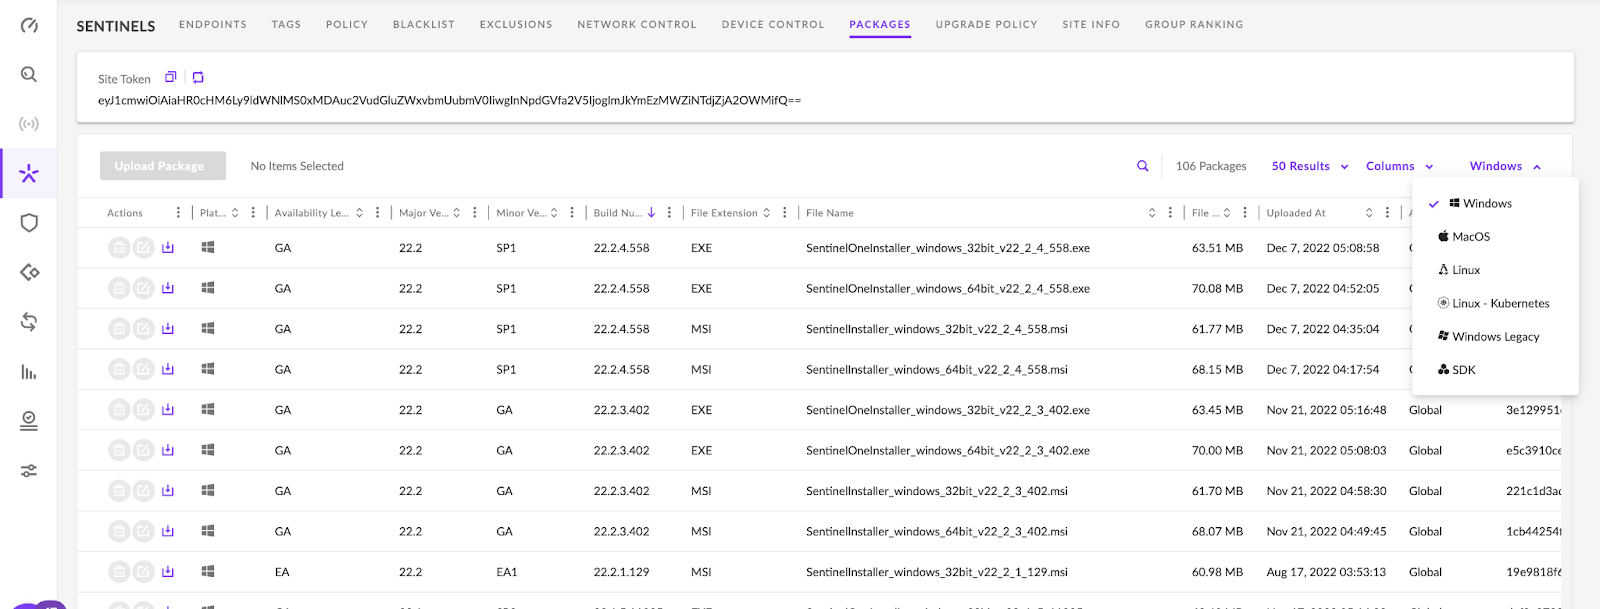
Each package agent has the “site” token built in and the newest package versions are at the top, in the default console packages view. See the image below for the various packages and note that the newest versions are at the top by default.
Endpoint
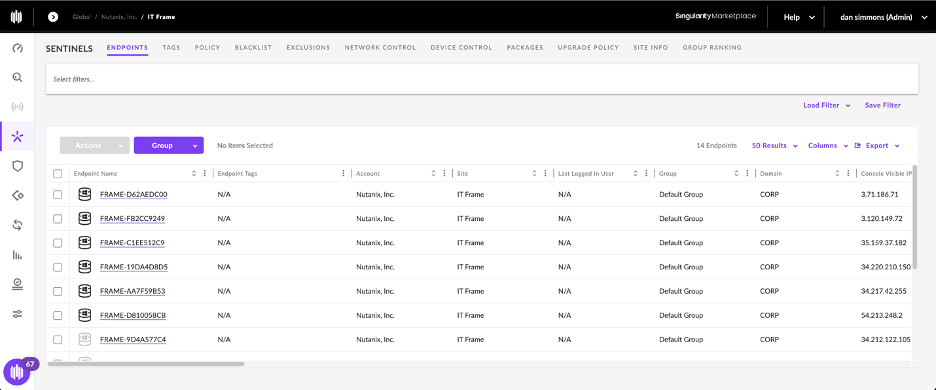
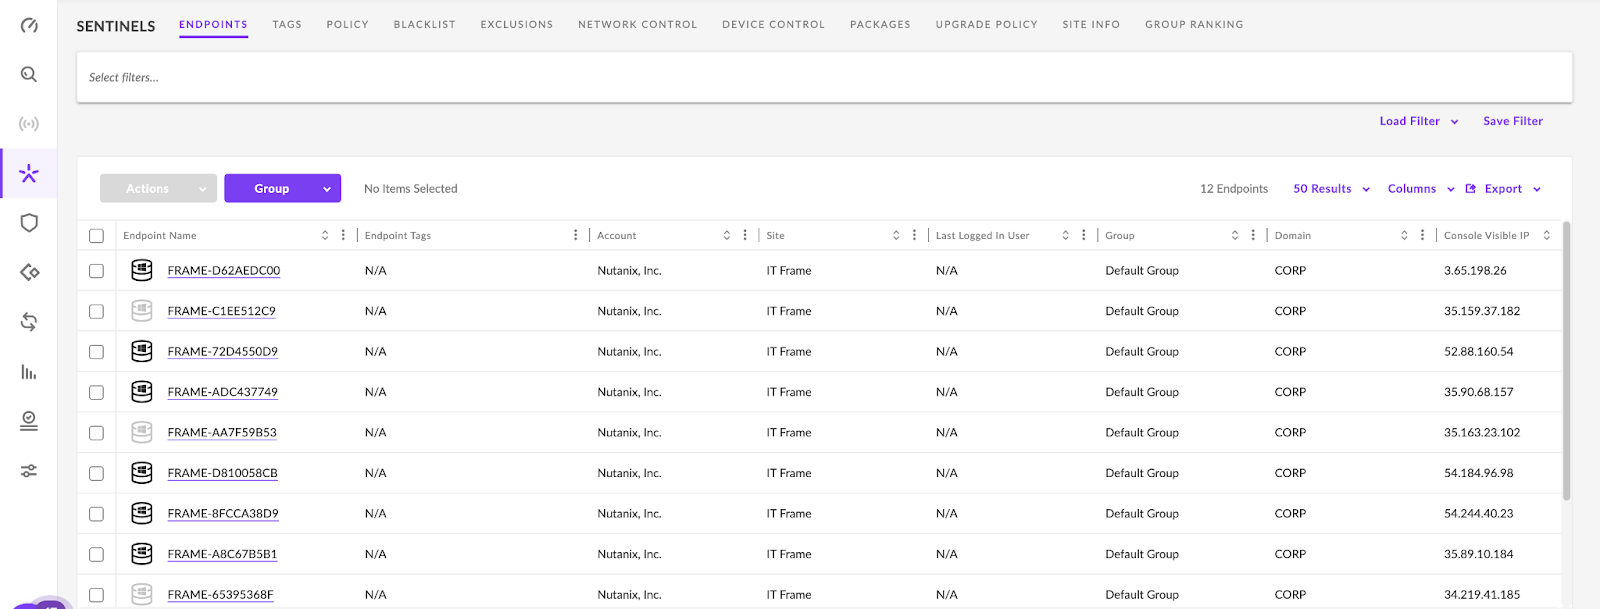
Endpoints are the actual devices you are monitoring, protecting, and alerting on. They can be physical or virtual machines. For the purpose of a Frame deployment, all endpoints are virtual machines and for most customers, will be non-persistent virtual machines. Endpoints are listed as they check in and are either active or inactive. See the image below:
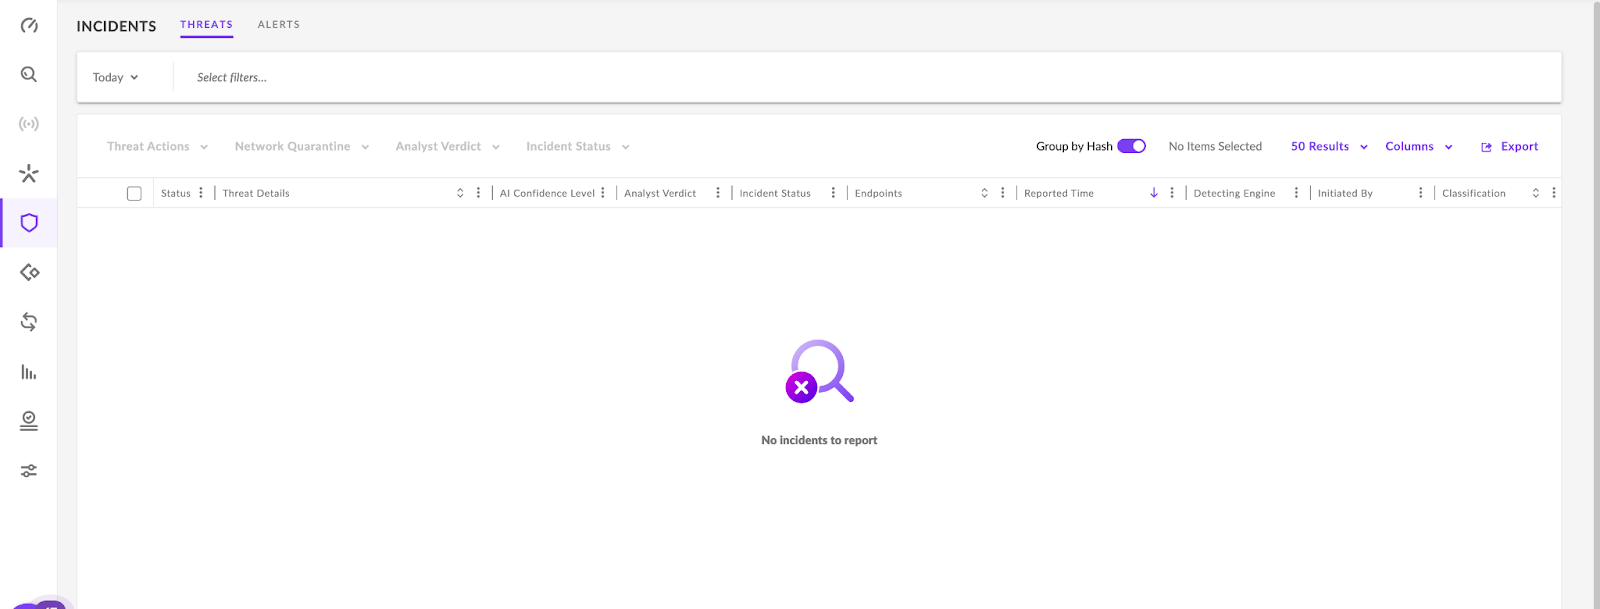
Incidents
This is where S1 tracks and reports on threats and alerts that S1 has identified, with a dedicated view for each. See the image below for the Incidents view.
Console Actions
The following are the areas and items to check and, if needed, set for S1 integration with Frame.
Review the site and group design and if needed, create a site or group for the Frame endpoints.
noteIt is recommended to have a dedicated site or group for the Frame endpoints.
Review existing or create new policies that have the following set:
Disable the following:
- Anti-tampering.
- Scan new agents.
- Snapshots.
Enable the Policy/Policies.
noteIt is recommended to have distinct policies for the Frame endpoints.
Review and set within the site, or group, all Frame based exclusions as per our Frame recommended exclusion rules
Find and download the newest OS S1 agent package for setup on the sandbox master image.
- Make sure it has the site or group token within, if not then copy the token down individually to use during installation.
Setup the S1 agent on the Sandbox image as noted in the next section.
Monitor endpoint checking in as capacity is built, or a publish is performed.
The Agent
The agent is the software package that you downloaded earlier from the console and will be installed into the Frame Sandbox, so that it is part of your Frame deployment when you build out capacity for use. You may also need the S1 token whether site or group based, depending on your deployment model. Make sure to grab the proper one for the deployment model being used (site level or a group.)
S1 agents are specific to and available for various OS types. Each OS and OS version will have a specific agent it uses. Always use the latest available unless noted not to by S1 or Frame.
For the purpose of this document, we will be showing an example of deploying on a Windows based Frame Account. We will follow the guidelines, as laid out by S1 for deploying to a VDI solution as noted in the URLs below:
URLs:
- https://euce1-100.sentinelone.net/docs/en/vdi-and-vm-deployment.html#vdi-and-vm-deployment
- https://euce1-100.sentinelone.net/docs/en/installing-windows-agents-on-vm-or-vdi.html#installing-windows-agents-on-vm-or-vdi
Note: Install the SentinelOne agent with the /VDI CLI argument/switch. This allows for cold cloning after a sysprep. It makes the cloud console recognize that it's a clone, and generates a new UUID.
Agent Installation
Note: Install the agent after you have installed all other applications and are in the final stages of testing the sandbox image. This is a VDI general recommendation and not a Frame-specific recommendation.
To add the SentinelOne Agent to the sandbox master image:
- Download the SentinelOne Windows Agent exe or msi to the image.
- On the master image VM, run the Agent installer with the
/VDIswitch.
Note: The syntax is different depending on whether you install an EXE or an MSI installation package.
Example of an EXE package installation:
C:\Users\User1\Desktop\SentinelInstaller.exe /VDIExample of an MSI package installation:
C:\Users\User1\Desktop\SentinelInstaller.msi VDI=trueThe syntax for Agents version 22.1 and higher installed with the new installer:
C:\Users\User1\Desktop\SentinelInstaller.exe -a "VDI=true"or
C:\Users\User1\Desktop\SentinelOneInstaller.exe -a "INSTALL_PATH_DATA=drive:\path VDI=true"Continue the installation.
Exit installer once completed.
Verify agent setup and confirm the S1 Token is the right one for your deployment model.
Finalize the image with any optimization tools or scripts.
Make sure all Windows updates are processed and the service disabled.
Run the sysprep check tool. (optional, only run if needed.)
Power off sandbox image.
Publish to the instance pool capacity needed.
For persistent Frame accounts where users are assigned a virtual machine, deploy the S1 agent as you would for a non-persistent Frame account in the Sandbox using the /VDI option. Then manage the persistent desktop virtual machines as you would a traditional endpoint, once the persistent desktop is assigned to a user.
Known Issues
Issue One: Publishing failures or cancellation.
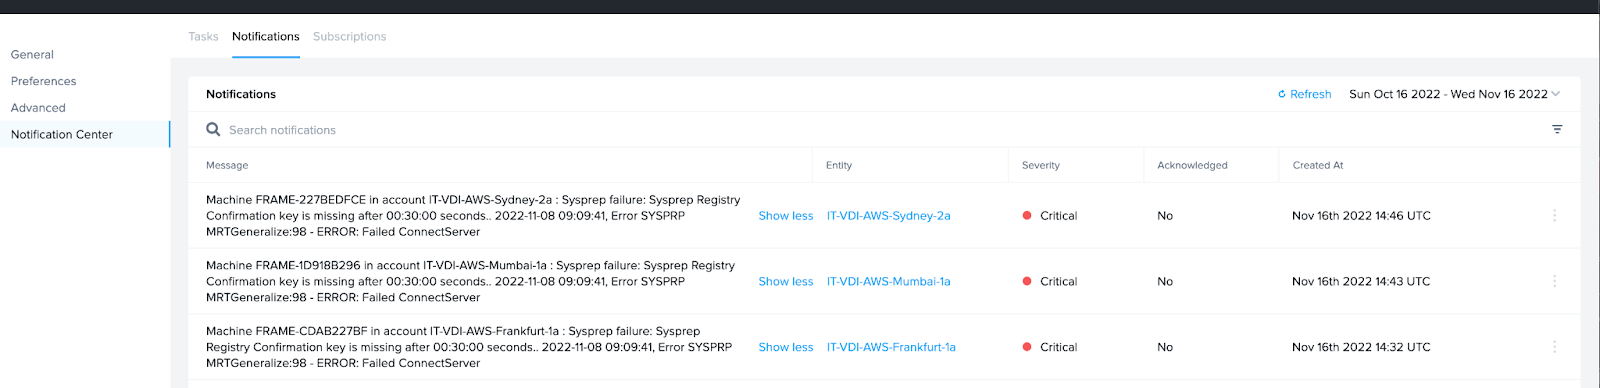
Reason: Sysprep timing out.
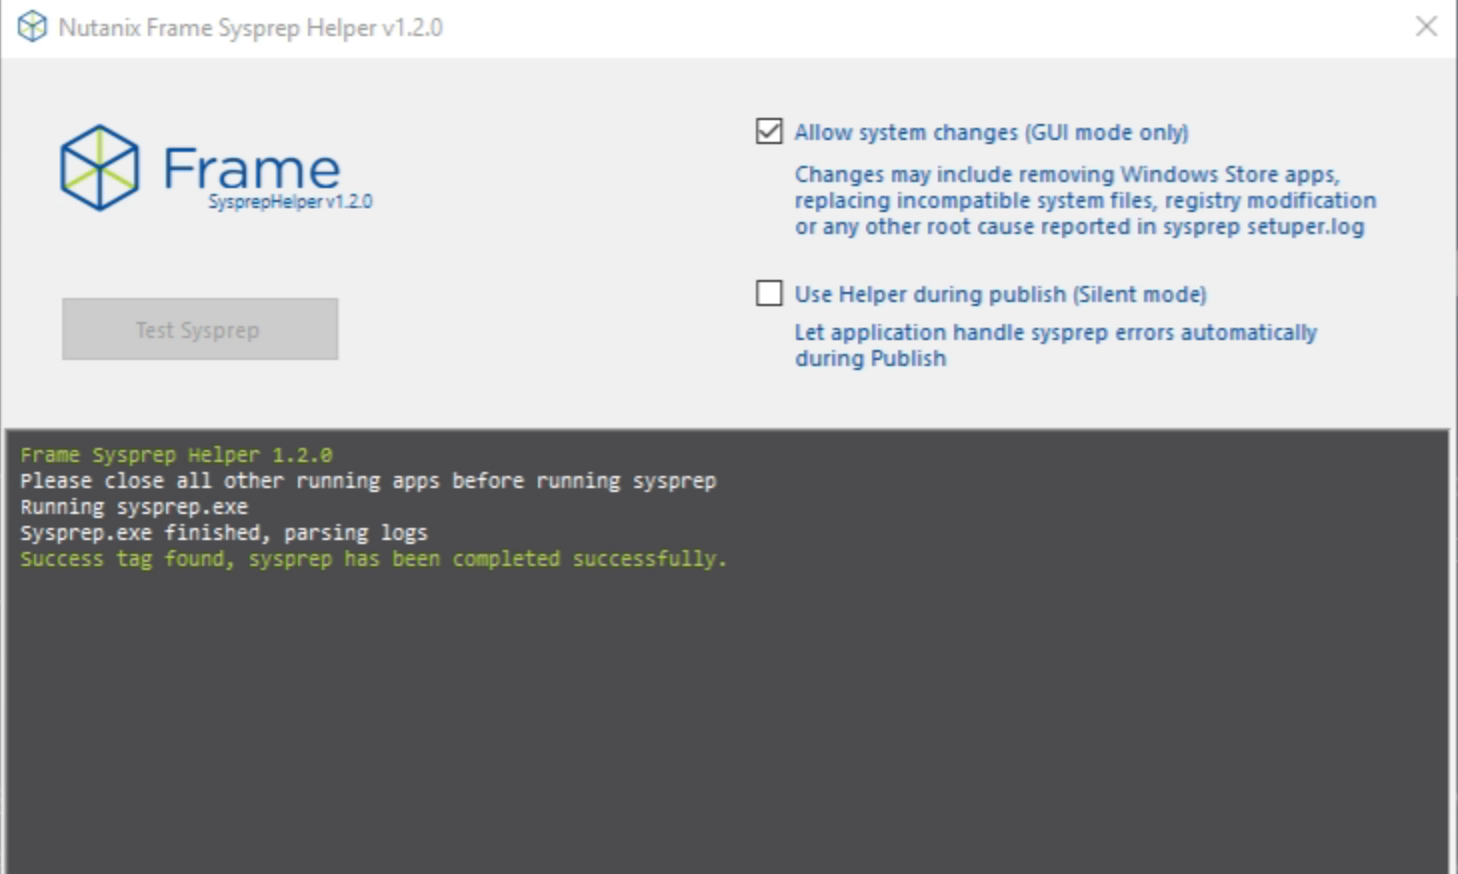
Fix: Run the sysprep check tool on the sandbox prior to publishing.
Issue Two: The inability to start sessions on production pool instances in OFS-enabled accounts.
Reason: File security descriptors were not set correctly, resulting in file access denied in some scenarios and also directory query could return corrupted buffers. We have confirmed an issue exists when using OFS v1.4.403.0 and exists on all clouds (AWS, Azure, and GCP).
Fix: The new OFS version OFS v1.5.x, does not have this issue. Contact Frame Support to obtain the latest version of OFS.
Troubleshooting
To troubleshoot issues, see the MSI installation log or call S1 Support.The MSI installation log is named MSI<string>.log.
If you run the installation/upgrade from a specific user, the installation log will be in the folder
%temp%.If you run the installation/upgrade from a system user (like from the Management Console) the installation log will be in the folder
%systemroot%\temp.To see if an Agent was installed with the /VDI switch:
Run: Sentinelctl.exe agent_id -v in the virtual machine from an administrative command prompt.
Sentinel One Logs
Log Location for Each Activity in Detail
| Activity Type | Initiated By | Log Location |
|---|---|---|
| Clean Install | Management or GPO | %windir%\temp\Sentinelinstaller*.txt%windir% is typically C:\Windows |
| Clean Install | End user | %temp%%temp% is C:\Users\<User>\AppData\Local\TempIf the clean install is from MSI, and the MSI fails before handing off to the SentinelInstaller, the log filename is MSI*.LOG. Otherwise, the log filename is Sentinelinstaller*.txt |
| Clean Install | Logs are copied automatically after successful installation | C:\ProgramData\Sentinel\UserCrashDumps\*.* |
| Customize Installation Folder Name | End user | C:\Program Files\_Customized_Folder_Name_, Sentinelinstaller*.txt, or MSI*.LOG |
| Upgrade | Management or GPO | %windir%\temp\MSI*.log, %windir%\Temp\Sentinel*.etl, C:\ProgramData\Sentinel\UserCrashDumps\*.* |
| Upgrade | End user | %temp%\MSI*.log, %temp\Sentinel*.etl, C:\ProgramData\Sentinel\UserCrashDumps\*.* |
| Uninstall | Management or GPO | %windir%\temp\ |
| Uninstall | End user | %temp% |
Tip: To troubleshoot installation issues, search the logs for ERROR or FATAL.