Installation
Customers manually deploying the SGA will follow the instructions below to install an SGA instance in their infrastructure:
Prerequisites
Frame Streaming Gateway Appliance 3.x prerequisites are as follows:
- Download the Frame SGA disk image from the Downloads Page for the hypervisor/infrastructure on which you wish to deploy the SGA.
- Download the SGA Toolbox for your desired operating system.
- Configure networking and firewall to support additional FQDNs and protocols/ports to support FRP8 if necessary. For FRP8, each SGA VM must have its own public IP address, in addition to the load balancer public virtual IP address.
- Ensure you have obtained a public key certificate, private key, wildcard subdomain, and public IP address for wildcard subdomain.
Customers must contact Frame Support after installing SGA 3.x to finalize SGA registration.
Step 1: SGA Subdomain
End users' browsers must be able to reach the SGA from the Internet. Since the SGA will be deployed behind your organization's firewall, the end users' HTTPS requests, Secure WebSocket connections (for FRP7) and WebRTC (for FRP8) must be able to resolve to a public IP address on your organization's firewall. From there, the request would need to be forwarded to the private IP address of the SGA and then from the SGA to the workload VMs.
Each Frame-managed workload VM will have an FQDN, based on the SGA subdomain. Consequently, the SGA subdomain will need to be configured as a wildcard DNS A record. For example, a company would need to ensure that:
*.sga.company.com resolves to the public IP of the SGA.
The public IP address of the SGA is network address-translated to the private IP address of the SGA by the firewall.
Do not use the company domain as the SGA domain (e.g., "company.com") and the company wildcard certificate (e.g., "*.company.com") for the SGA certificate.
Step 2: SGA public key certificate
Generate the wildcard SSL certificate signing request and corresponding private key for the subdomain chosen in the previous step. If this SGA is intended for use in a production environment, please obtain a public wildcard certificate or a certificate with a Subject Alternate Name (SAN) containing the wildcard SGA subdomain from the certificate authority of your choice. If the SGA is to be used for testing or a proof of concept environment, a free public wildcard certificate can be obtained from Let's Encrypt.
Free Let's Encrypt certificates have a ninety-day lifetime. The SSL certificate must match the DNS subdomain record. For example, if the wildcard SSL certificate is .sga.company.com, then the DNS subdomain A record must be .sga.company.com (and not company.com).
You can generate a private key and certificate signing request (CSR) in several ways. In the following example, we will use OpenSSL version 1.X. You can install OpenSSL on any operating system and run it from command prompt, or terminal. You may need to navigate to the OpenSSL bin directory in order to run the following commands.
First, we will generate two files. A Private key which should be kept safe and will be used in the SGA helper tool, and a CSR file which will be delivered to a wildcard provider in order for them to generate your wildcard certificate.
openssl req -newkey rsa:2048 -keyout ENCRYPTED.key -out MYCSR.csrThis command will prompt you to fill out information regarding the certificate request such as country, state, company etc. Many fields are not required and can be left blank, but be sure to fill in the FQDN field with your wildcard including the <*>. For example:
\*.SGA.WIDGETSINC.COM. You will be prompted for a challenge password which you will use in the following step.You should now have 2 files in your working directory:
ENCRYPTED.keyandMYCSR.csrThe CSR file
MYCSR.csris ready to be provided to your certificate provider, in order for your certificate provider to generate the public key certificate.Next we need to unencrypt the key by running the following command:
openssl pkcs8 -topk8 -nocrypt -in ENCRYPTED.key -out PRIVATEKEY.key
It will prompt you for a password which you created in step one, and it will output PRIVATEKEY.KEY
You can now open that key in Notepad to copy and paste into the SGA Helper Tool.
Deliver the CSR file generated in the step above to your certificate provider. The provider will give you files that contain your wildcard certificate, a root certificate, and intermediate certificates. You can open them with Notepad to copy them, as needed.
If you need to verify which files are which certificates, you can save the pasted certificate as a
.crtfile and open it (do not install it) in Windows. Under the “Certification Path” tab in the file's properties:- If you see only 1 level in the path hierarchy, then you are looking at the root certificate.
- If you see only 2 levels in the path hierarchy, then you are looking at an intermediate certificate.
- If you see all 3 levels in the path and the name of your wildcard, you are seeing the wildcard certificate.

SGA Wildcard Certificate
Step 3: Configuration File
Run the SGA Toolbox (“sga_toolbox.exe”) to generate the SGA configuration file. The SGA Toolbox will need to be connected to a network that has access to public DNS servers in order to validate that the SGA wildcard subdomain has an associated public IP address.
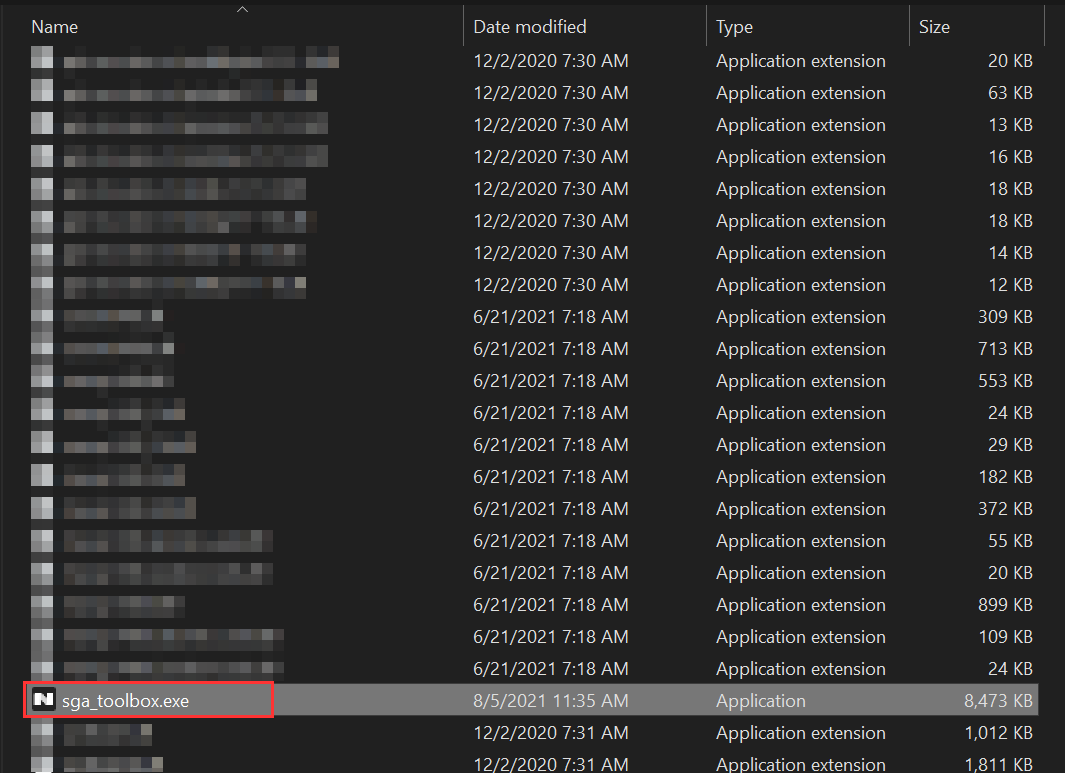
SGA Toolbox Executable From the top menu of the SGA Toolbox, select “Tools” and then “Generate SGA configuration”
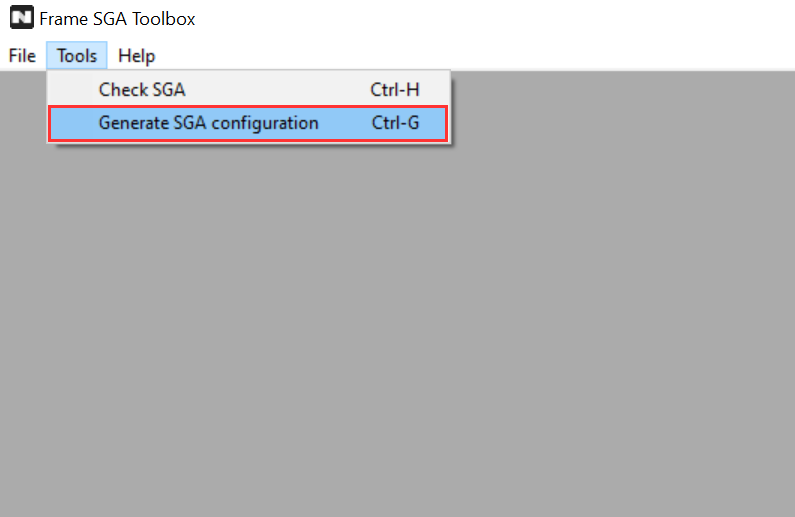
SGA Toolbox - Generate SGA Configuration Next, enter the required information into the corresponding fields:

SGA Toolbox - Configuration Parameters
| Parameter | Description |
|---|---|
| Base domain name | Enter the base domain name for the subdomain that matches the wildcard certificate. |
| Frame workloads VLAN CIDR | Enter the VLAN CIDR range for your workload VMs. |
| Frame Platform instances | Select the Frame Platform version you wish to use. |
| SGA version | Ensure the SGA version to be installed matches the SGA version specified in the SGA Toolbox. |
| Public IP address | Specify the public IP address of the SGA. |
| SSL certificate chain | Enter your SSL certificate chain in the following order: Wildcard SGA certificate, Intermediate CA certificate, and Trusted Root CA certificate. |
| SSL certificate private key | Enter the matching private key for the certificate. |
- Once all of the information has been entered correctly, click “Generate” and SGA Toolbox will produce your SGA configuration file. You can use the icons above the SGA configuration box to either copy the SGA configuration data to your clipboard or save the file for AHV.
- If you are creating an SGA VM on ESXi, you must save the SGA configuration data as an ISO file (to be mounted as a CD-ROM when creating the SGA VM).
- If you are creating an SGA VM on Azure infrastructure, you must copy the SGA configuration data directly from the tool into the Azure console referenced in later steps. Copy the data to your clipboard before moving forward.
As a best practice, Frame strongly advises administrators to save the valid configuration file for troubleshooting purposes, or in scenarios where more than one SGA VM is required.
The “Generate SGA configuration log” window will provide you with additional details in the event that the file generation fails.
Once created, you can customize the SGA configuration file as needed. The default username, password and port number to access the SGA Management Console can be changed by setting the configuration parameters WEB_MGMT_USERNAME, WEB_MGMT_PASSWORD, and WEB_MGMT_PORT. You can also add an SSH public key for the nutanix user account by setting the configuration parameter SSH_MGMT_PUB_KEY to an SSH public key you created previously to access the SGA VM using SSH.
These SGA configuration parameters, along with any additional SGA configuration parameters and their values, are added below the bootcmd: block of the SGA configuration file:
#cloud-config
bootcmd:
  - set_sga_var WEB_MGMT_USERNAME nutanix
  - set_sga_var WEB_MGMT_PASSWORD nutanix/4u
  - set_sga_var WEB_MGMT_PORT 8888
  - set_sga_var SSH_MGMT_PUB_KEY ssh-rsa AAAAB3NzaC1yc2EAAAADAQABAAABgQDtfileuEjCuTnWkRR7KpvEQCXIg81Bl7sgmN1WbRqbRRZvNxhD5Z+9qK5vQ2XXwmn3t70RSYIHPjnK4/CGyR4urLUfTdOoNMl3zQv70/trkZ+Y1mRry2JCQEGyf7OIZE01Bw0vYgtS3KETOCQ2PYR8s04Ig0/FRc25UHxVfwKWUD3fu2sScIDmNf/LFXXSCih6bAIP5KmSxRciyt7pdKmjybGneQSc8F8rSiO58zzUb0TLbK0EY5EfCmQeGXDgTynugiwGF6jbCNbyZ68eh8uCsU1JuCjUE73b/jru2jq5Dk4zNh7LK0nth2iHMZJHOzye3+LetsPQ4gVNaW/Ee4pVG18JP4eh44C5MuGNTSJFz6wN06YI0VofdjJ8eDmtl4vkDLvQZCSEKT4C3lq77biR2GJLz76stLW+LcBfyRo4CDg/hjBlidacEf0O3yCplhmm4uC/PMef6yU4LOrVwVpRpDSMli++/tLGNOyy8jxv6ni86Jnpc55xJG2St500p+s= acct@local
Step 4: SGA Creation
After the configuration file has successfully been created, follow the steps below, based on the hypervisor/infrastructure you have chosen, to create and configure the Streaming Gateway Appliance.
- AHV
- AWS
- Azure
- ESXi
- GCP
The following instructions assume you have already identified the AHV VLAN that the SGA will be placed in. The VLAN will need to be “public” (have a route from/to the Internet) and will need network connectivity to the private VLAN where the workloads are placed.
Create a new VM in Prism Central (or Prism Element), enter a name and set timezone to UTC.
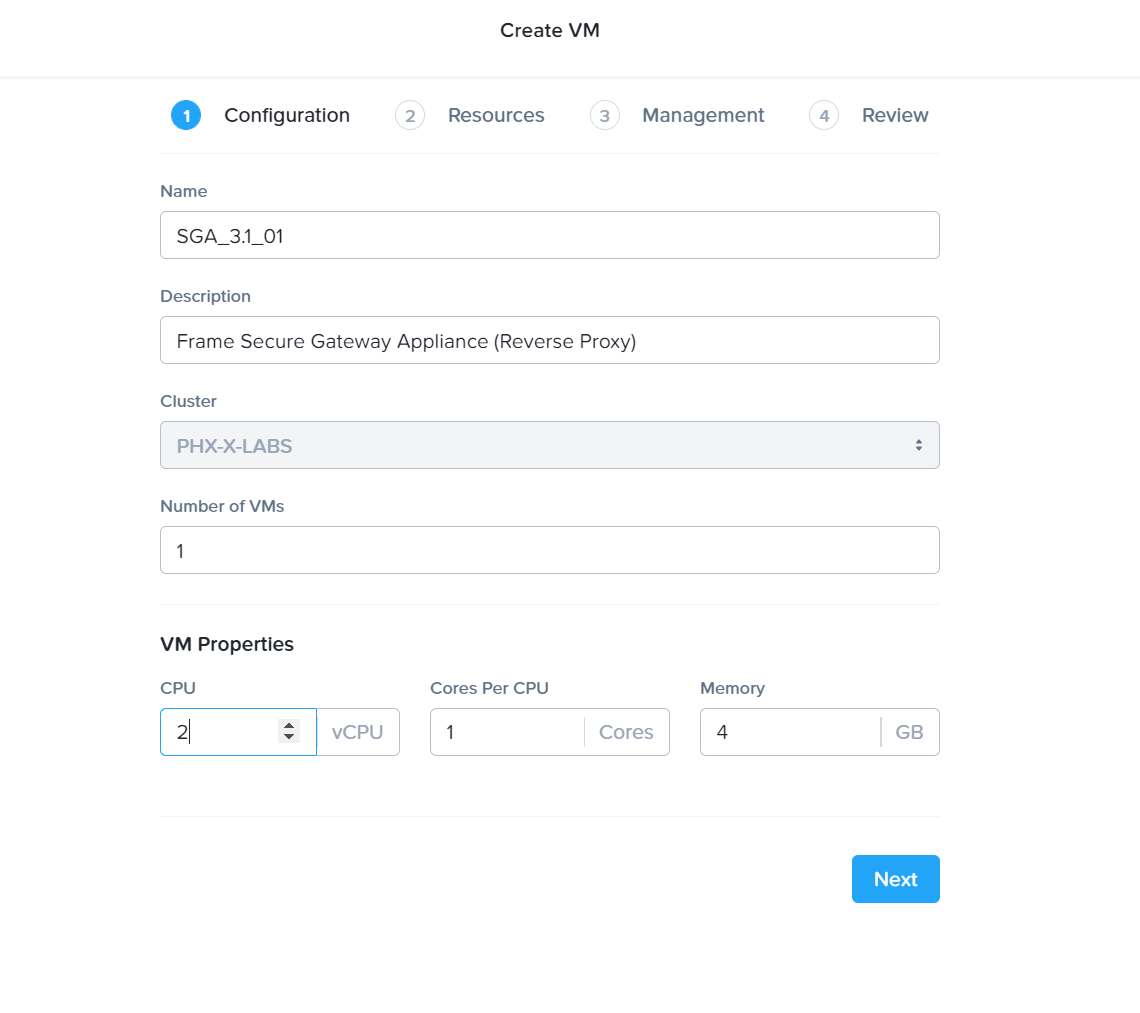
SGA VM Creation - VM Creation
The timezone must be set to UTC.
Configure Compute Details: SGA VMs should have at least two (2) vCPUs and 4GB RAM. This configuration supports up to 500 concurrent user sessions. Click “Save.”
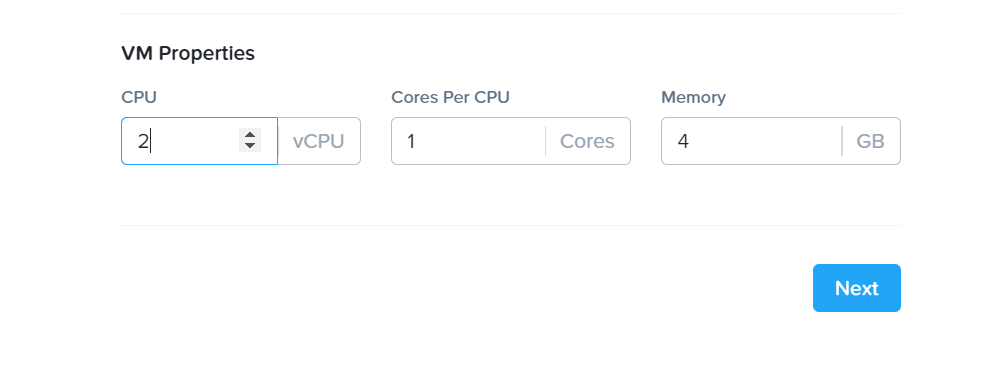
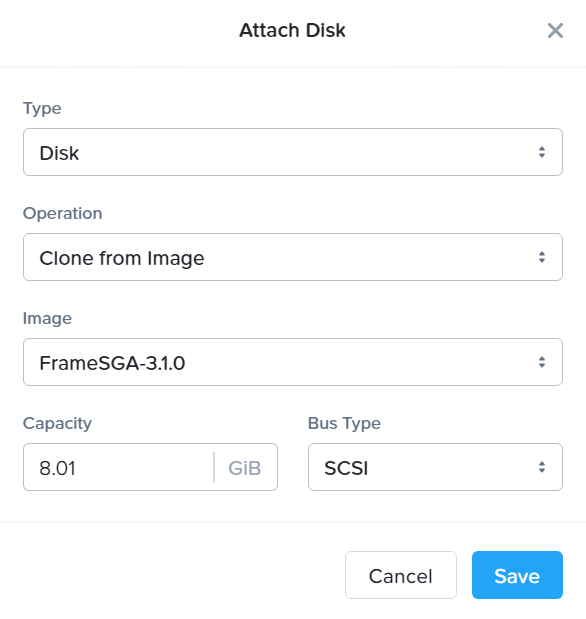
SGA VM Creation - VM Configuration Add the SGA disk image by clicking “Attach Disk”
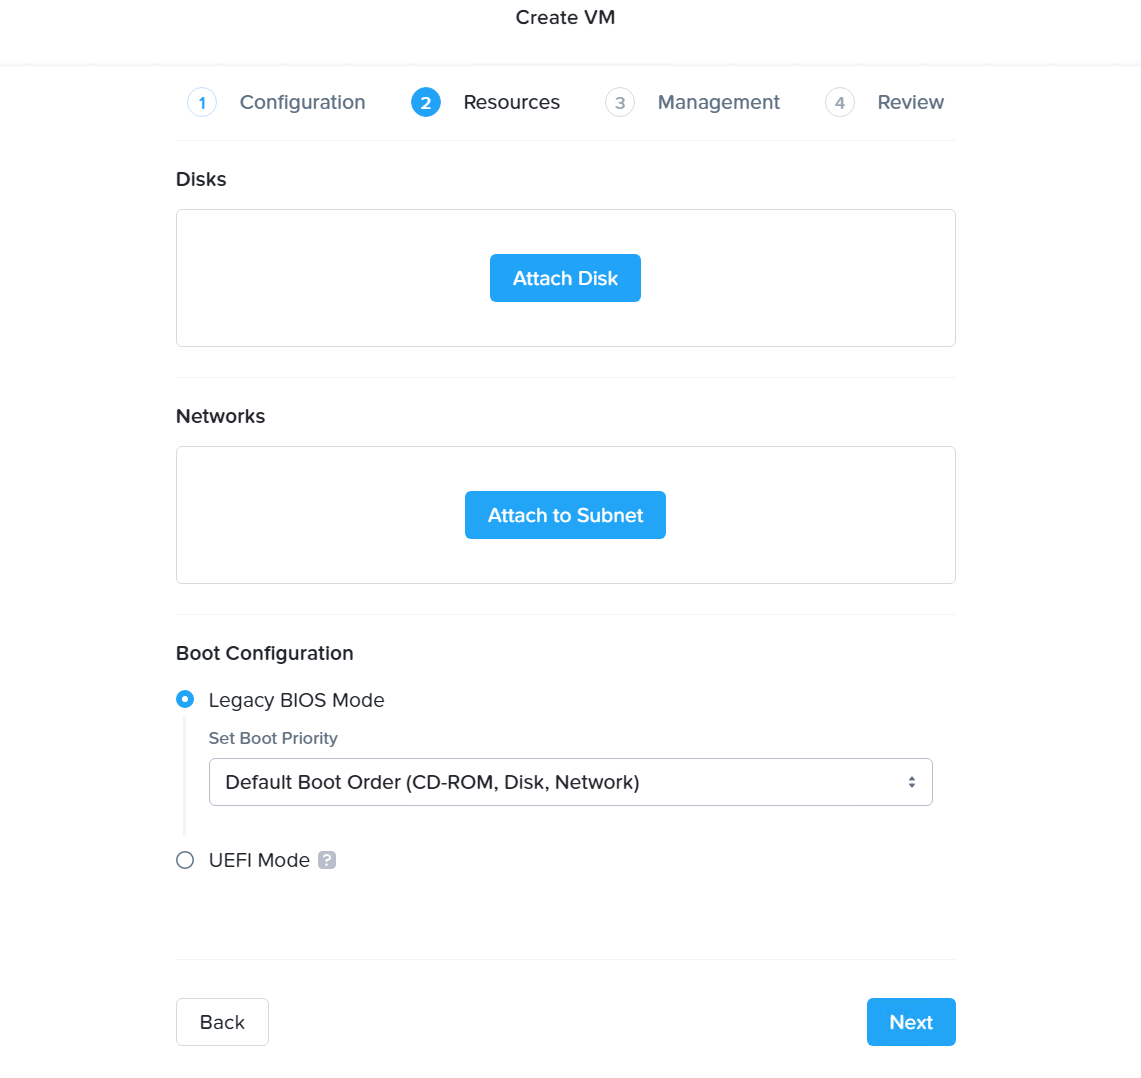
SGA VM Creation - Attach Disk Specify your Frame SGA disk image. Click “Save.”
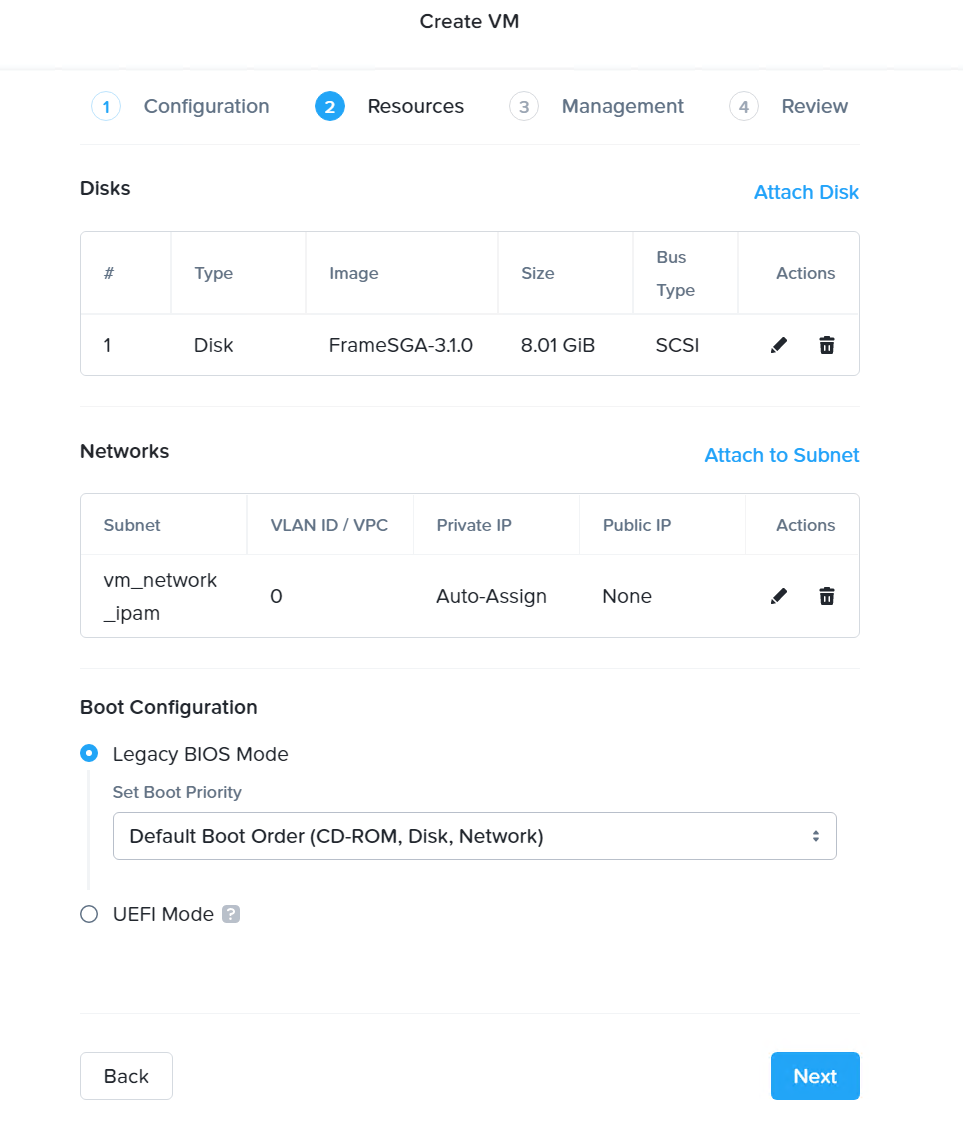
SGA VM Creation - Attach Disk Under “Networks,” click “Attach to Subnet” to assign the appropriate VLAN to the new VM. You can set the static IP address at this point.
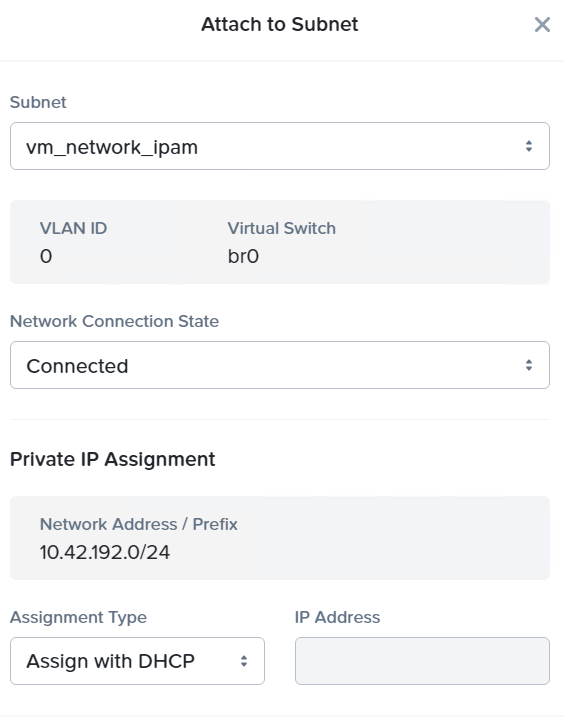
SGA VM Creation - Attach Subnet Once the SGA disk and networks are attached, select “Next.”
SGA VM Creation - VM Configuration Enable the Custom Script option and paste in the SGA configuration file. The certificate and private key within the configuration file will be loaded into SGA once the VM is created.
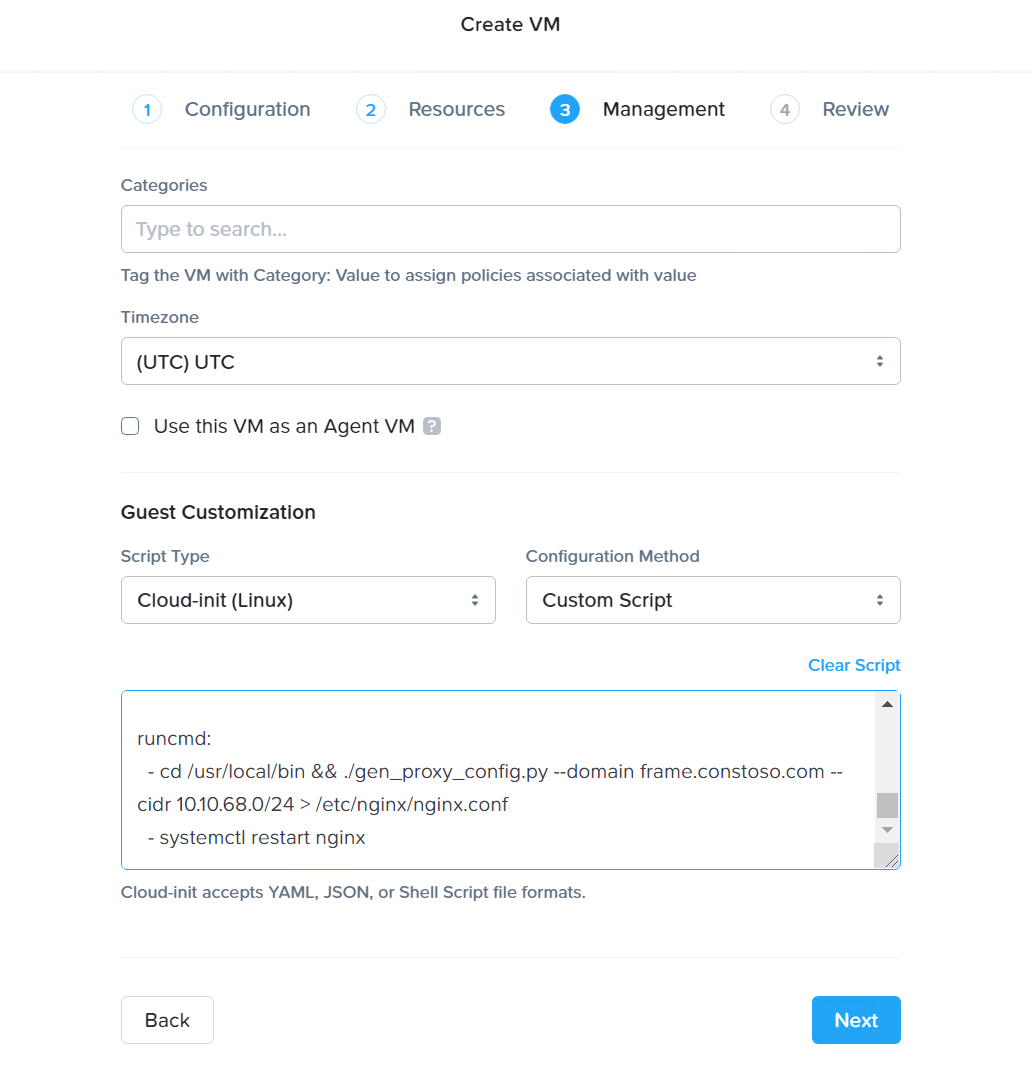
SGA VM Creation - Custom Script Select “Next” and then click “Create VM” on the final Review step.
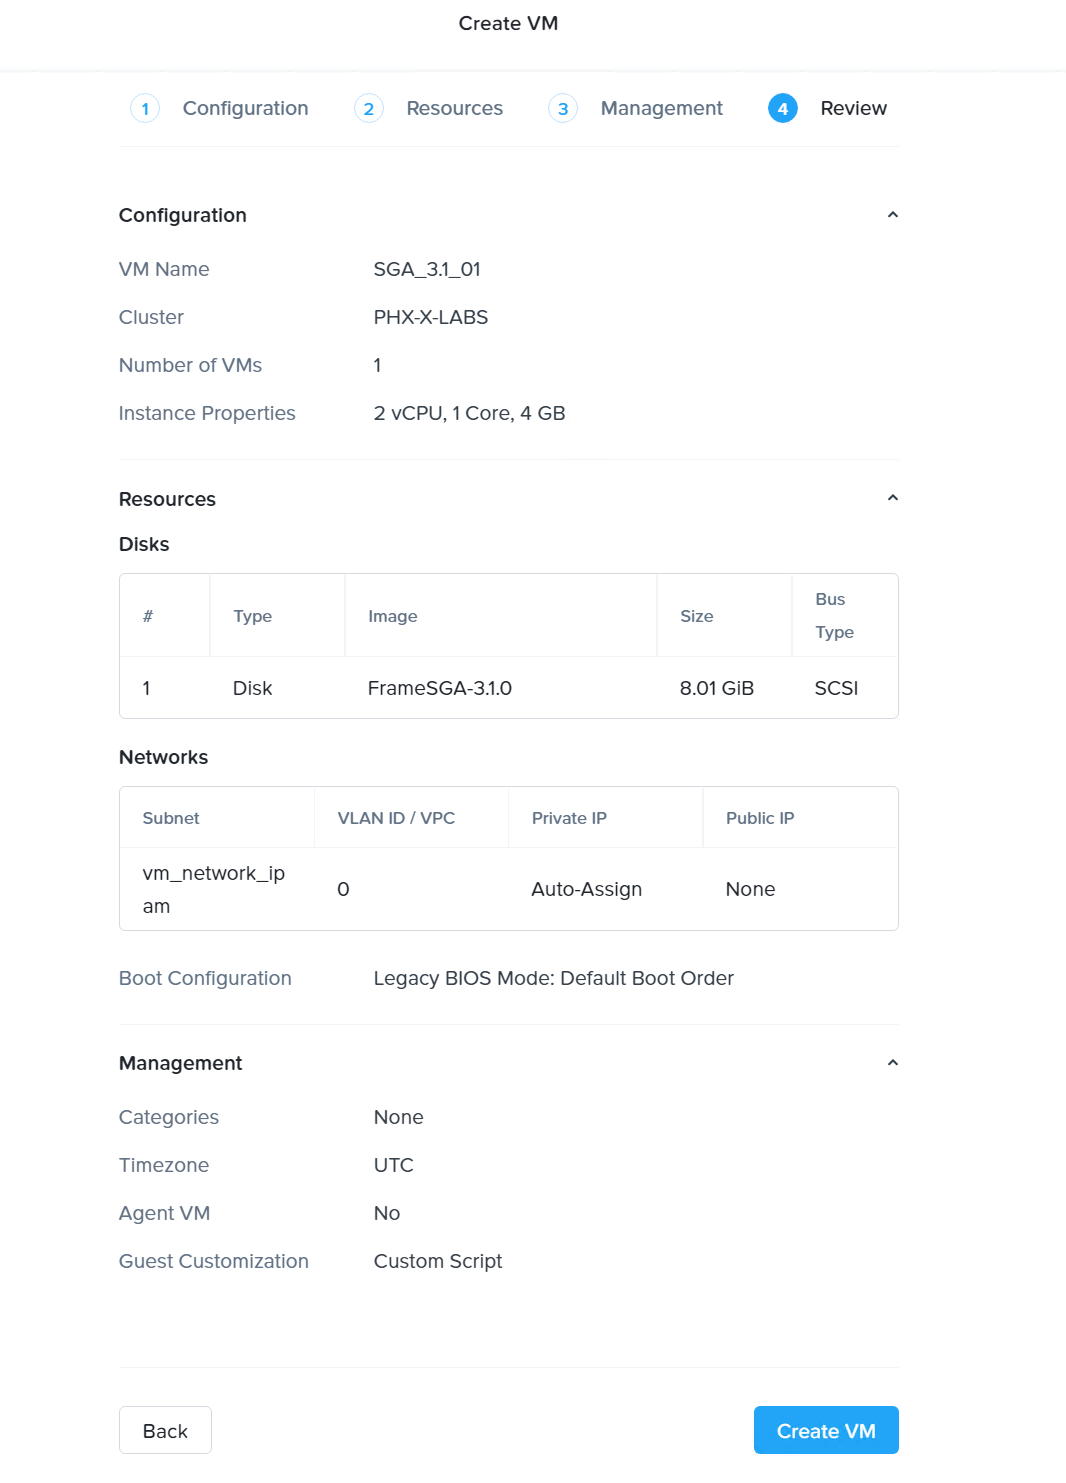
SGA VM Creation - Create VM You should now be able to see the newly created VM in Prism.
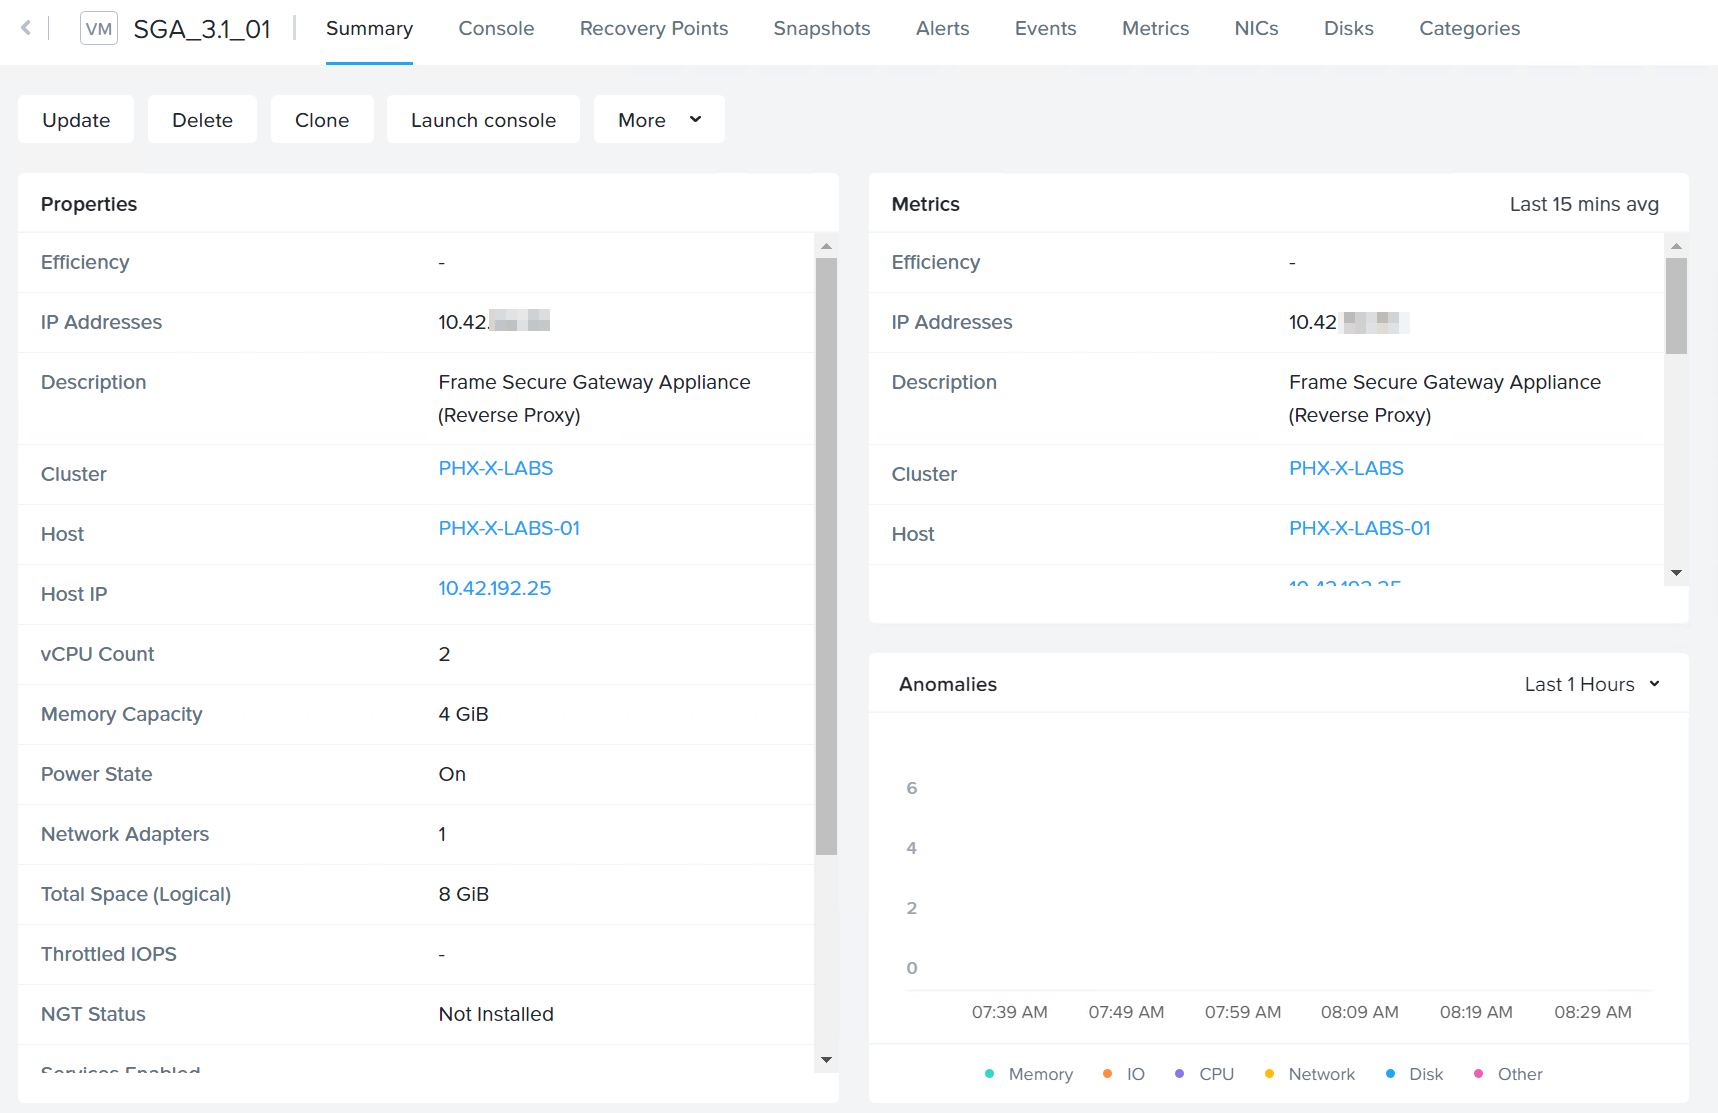
SGA VM Creation - SGA VM in Prism Power on the SGA VM. You can connect to the SGA VM by clicking on the “Launch console” button near the top of the Prism dashboard to access the Virtual Network Console (VNC).
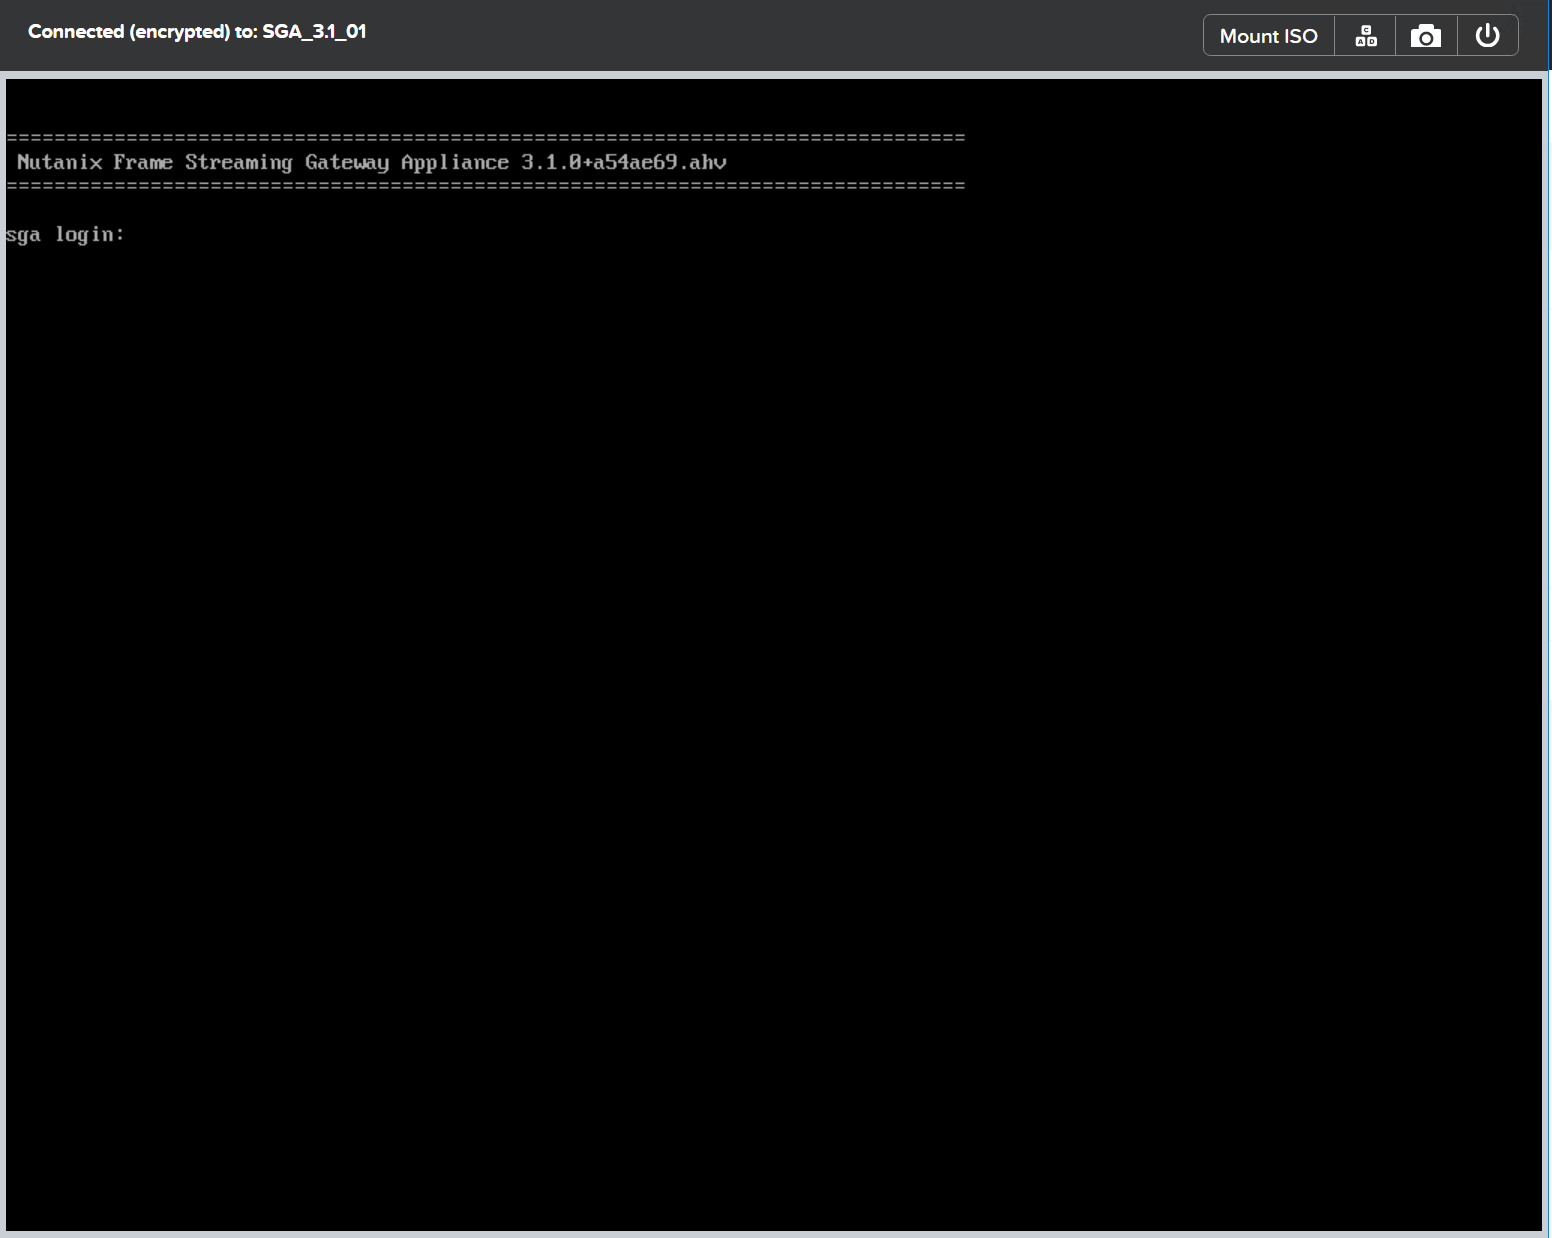
SGA VM Creation - VM Configuration Log in to the SGA VM using the default Nutanix credentials (username:
nutanix) and change the password immediately.
Static IP Address Assignment
Next, we'll need to configure a static IP address for SGA. While in the VNC console, run the command
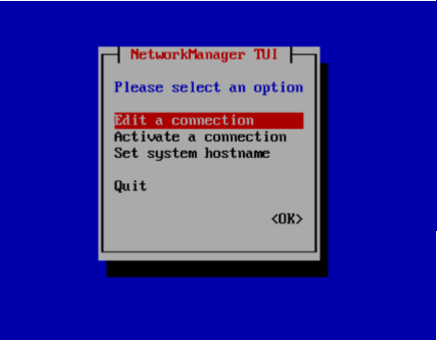
sudo nmtuito access the network configuration.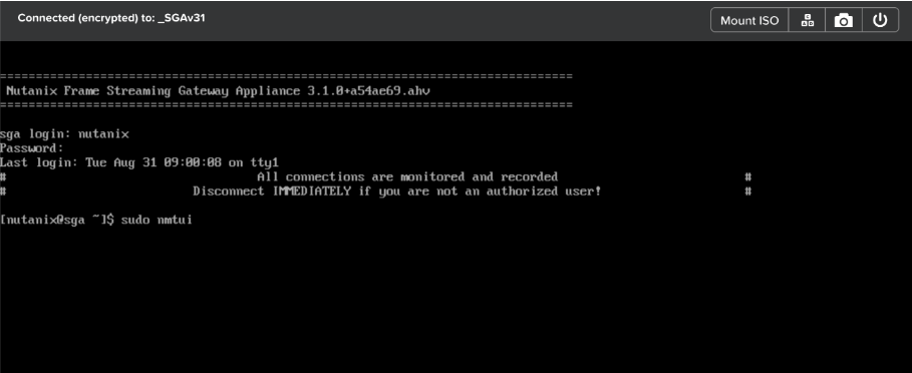
SGA VM - Login In the NetworkManager TUI, select "Edit a connection".
SGA VM - Network Manager Select the connection.
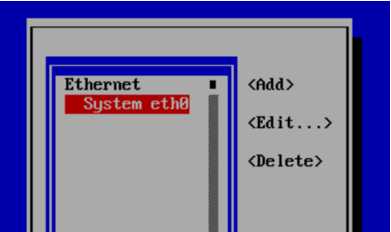
SGA VM - Select Connection Change the IPv4 CONFIGURATION to
<Manual>. Enter the static IP address and/maskto the end of the IP address for the SGA VM, the gateway IP address, and at least one DNS server IP address. The DNS server must be able to resolve public FQDNs.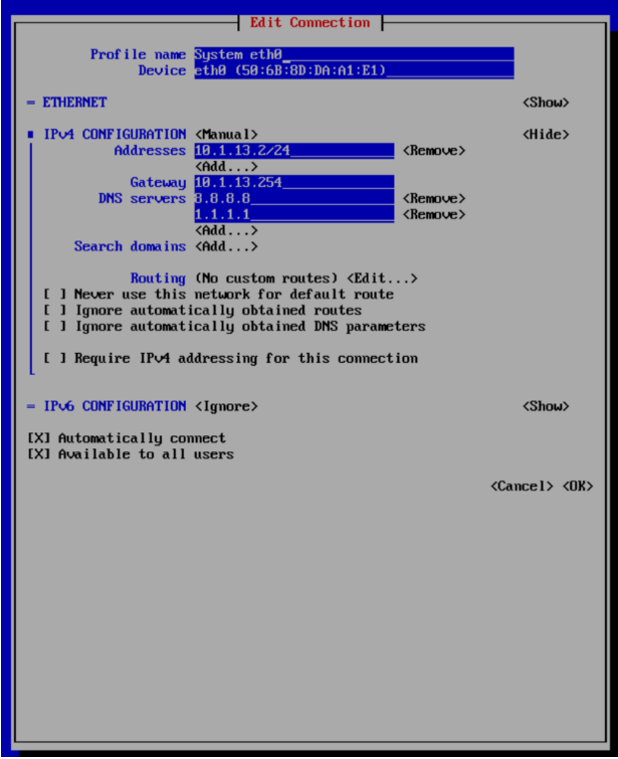
SGA VM - Edit Connection Use
ifconfigto verify the IP address change was saved and that the DNS configuration is valid.
The following instructions assume you have already identified the AWS VPC and subnet that the SGA will be placed in. The subnet will need to be “public” (have a route from/to the Internet via an AWS internet gateway) and will need network connectivity to the private network where the workloads are placed.
Download and Import an SGA Image: With access to the AWS Command Line Interface (CLI) and an AWS Access Key, you can download and import the SGA image into your AWS account.
- Download the AWS SGA image file (.raw.gz) from the Downloads page.
- Decompress the .gz file.
- Create an S3 bucket and upload the uncompressed .raw file to the S3 bucket. The S3 bucket should be in the region where you plan to deploy the SGA. The image size is 8 GB, so it may take awhile to upload.
- Create a
vmimportrole as described in this documentation - Create an import configuration file using the template below. Name the file “sgaimport.json” and place that file in the directory where the uncompressed raw file is. The description string can be customized. We recommend the name of the image and version number.
[
  {
    "Description": "SGA 3.4",
    "Format": "raw",
    "UserBucket": {
      "S3Bucket": "<Name of SGA Bucket>",
      "S3Key": "FrameSGAAWS.aws.raw"
    }
  }
]- Use AWS Configure to set up your AWS CLI. Ensure you choose the region used in the steps above.
- To import the AMI, run the command below from the same directory that the sgaimport.json and raw image files are located.
aws ec2 import-image --description "SGA 3.4" --disk-containers "file://sgaimport.json"You should see a response containing:
...
"StatusMessage": "pending",
"ImportTaskId": "import-ami-031f8724e05c24af9"- You can use importTaskId to check on the status of the import with the following command:
aws ec2 describe-import-image-tasks --import-task-ids <ImportTaskId>Once completed, the AMI should be available for you to launch and use.
Configure an Elastic IP: Deploying an SGA requires a static public IP, which Amazon calls an “Elastic IP” or “EIP.” To do this, an administrator would either need to obtain a static IP from Amazon or set up a static IP one already owns as an Elastic IP. For more information, see AWS Official Documentation.
Create a Security Group: Next, administrators will want to create a security group for the SGA(s) they plan to deploy. The security group access should allow inbound connections for the SGA on
tcp/443andudp/3478, at a minimum. Administrators should also consider allowing inbound connections from a controlled set of private IP addresses to `tcp/8888(or the SGA Management Console port, as defined in the SGA Configuration file) as the SGA can provide important status information from the SGA Management Console.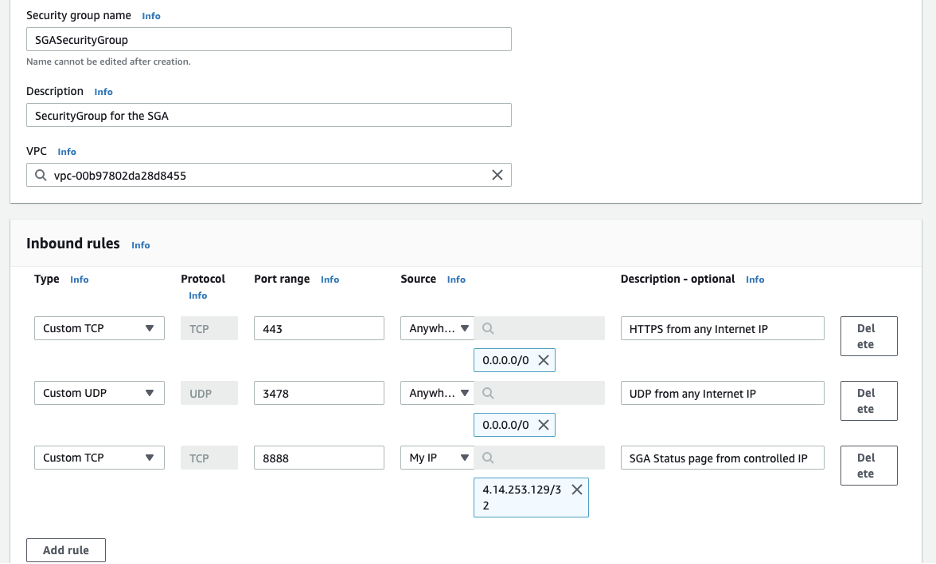
AWS Security Group Create an Elastic Network Interface (ENI): The next step is to create an Elastic Network Interface that can be associated with the recently created EIP. The Elastic Network Interface should be placed in the proper subnet and assigned to the recently created security group.
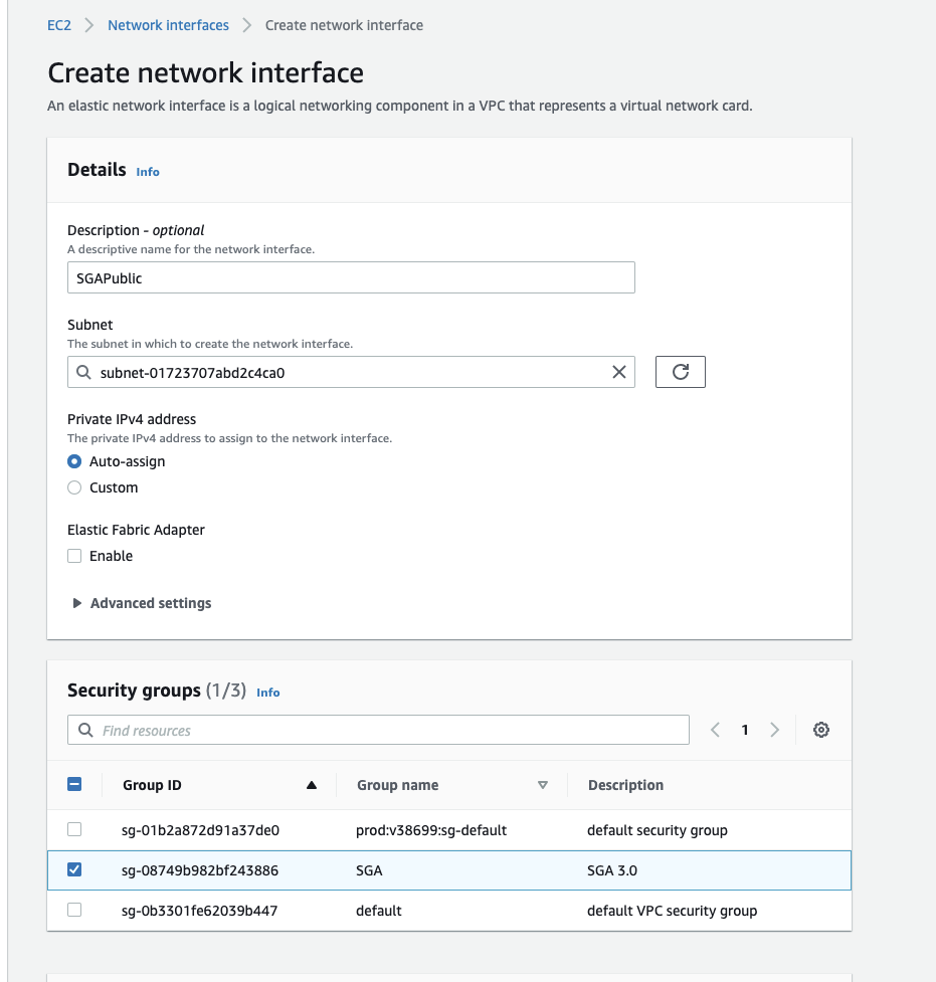
AWS Network Interface Creation ImportantCapture the ENI ID since it will need to be used later in the creation process:

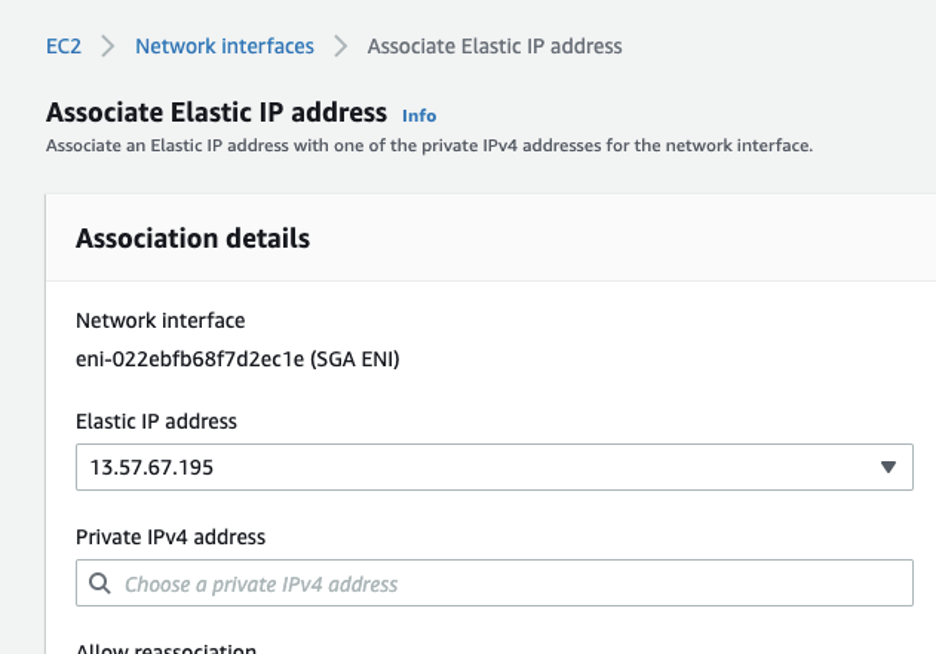
Successful AWS Network Interface Creation Associate the EIP with ENI: Administrators should now be able to associate the newly-created EIP with the ENI.
Associate AWS Network Interface Launch the EC2 Instance: Lastly, administrators will want to launch the AWS SGA instance. From the Amazon EC2 console dashboard, click “Launch instance” and select the AMI. Frame recommends the c5.xlarge instance type. A lower vCPU and RAM configuration can be used if a load balancer is used. When configuring the instance details, select the VPC and subnet. Switch to the newly-created ENI under “Network Interfaces,” as shown below:
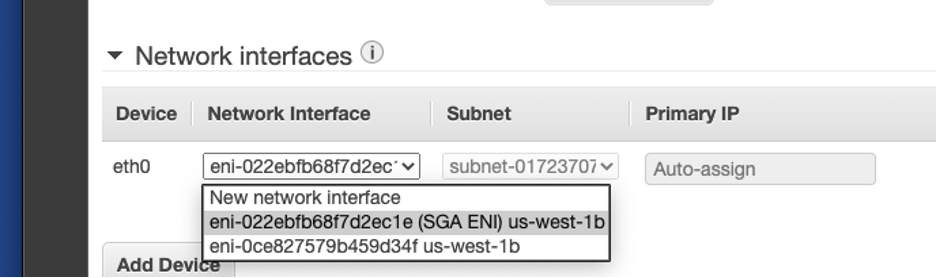
Launch EC2 Instance - Specify Network Interface
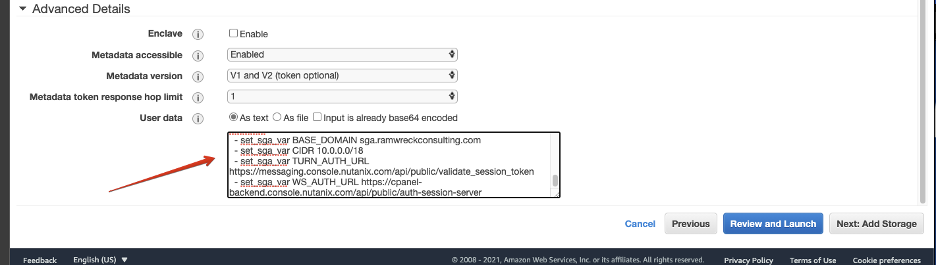
Under “Advanced Details,” paste the contents of your YAML file. Then click "Review and Launch".
The following instructions assume you have already identified the Azure VNet that the SGA will be placed in. The VNet will need to be “public” (have a route from/to the Internet) and will need network connectivity to the private VNet where the workloads are placed.
Administrators are strongly advised to create a Virtual Machine in Azure in the region where the SGA will be created, and follow the steps below from that VM. Choosing not to create a VM and attempting to upload the ~8GB .VHD file from your local network may result in failure.
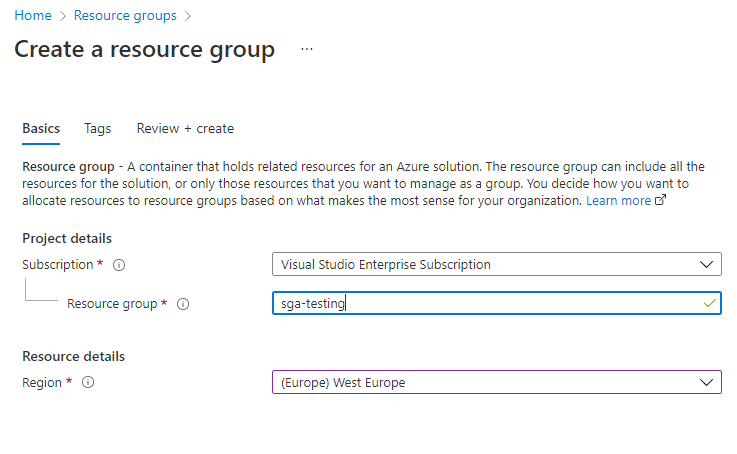
Create a new Resource Group by clicking on "Resource Groups" in the Azure portal sidebar and clicking the "+ Add" button.
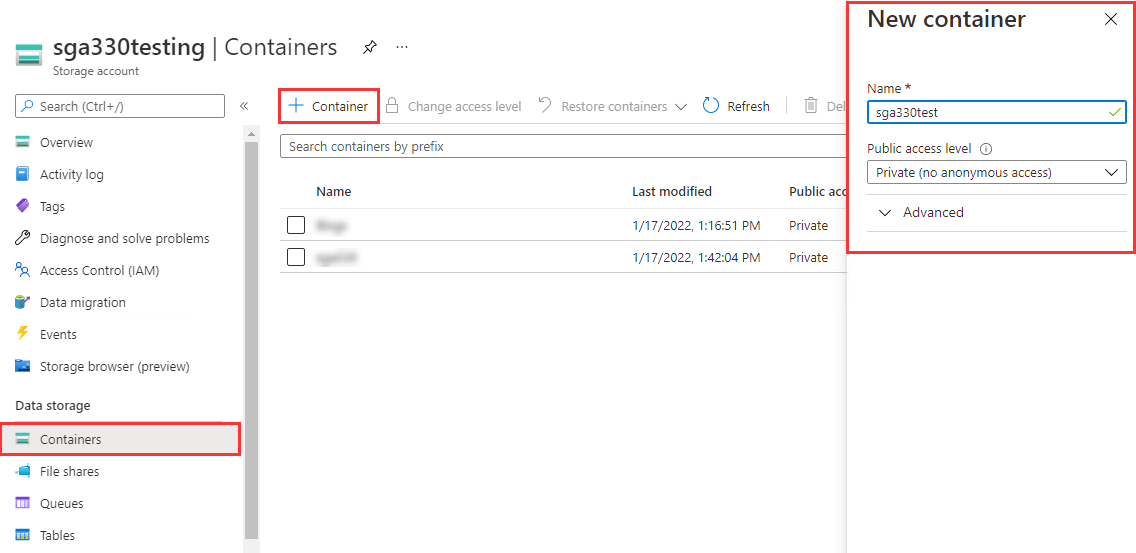
Azure Resource Group Creation Create a Storage Account and Blob Container.
Azure Storage Container Creation Download the SGA (.vhd.gz) file and and unzip.
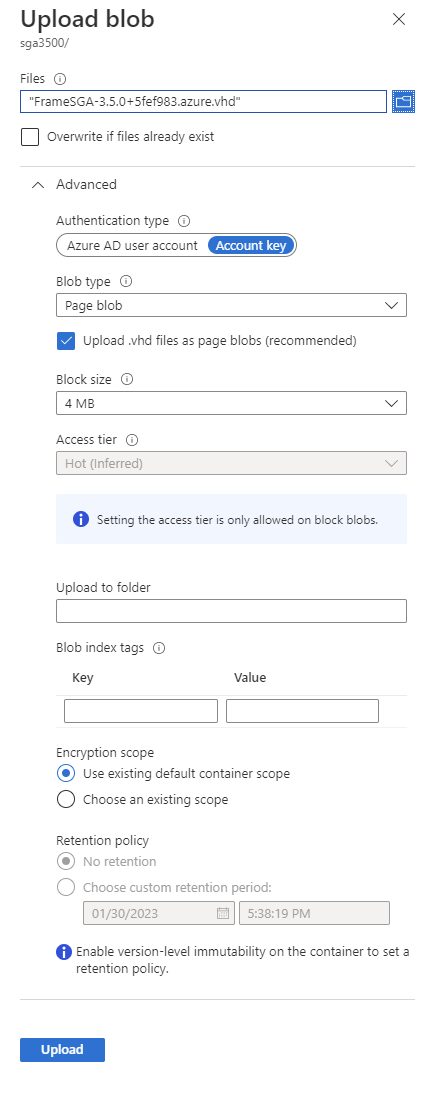
Upload the .vhd file as a page blob to Azure Storage. Ensure the “Upload .vhd files as page blobs (recommended)” box is checked.
SGA .vhd Upload Create an image from the .vhd blob. Be sure to choose Linux for the OS type, and navigate to the previously uploaded .vhd blob for the Storage blob (as shown below).
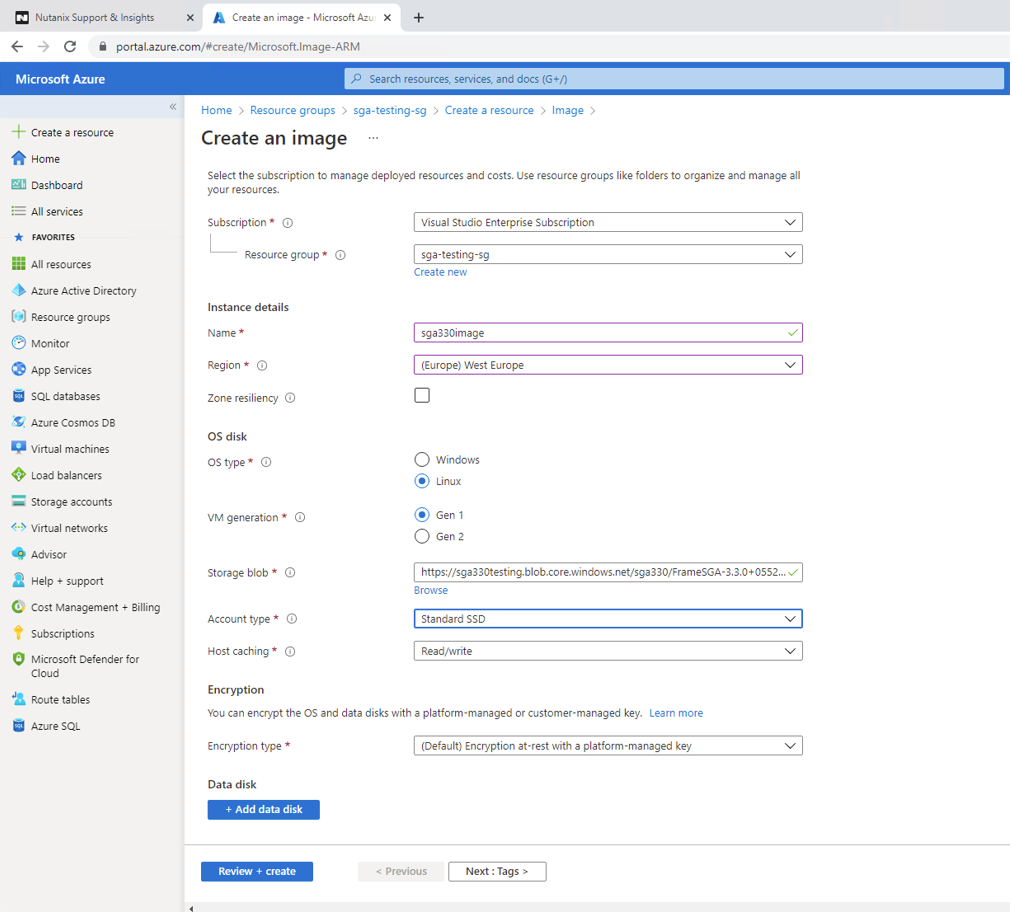
Create Azure Image Create a VM from the image.
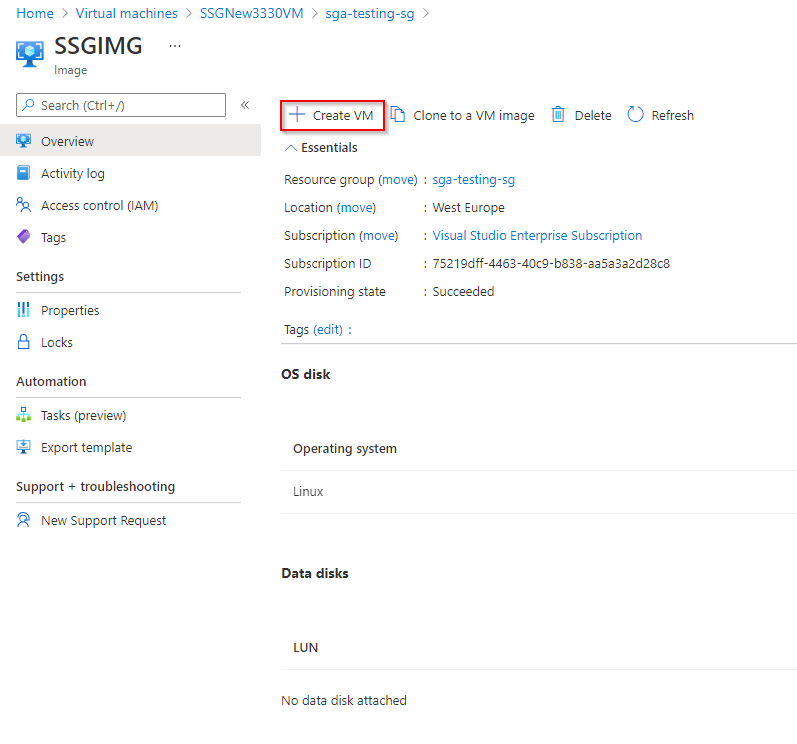
Locate your image and click on the image name.
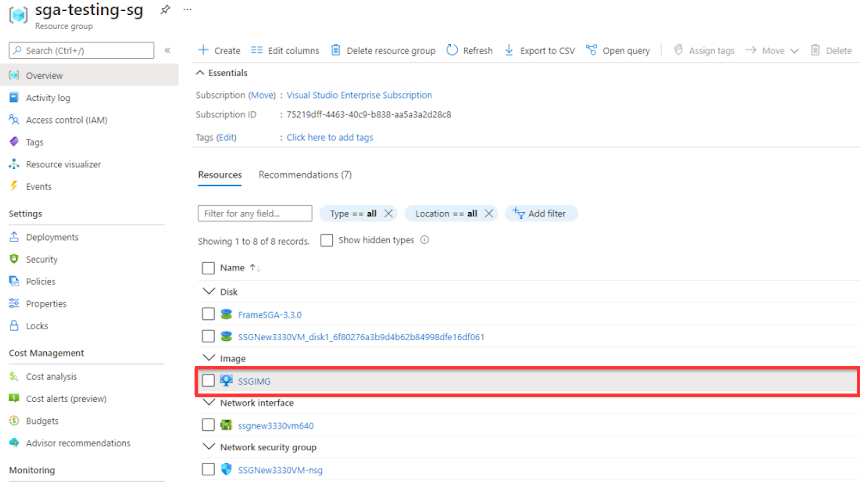
Azure Image Click the "Create VM" button in your Azure console.
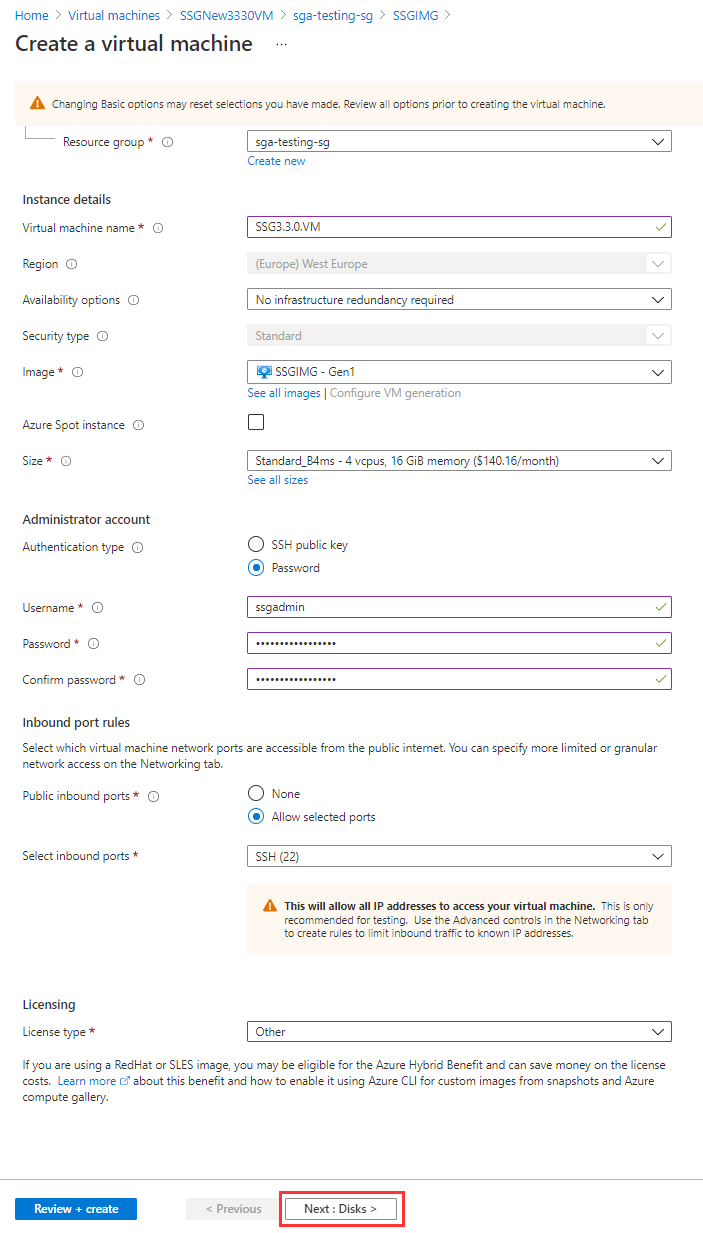
Create Azure VM from Image Configure your Virtual Machine by choosing a name, size (instance type), authentication model, and licensing type. Frame recommends a D4s v5 instance type. A lower vCPU and RAM configuration can be used if a load balancer is used.
You should also specify an Administrator user account (SSH public key or password) so you can administer your SGA VM in the future. Click “Next:Disks>” when you're done.
Azure VM Configuration Next, configure the disks by selecting the OS disk type and encryption type. Move on to the "Networking" tab.
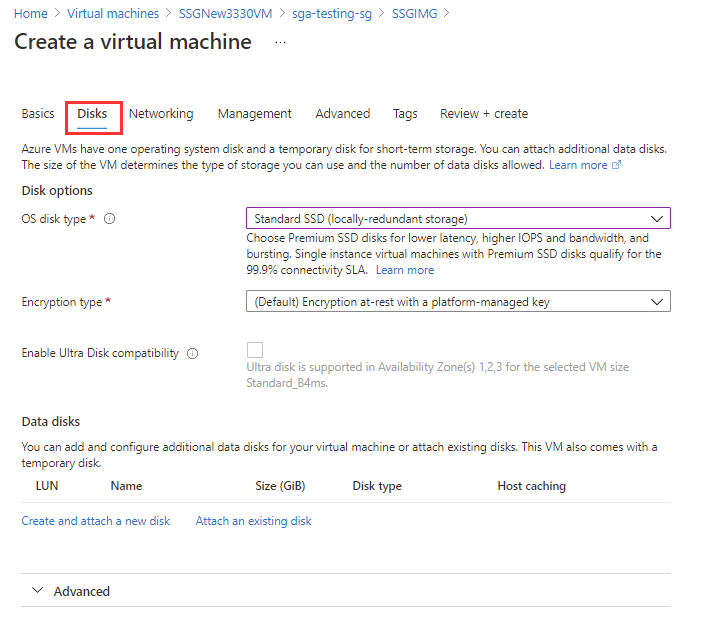
Azure VM Configuration - Disks Configure the networking for the VM. Either choose or create a new VNet. Ensure you are using a /18 CIDR block or smaller, and that your SGA has a public IP address.
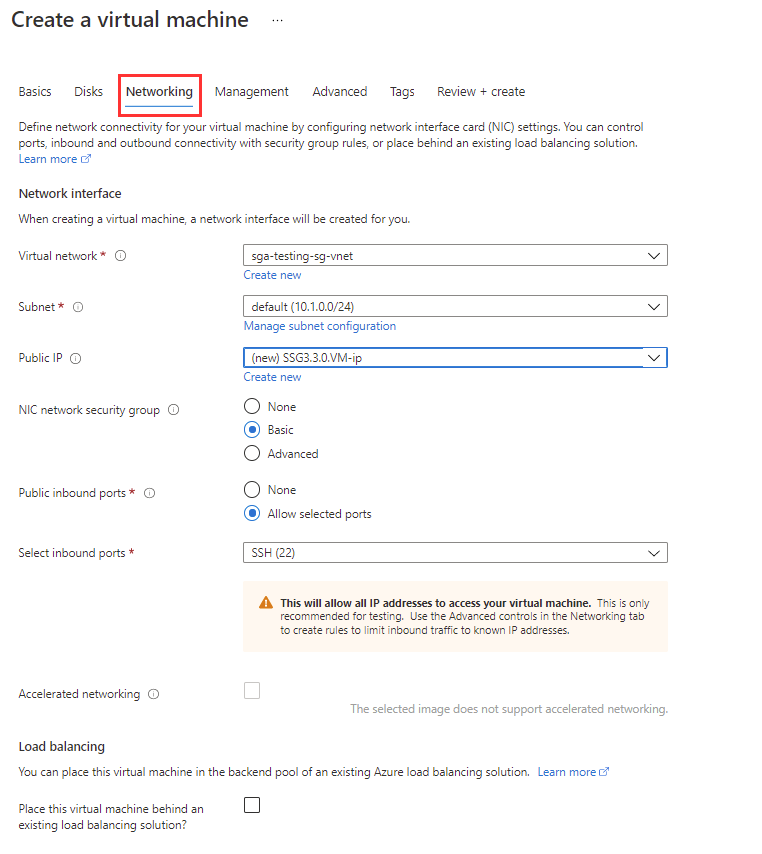
Azure VM Configuration - Networking Next, configure your management options as desired.
Now we will move on to the "Advanced" settings where we will enter custom data. Custom data is required for SGA to function properly. Paste the SGA Configuration Log data you created with the SGA Toolbox in Step 3 of this guide into the "custom data" field. From there, you can finish up the VM creation process by going through the rest of the wizard.
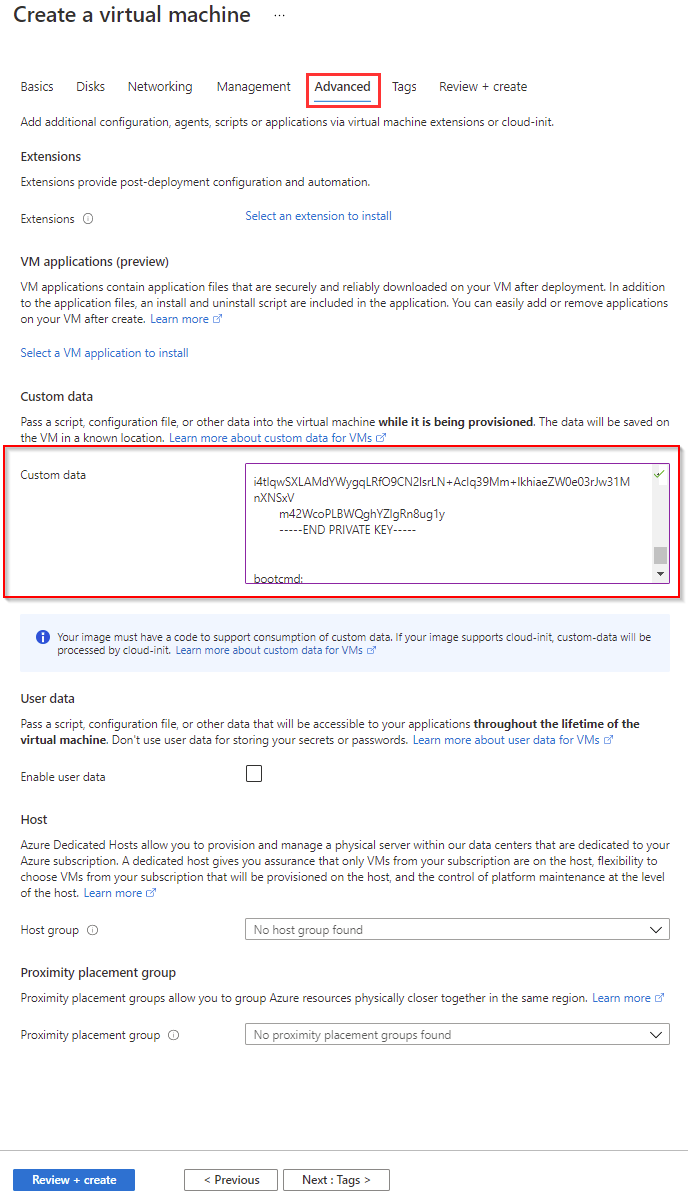
Azure VM Configuration - Advanced Once the SGA VM has been deployed in the DMZ VNet and the workloads have been deployed in the workload's VNet, we will configure peering between the SGA VNet and the Frame Workload's VNet. You can reference the official Microsoft documentation to learn how to do this.
Next, you will need to set up the network security inbound rules on SGA. Please reference our networking documentation to find more details relevant to your particular configuration.
noteFrame strongly recommends blocking traffic over Port 22 after you are done with SGA setup as a security best practice.
The following instructions assume you have already identified the network that the SGA will be placed in. The network will need to be “public” (have a route from/to the Internet) and will need network connectivity to the private network where the workloads are placed.
After the configuration file has successfully been created and saved as an ISO file, create a VM using the vCPU and memory recommendations as discussed in SGA VM Sizing with:
the SGA VMDK file as a SCSI hard disk and
the SGA Configuration ISO file as an IDE CD-ROM.
Power on the SGA VM.
Login to the SGA VM using the default Nutanix credentials (username:
nutanix) and change the password immediately.
Static IP Address Assignment
Next, we'll need to configure a static IP address for SGA. Run the command
sudo nmtuito access the network configuration.SGA VM - Login In the NetworkManager TUI, select "Edit a connection".
SGA VM - Network Manager Select the connection.
SGA VM - Select Connection Change the IPv4 CONFIGURATION to
<Manual>. Enter the static IP address and/maskto the end of the IP address for the SGA VM, the gateway IP address, and at least one DNS server IP address. The DNS server must be able to resolve public FQDNs.SGA VM - Edit Connection Use
ifconfigto verify the IP address change was saved and that the DNS configuration is valid.
The following instructions assume you have already identified the GCP VPC and subnet that the SGA will be placed in. The subnet will need to be “public” (have a route from/to the Internet via a GCP internet gateway) and will need network connectivity to the private network where the workloads are placed.
Download the SGA (.tar.gz) file.
Create a Cloud Storage bucket. The bucket should be in the region where you plan to deploy the SGA. Upload the .tar.gz file to the bucket, following Google's official instructions.
noteThe compressed image is under 1 GB, so it may take awhile to upload.
Import the image from your bucket. This may take up to 30 minutes to complete.
External IP: Deploying an SGA requires a Static Public IP address, which Google refers to as an “External IP address”. So first, we will need to reserve an External IP.
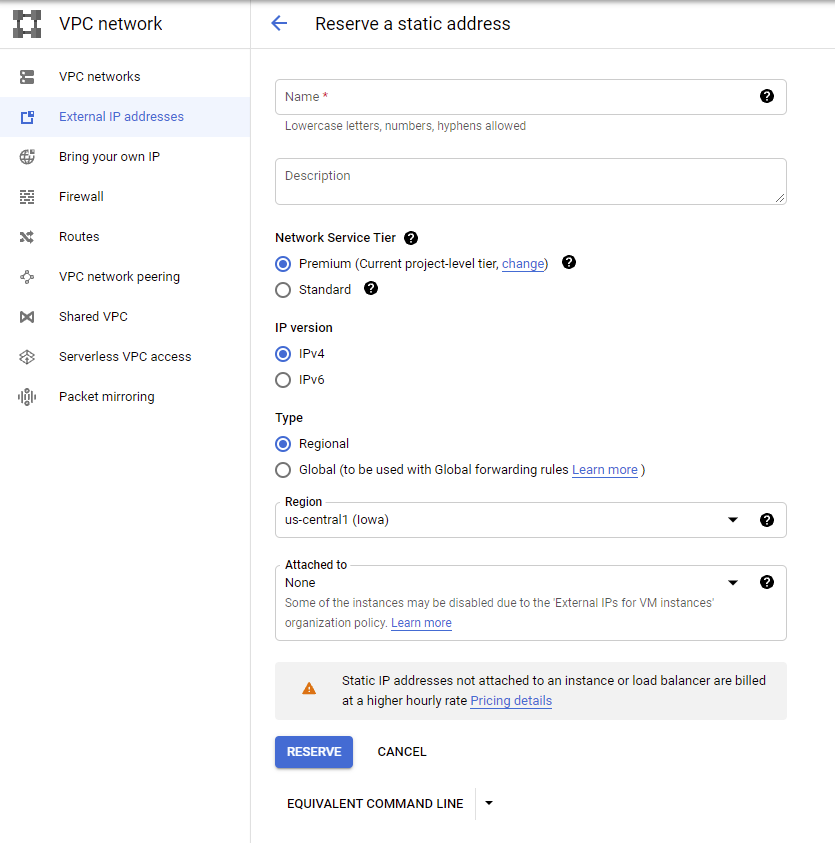
Google External IP Address Firewall Rules: Next, we'll create a firewall rule for the SGA(s) you plan to deploy. The firewall rules should, at a minimum, allow the following:
- Ingress connections for the SGA on tcp/443 and udp/3478. tcp/3478 is optional.
- Ingress connections from SGA to the workloads on tcp/443 and udp/4503-4509.
We also recommend allowing ingress from a controlled set of private IP addresses to tcp/8888 so administrators can access the SGA Management Console.
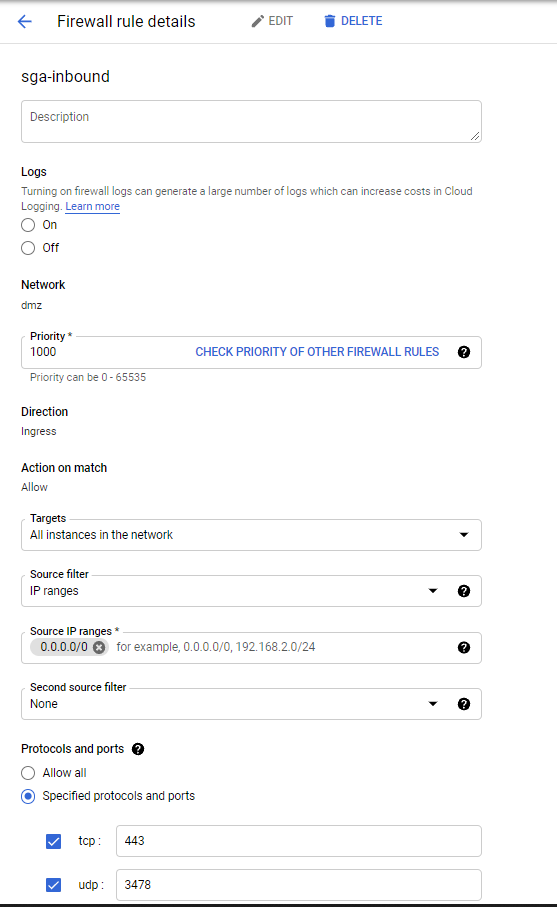
Google Firewall Rules Create the VM Instance: Now you are ready to create the custom SGA instance. Start the official instance creation process. Frame recommends an n2-standard-4 instance type. A lower vCPU and RAM configuration can be used if a load balancer is used.
You will first want to change the boot disk for your SGA VM.
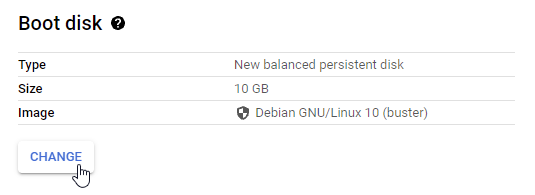
Create VM - Change Boot Disk Choose your SGA custom image as the boot disk.
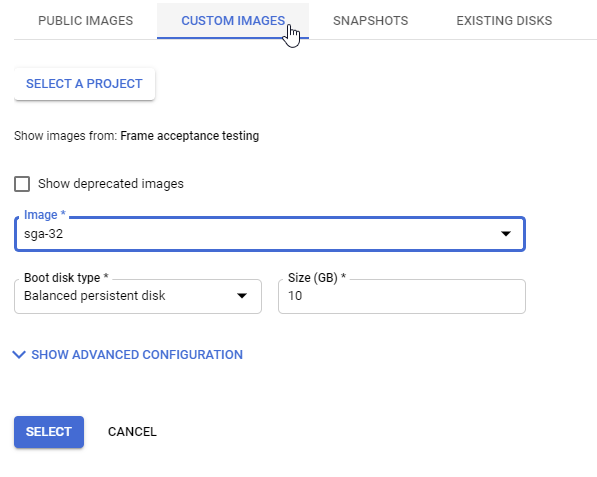
Create VM - Custom Images Reserve a static internal IP for your primary internal IP address, and then select your static External IP address from the drop-down menu as shown below.

Create VM - Network Interfaces Configure your metadata key and value by expanding the “Networking, Disks, Security Management, Sole-Tenancy” drop-down menu. Then, expand the “Management” drop-down menu and select “Add Item.” Enter
user-datain the “Key” field and paste the contents of your SGA Configuration YAML file into the “Value” field.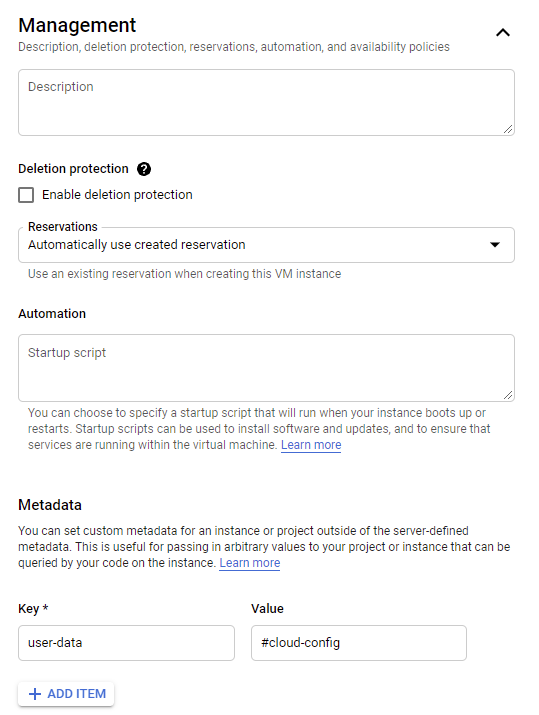
Create VM - Management Lastly, click “Create” to create the SGA VM.
Step 5: SGA Verification
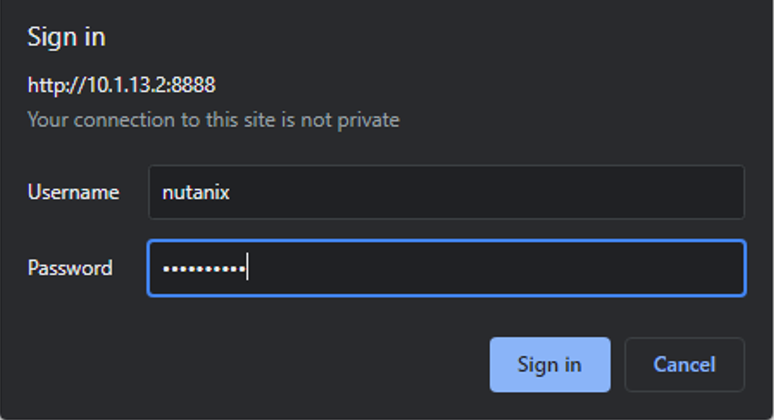
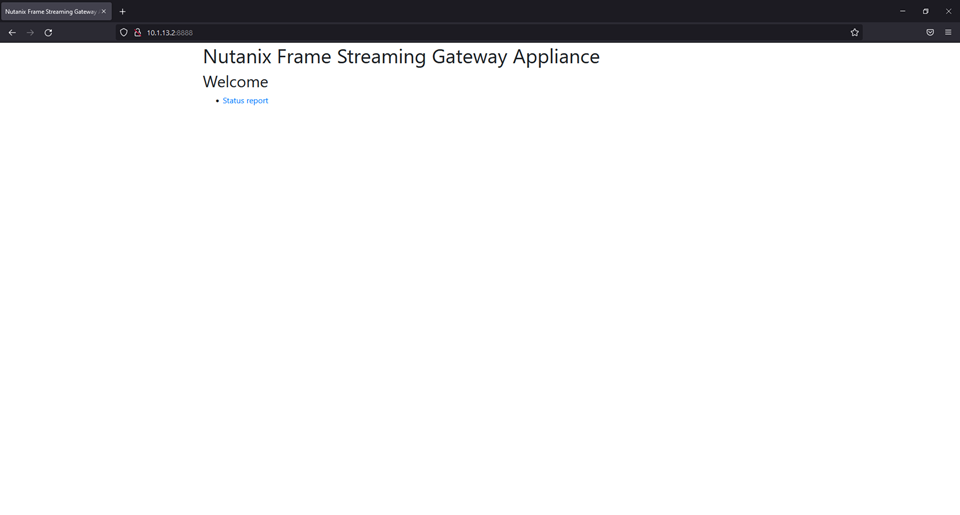
Once the SGA VM is powered up, you should be able to open a web browser and confirm the status of the SGA by going to http://<SGA_IP>:8888/. You must be in your private network and able to route to the private IP address of the SGA. You will be asked to login using the SGA Management Console login credentials that were set in Step 3.
Once you reach the management console, you can select the Status report.
Step 6: SGA Subdomain and IP Address
Create an address (A) record in your public Domain Name Server associating your SGA subdomain with your SGA public IP address for users to be able to reach your SGA from the Internet.

If your users in your private network need to reach your SGA from within your private network, create an address (A) record in your private Domain Name Server associating your SGA subdomain with your SGA private IP address.
You may choose to install additional SGAs within your private network rather than sending users to the same public-facing SGAs, if that simplifies your network security configuration and routing from the private network where your users are on to your DMZ and back to your private network where the workload VMs are running.
Step 7: Notify Frame Support
As mentioned above the deployment instructions, you must contact Frame Support to associate your Frame account(s) with your SGA. You can do so by submitting a support case though the Support Portal. Please provide the following information in the support ticket:
- Customer name
- Organization name
- Account name(s)
- Wildcard subdomain
- SGA public IP address
- SGA version number (e.g., 3.1, 3.2, 3.4, etc.)
Frame support will process your ticket and let you know as soon as the SGA has been associated with your Frame account(s).