Cloud Accounts
Frame provides administrators with the ability to manage various components of their cloud accounts easily from the Frame console. This guide discusses how administrators can manage their virtual networks, master images, and instance types associated with each of their cloud accounts.
Administrators with the appropriate role can add new public cloud accounts and review the list and status of existing cloud accounts by navigating to the Customer or Organization Dashboard in the Admin Console and selecting Cloud Accounts in the left-hand menu.
To inspect or manage a specific cloud account, click on adjacent kebab menu icon of a specific cloud account and select Update.
Options by Infrastructure
The tabs you see at the top of the Cloud Account page will vary depending on the type of cloud account (infrastructure) you are accessing.
| Infrastructure | Configuration | Master/Template Images | Virtual Networks | Shared VPCs |
|---|---|---|---|---|
| AWS | X | X | ||
| GCP | X | X | ||
| Microsoft Azure | X | X | ||
| Nutanix AHV | X | X |
Virtual Networks (AHV only)
The Virtual Networks tab is available for AHV cloud accounts. Under Virtual Networks, administrators can see which virtual networks have already been used to create Frame accounts with Frame workload VMs.
Each time you go to this tab, Frame control plane will retrieve the list of VLANs from your AHV cluster and display them in this tab.
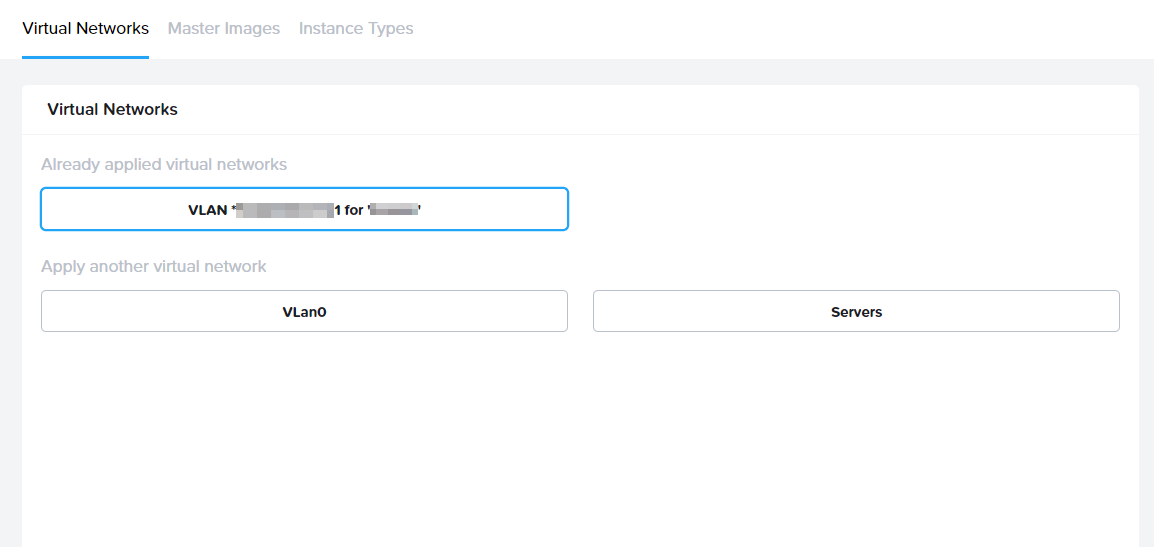
If you would like to make another virtual network available to chose from when creating a new Frame account, you can click on the desired network under Apply another virtual network and click Save in the upper right corner of your Frame Console.
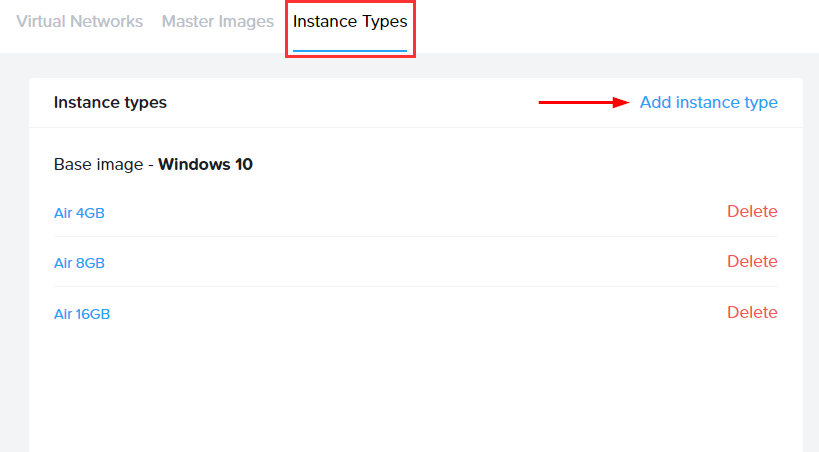
Instance Types (AHV only)
Administrators can add and remove custom instance types for AHV from the Instance Types tab by following the instructions below.
Add an Instance Type
- Select the Instance Types tab at the top of the page and then click the blue Add instance type link.
- Within the Edit instance type page, specify the following information:
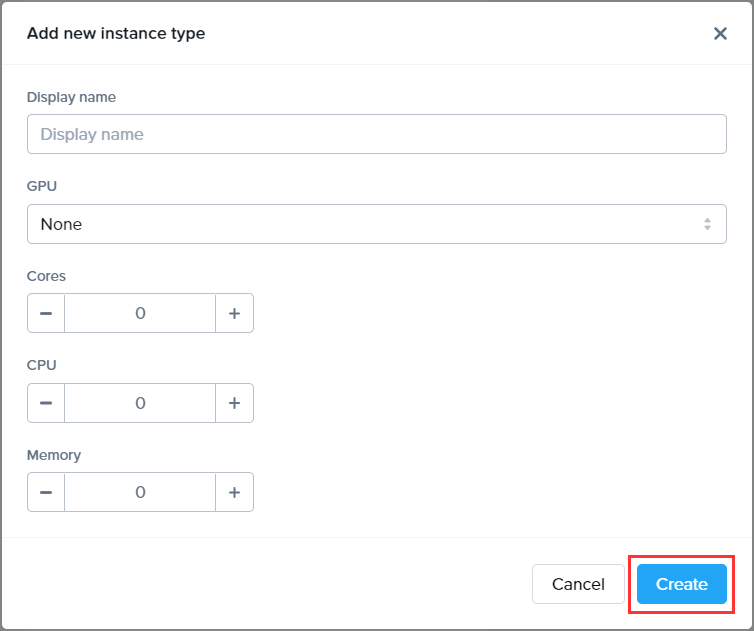
- Display Name: Name of the instance type that will appear to administrators and users within Frame Console and Launchpad, respectively.
- Image Families: The operating systems that can run on this instance type.
- GPU: If you have NVIDIA vGPUs configured in Prism, the list of vGPU profiles will be displayed. You may pick a vGPU profile if you wish for the instance type to have a vGPU when VMs of this instance type are provisioned.
- Cores: Number of cores for each vCPU.
- CPU: Number of vCPUs for this instance type.
- Memory: Amount of memory in GiB.
Frame recommends giving the instance type a name (e.g., "Air 2vCPU 8GB") that provides sizing information at-a-glance.
- Click Create at the bottom of the window when you are done.
Once you have defined the instance type under your AHV Cloud Account, you can go to Capacity of your Frame account(s) to add a production pool of this instance type.
Remove an Instance Type
If all pools using an instance type have been deleted from your Frame accounts, you can fully remove the instance type from the Cloud Accounts page.
- Navigate to the Customer or Organization Dashboard in the Admin Console where the cloud account is registered.
- Select Cloud Accounts in the left-hand menu.
- Navigate to the cloud account where you will be deleting the instance type. Click on the adjacent kebab menu and select Update.
- Click on the Instance Types tab at the top of the page. Click the red Delete link next to the instance type you would like to delete.
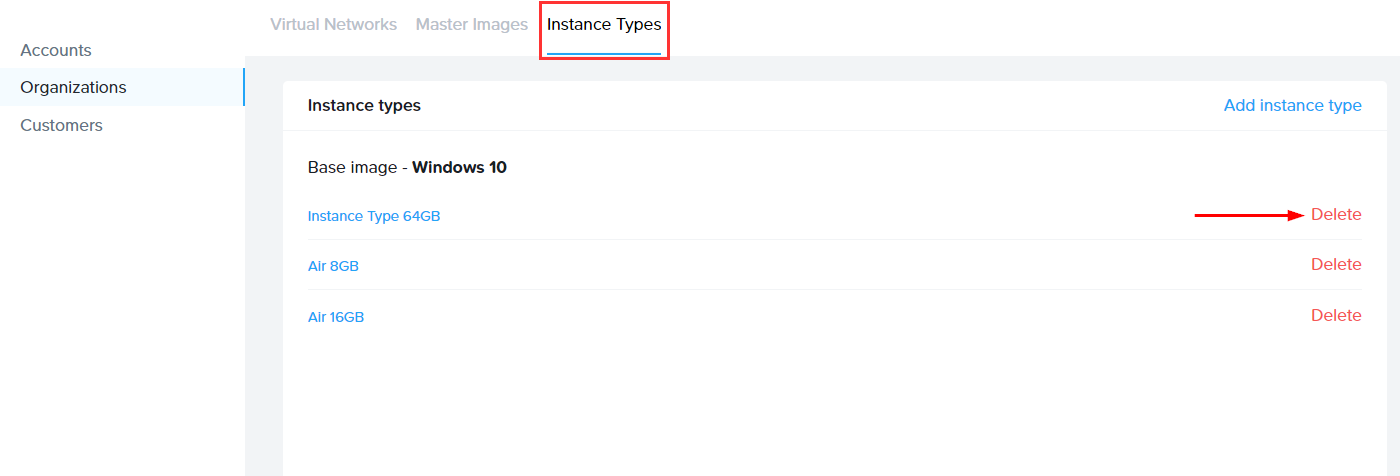
- Click Remove in the bottom corner of the prompt that appears to confirm your choice.
Notification Center will notify you when the instance type has successfully been removed from your cloud account.
Update Configuration
The Configuration tab is available on the cloud account management page for AWS, Azure, and Nutanix AHV. The sections below discuss what is provided for each provider.
AWS
For an AWS cloud account, there are two sub-tabs: Update Stack and Recreate Stack.
Update Stack
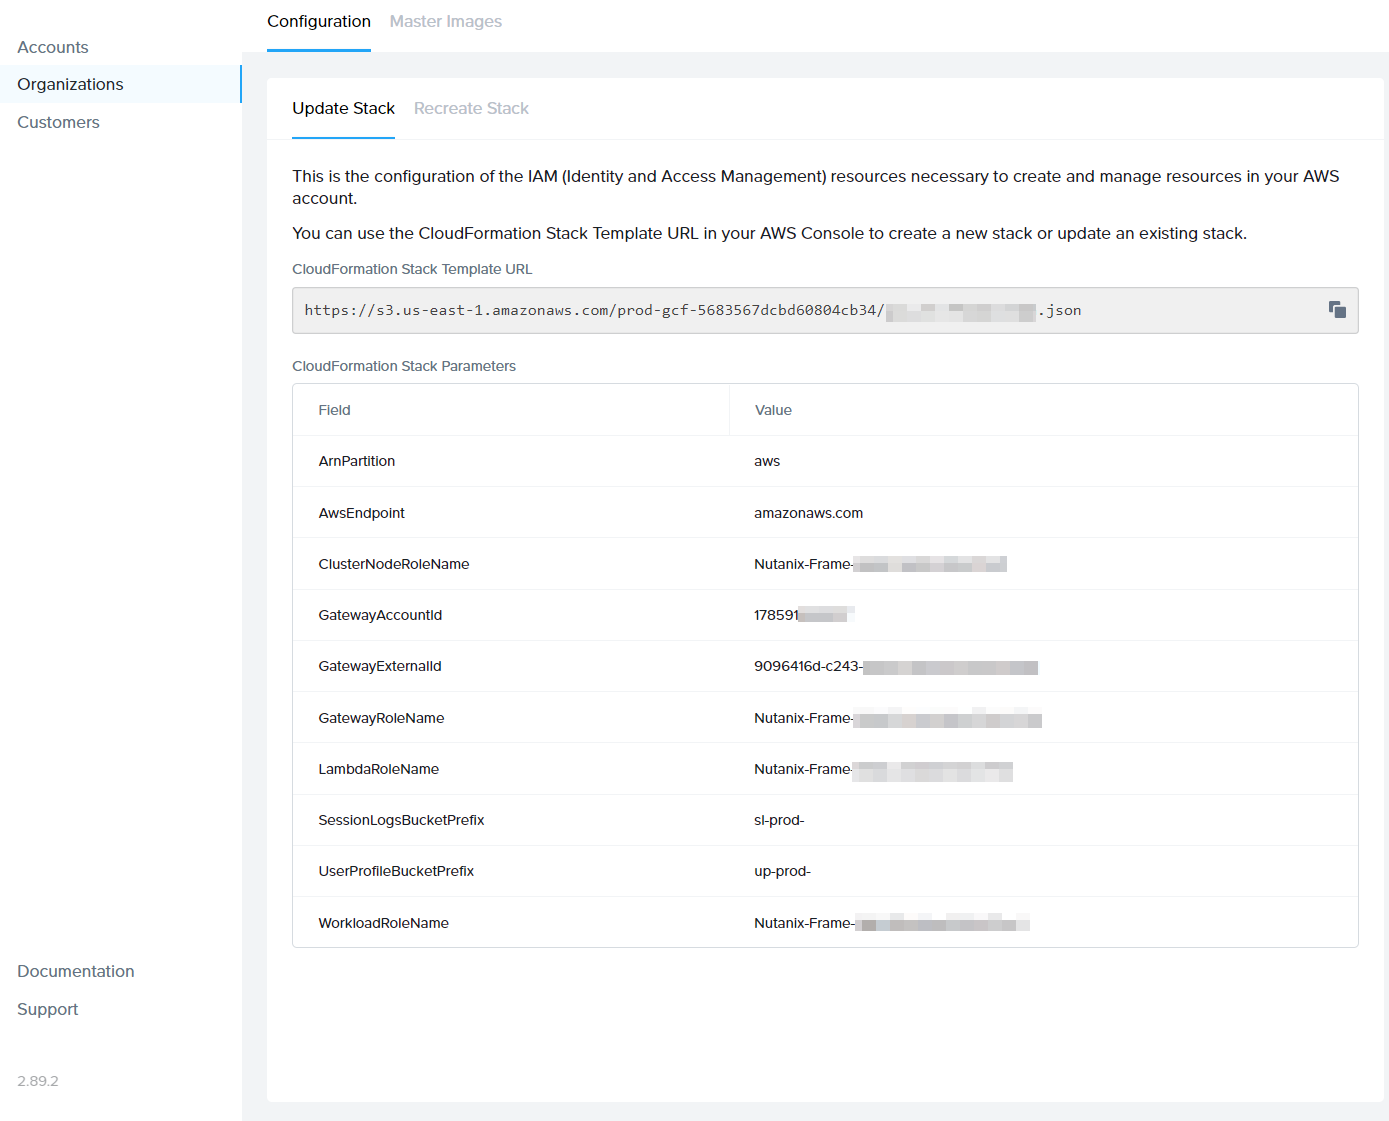
The Update Stack tab provides you with your CloudFormation Stack template URL and Stack parameters, as shown above. These details can be used to update IAM (Identity and Access Management) roles as needed. As an example, you may need to use the CloudFormation Stack template URL to expand your IAM permissions after a Frame product update in order to use new product features.
Recreate Stack
Use the Recreate Stack sub-tab to recreate your CloudFormation stack to a known good state and verify the connection. Typically, most administrators will access this page when troubleshooting permissions/account setup issues.
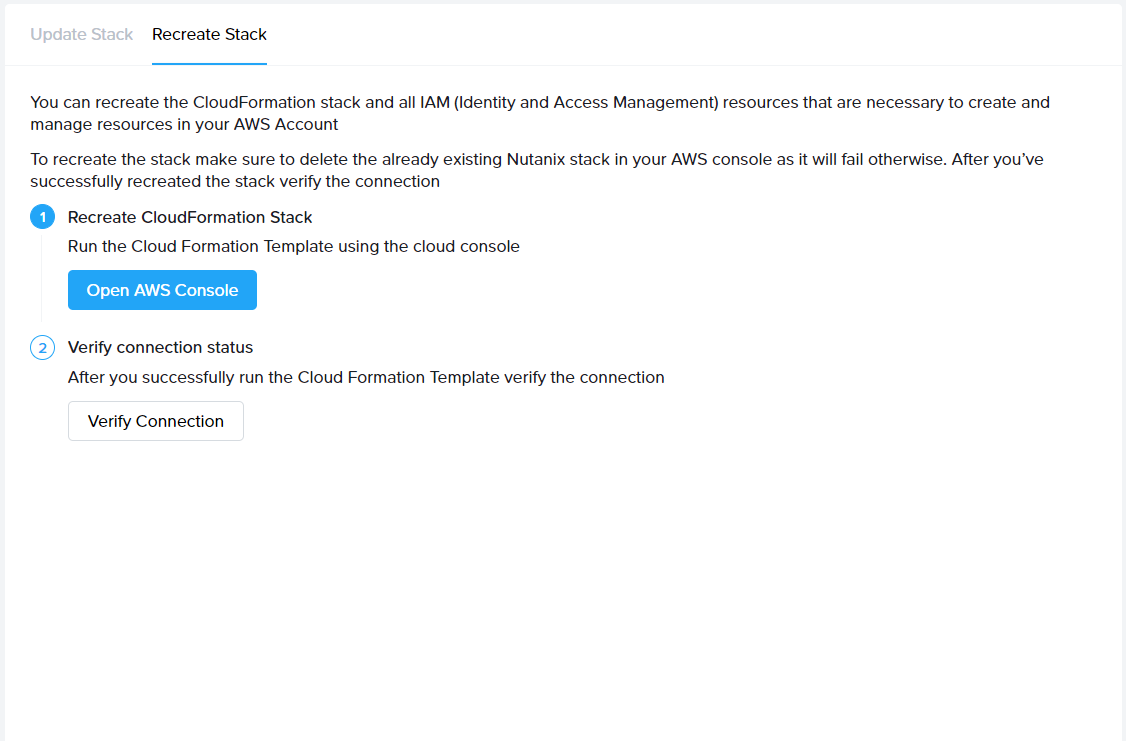
In order to recreate your CloudFormation stack, you must delete the existing stack in your AWS Console which you can access directly from the Recreate Stack sub-tab.
Azure
The configuration tab for Azure can be used to update your Azure credentials found in the Azure Portal. Most administrators will need to access this page in order to update the client secret before it expires. Microsoft Azure limits client secrets to expire 2 years or less after their creation date.
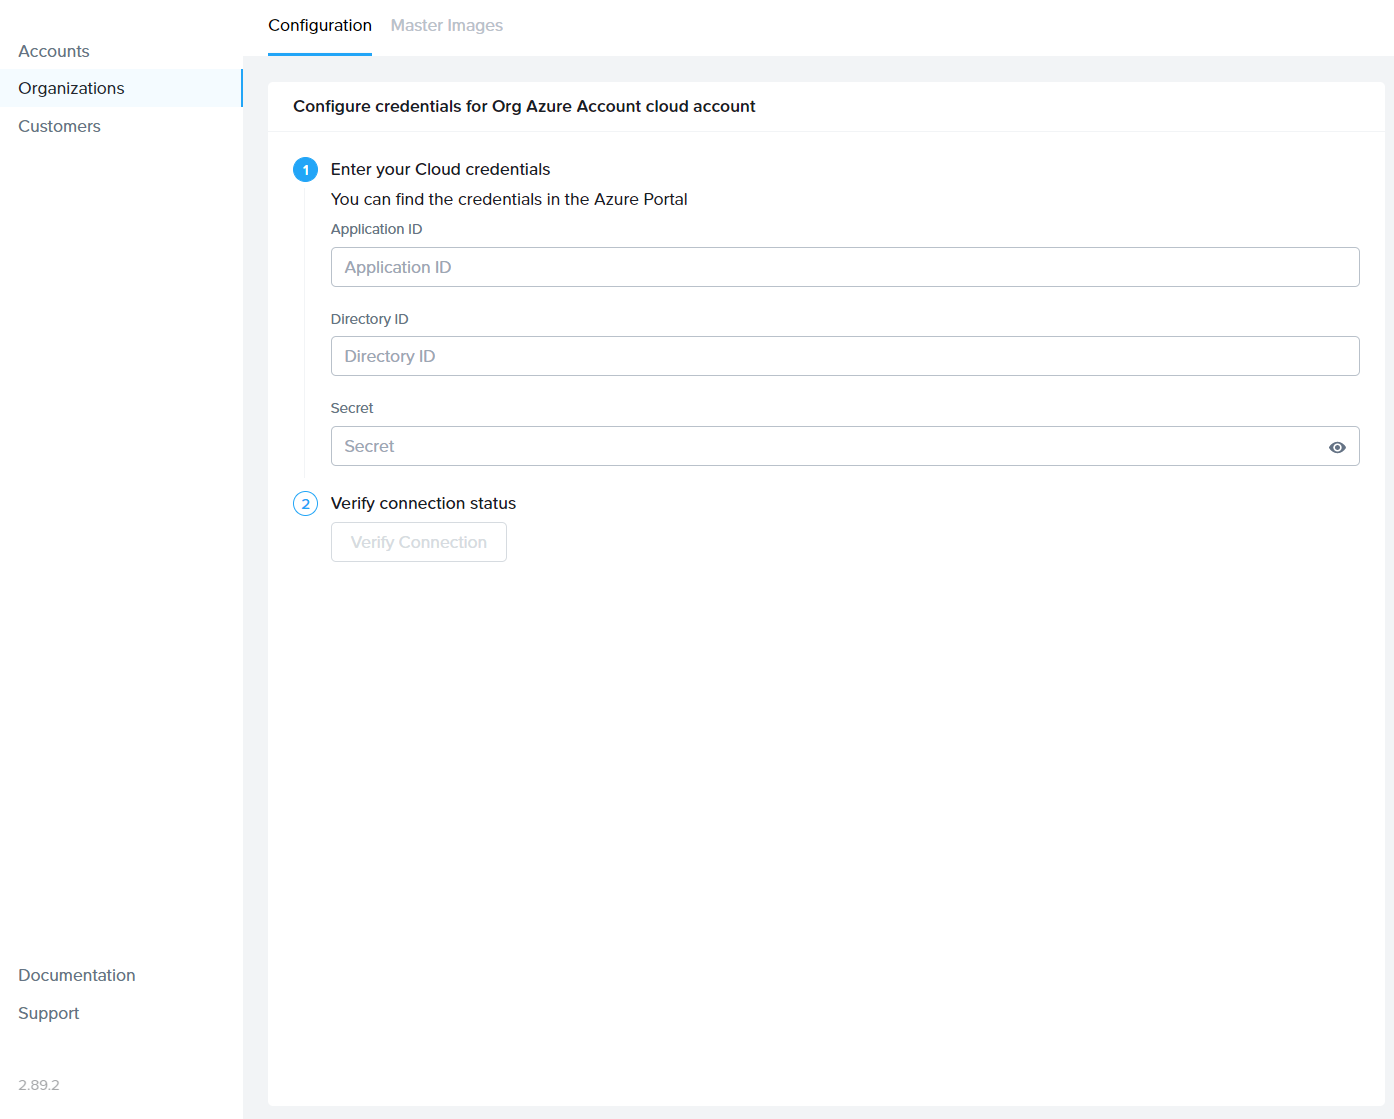
The client secret is used by Frame to manage your BYO Azure account. Microsoft implemented a maximum expiration date of 2 years from the client secret creation date. When your key expires, you will need to re-enter your cloud account credentials from the cloud account management view of your Frame console. If you fail to update your client secret before it expires, Frame will no longer be able to manage your Azure account and you will likely experience an outage.
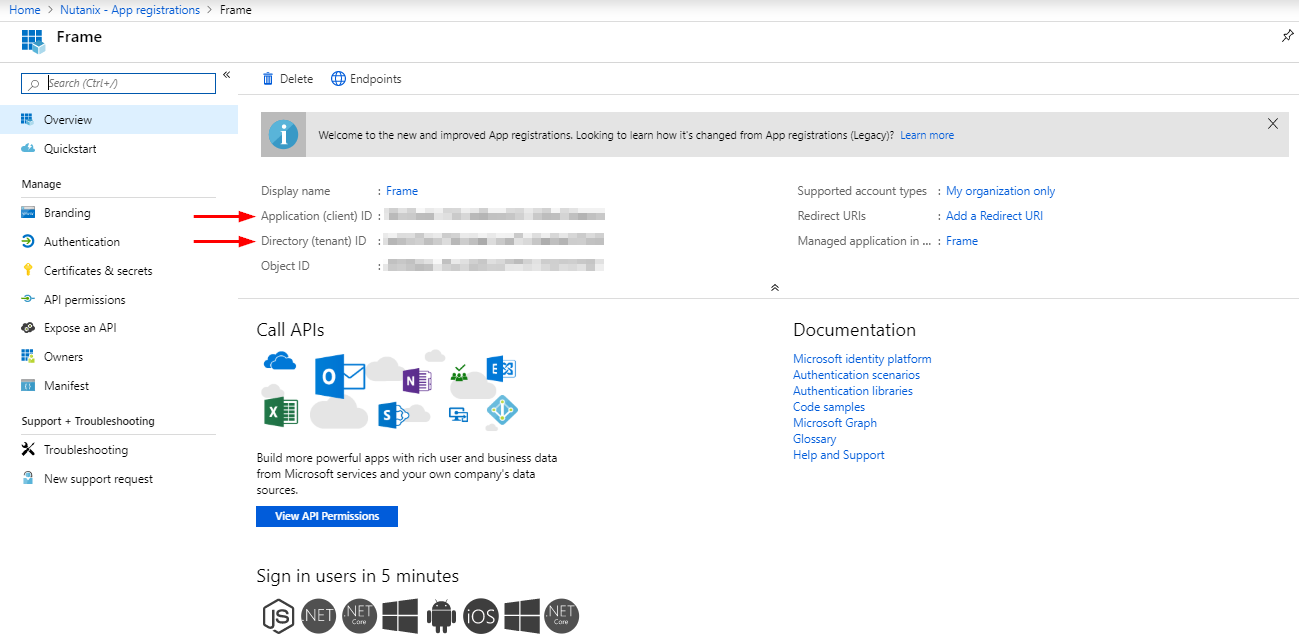
If your client secret has expired, you can simply re-enter your cloud credentials here and click the Verify Connection button. Your Application ID and Directory ID can be found in the Overview section of your Frame app registration in the Azure Portal.
Template Images
The Template Image (aka Master Images) tab enables administrators to select the desired images they would like to use as the base images for Frame account Sandboxes. Please refer to the BYO OS Images of our documentation for detailed instructions on how to prepare and add your own template images to your infrastructure. The guides outline how to add your desired template images through your infrastructure provider and then make them visible in the Frame Console. Once they are added to your cloud account using the Master images tab, you can then use them to create a new Frame account or to reset the Sandbox image of an existing Frame account. You can also remove the template image from the list of template images.
Add a Template Image (AHV)
To add a new template image that has already been prepared and uploaded to your AHV cluster, perform the following steps:
- Navigate to the Customer or Organization Dashboard in the Admin Console where the cloud account is registered.
- Select Cloud Accounts in the left-hand menu.
- Navigate to the cloud account you will be managing. Click on the adjacent kebab menu and select Update.
- From there, navigate to the Master Images tab at the top of the page. The list of already imported template images are listed.
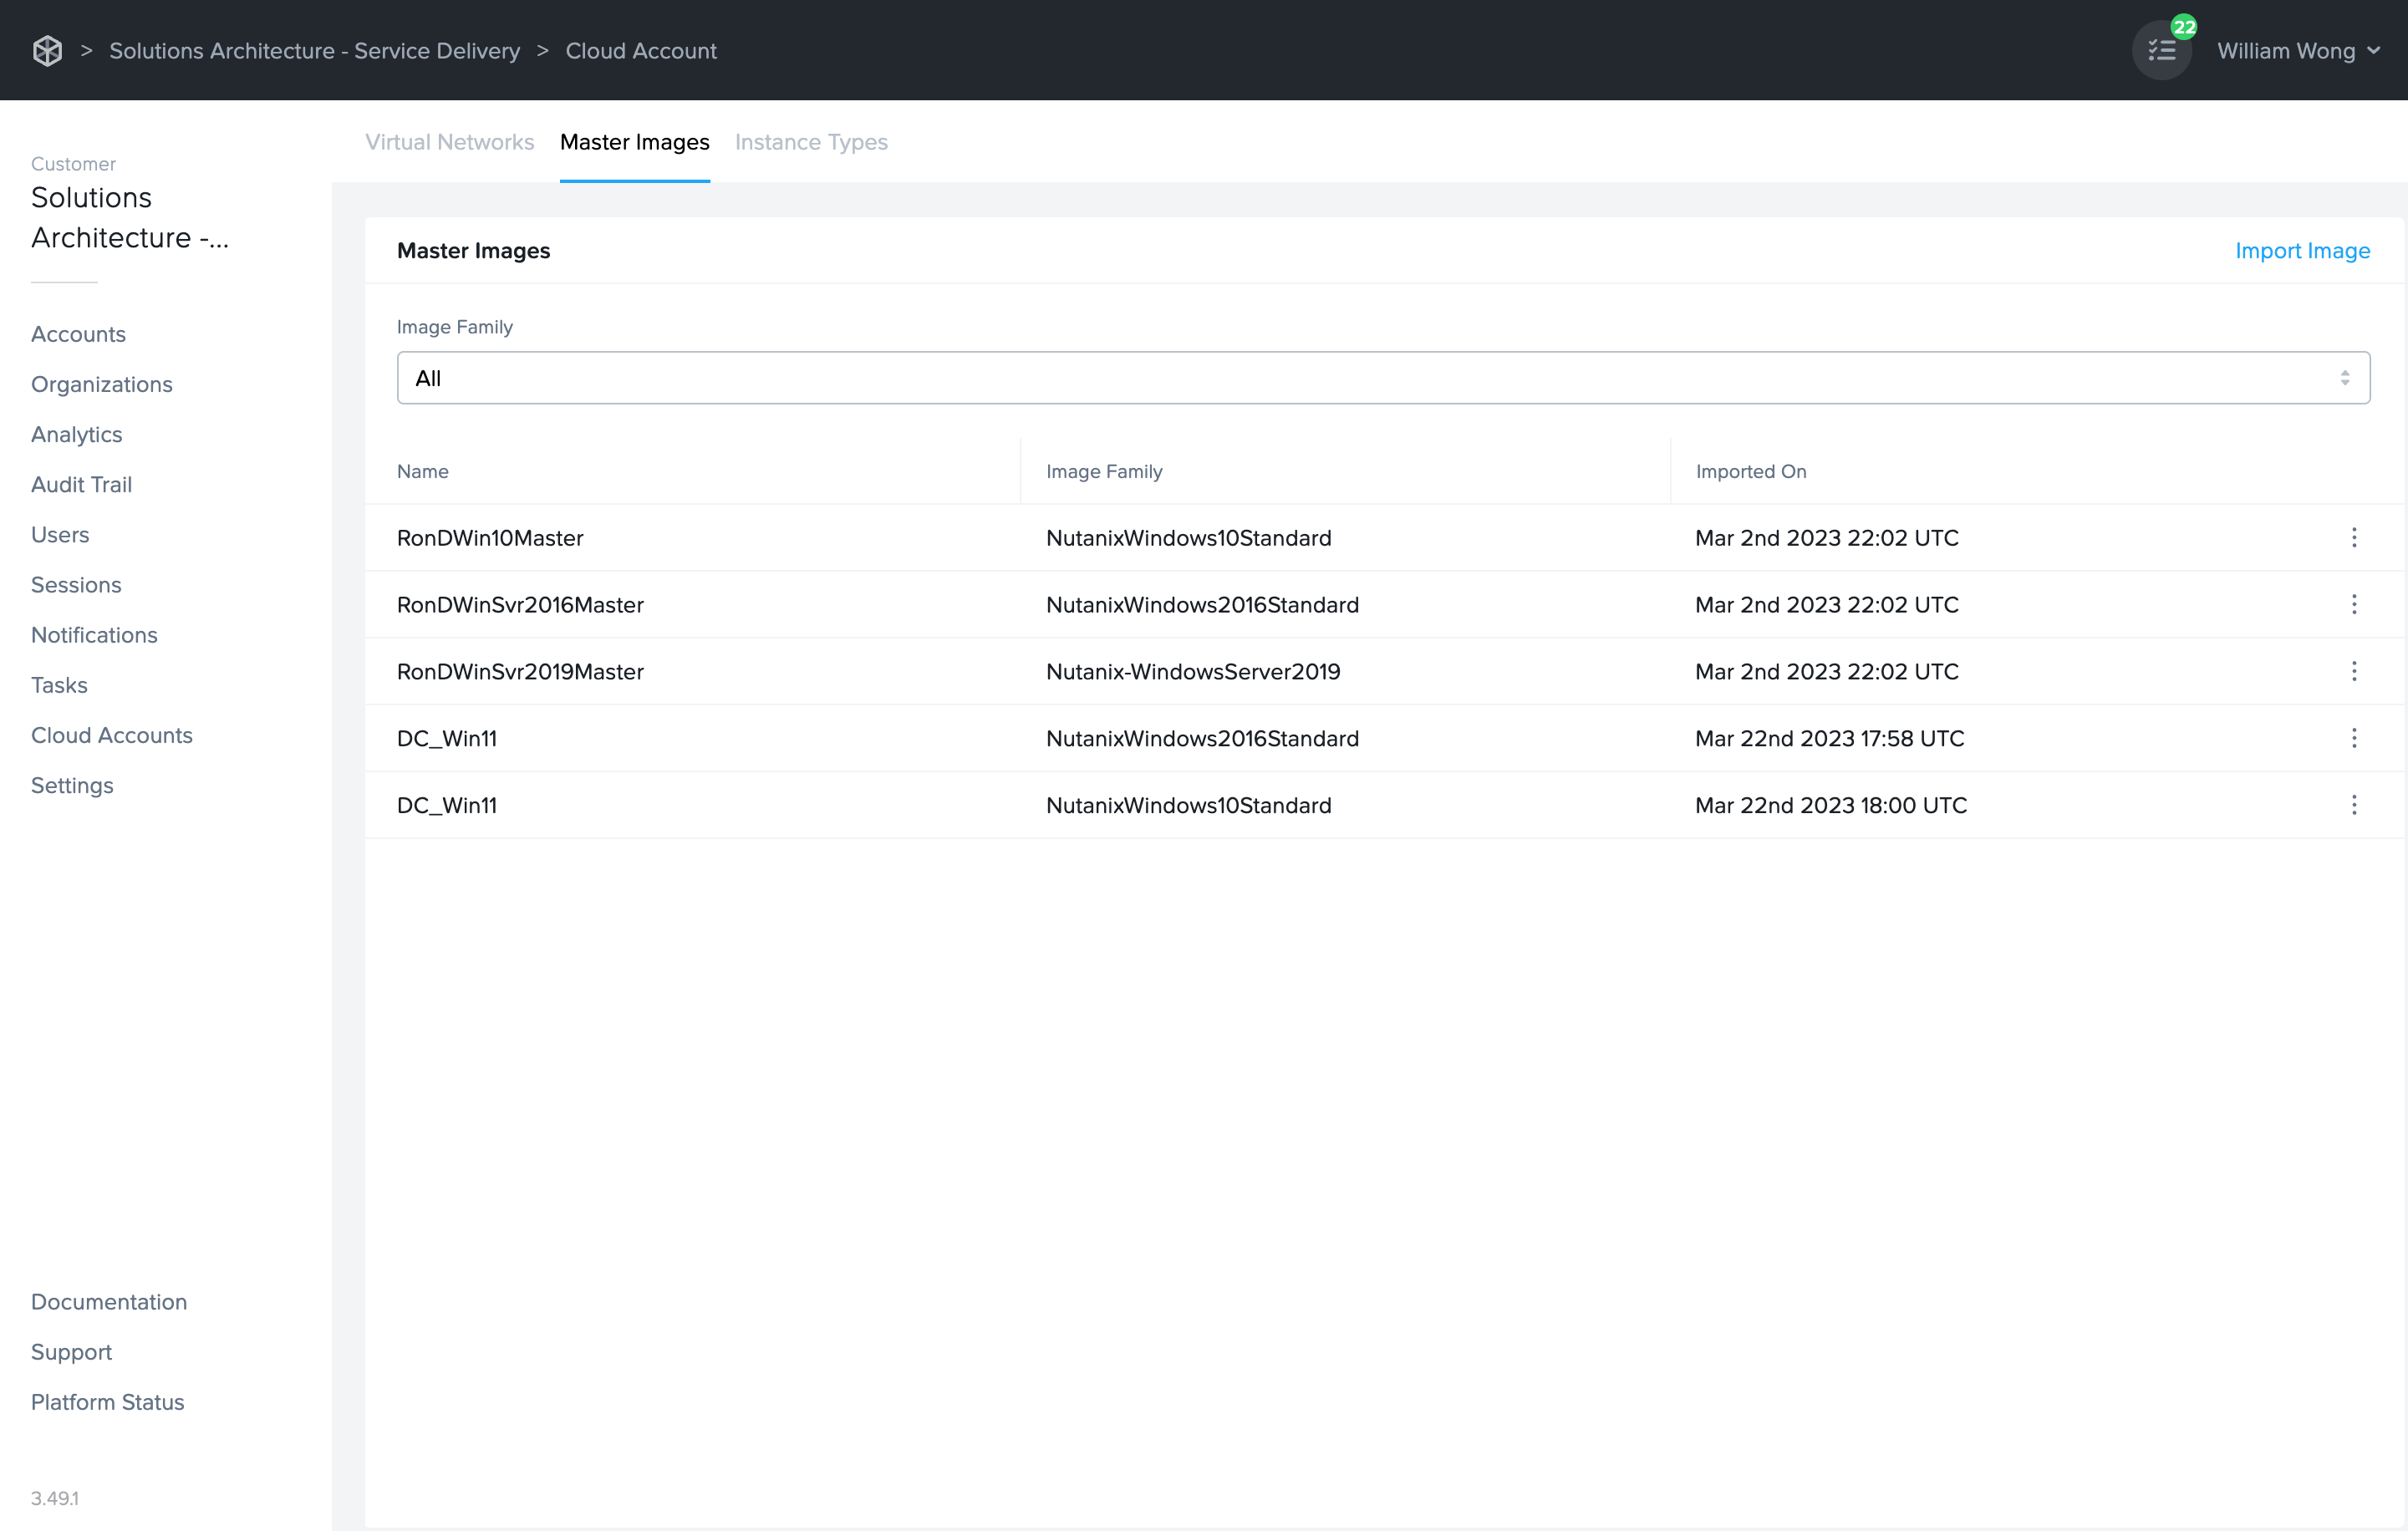
- To add a new template image, select Import Image.
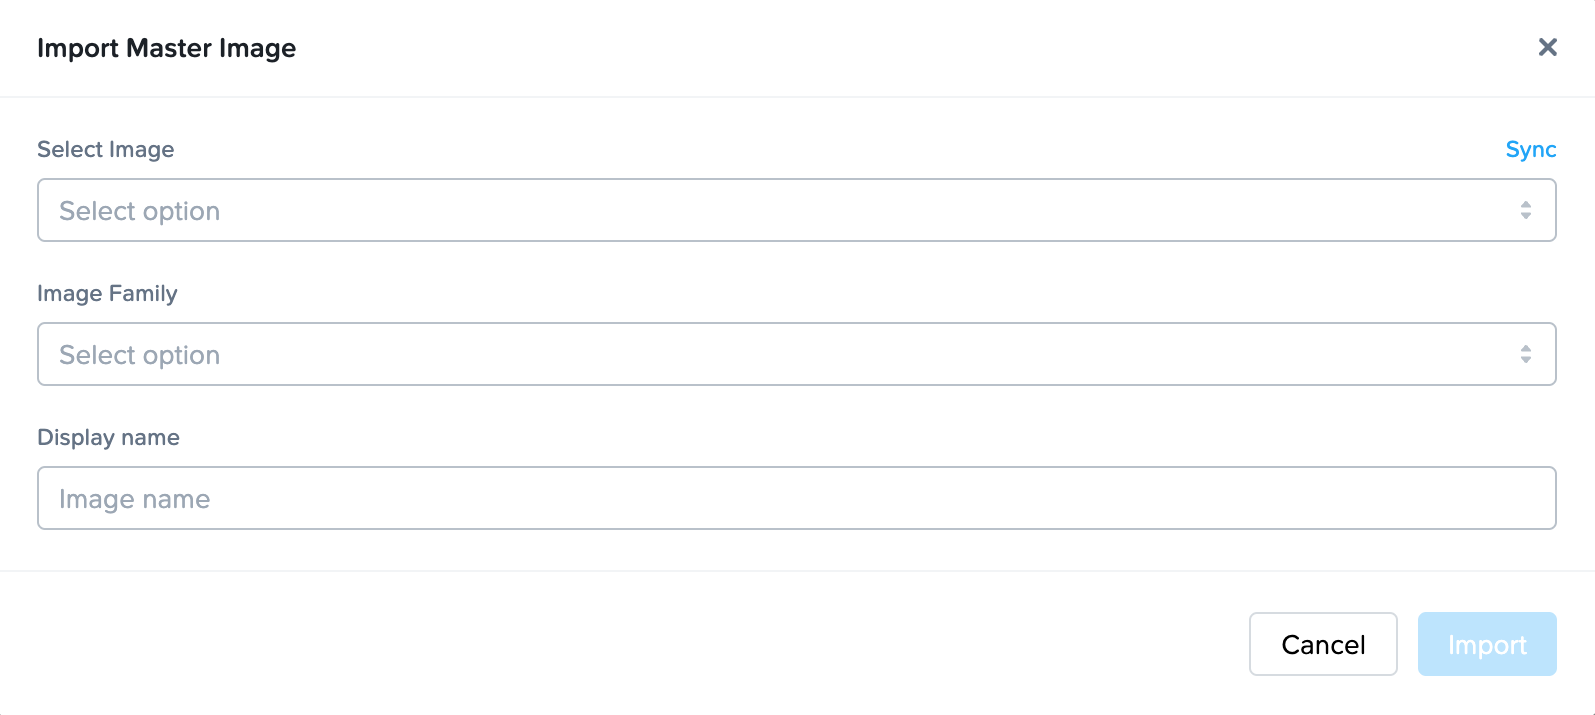
If your template image has not been imported into Frame before, click Sync so Frame Platform will query your infrastructure for the list of available images. Then, complete the remainder of the form:
- Select Image: Select the image to import from the picklist.
- Image Family: Specify the OS type for this image.
- Display Name: Enter the display name of image.
Click Import for Frame Platform to import your template image to your Cloud Account.
Add a Template Image (Public Cloud)
To add a new template image that has already been prepared and uploaded to a specific region in your public cloud infrastructure, perform the following steps:
- Navigate to the Customer or Organization Dashboard in the Admin Console where the cloud account is registered.
- Select Cloud Accounts in the left-hand menu.
- Navigate to the cloud account you will be managing. Click on the adjacent kebab menu and select Update.
- From there, navigate to the Master Images tab at the top of the page. The list of already imported template images are listed.
- To add a new template image, select Import Image.
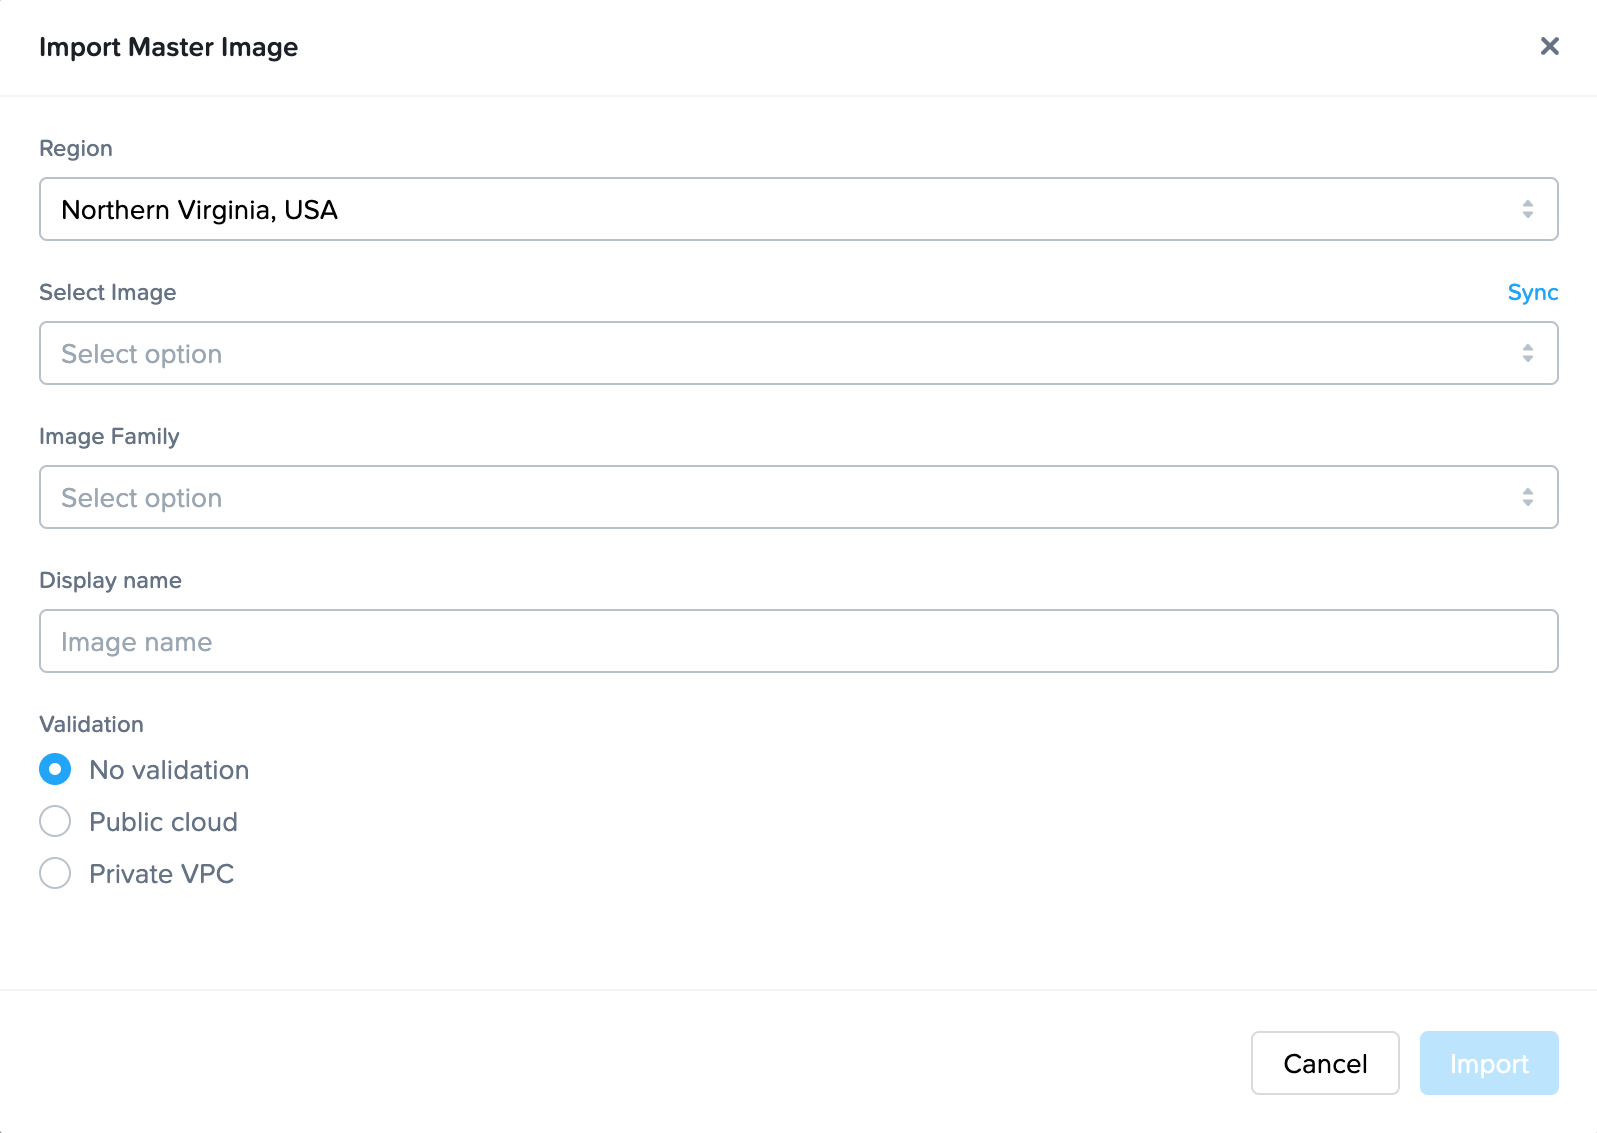
Select the region where your new template image is located. If your template image has not been imported into Frame before, click Sync so Frame Platform will query your infrastructure region for the list of available images. Then, complete the remainder of the form:
- Select Image: Select the image to import from the picklist.
- Image Family: Specify the OS type for this image.
- Display Name: Enter the display name of image.
- No validation: The image will be added to your cloud account, but will not be verified. There is no guarantee that this image will work.
- Public cloud: The image will be used to create a new test Frame account with a standalone VPC and Sandbox. The Frame platform will then verify that the Sandbox can communicate with the Frame Platform before terminating the test Frame account and deleting all associated cloud resources created by Frame.
- Private VPC: After you specify an existing VPC/VNET ID, the Frame platform will use the image to create a new test Frame account in the specified VPC/VNET. Frame will then verify that the Sandbox can communicate with Frame Platform before terminating the Frame account and deleting all associated cloud resources created by Frame.
Click Import for Frame Platform to import your template image to your Cloud Account.
During the validation process, you will see an active task running in the Notification Center. However, the test Frame Account will not be visible within the Frame Admin user interface. Depending on the public cloud provider, this validation process may take 30 minutes to an hour to complete.
- Once registration and validation (optional) of the image is complete, you can create new Frame accounts using your new template image or reset an existing Frame account Sandbox to the new template image.
You can check your infrastructure console to monitor the provisioning and de-provisioning of resources during the validation process.
Discard a Template Image
- Before you remove an unnecessary template image from your cloud account, you must ensure that there are no Frame accounts using that template image.
- Discarding an imported template image simply unregisters the template image from your cloud account. This action does not delete the source template image within your infrastructure.
- Navigate to the Customer or Organization Dashboard in the Admin Console where the cloud account is registered.
- Select Cloud Accounts in the left-hand menu.
- Navigate to the cloud account you will be managing. Click on the adjacent kebab menu and select Update.
- From there, navigate to the Master Images tab at the top of the page.
- Identify the image you wish to remove and select the kebab menu to the right of the image.
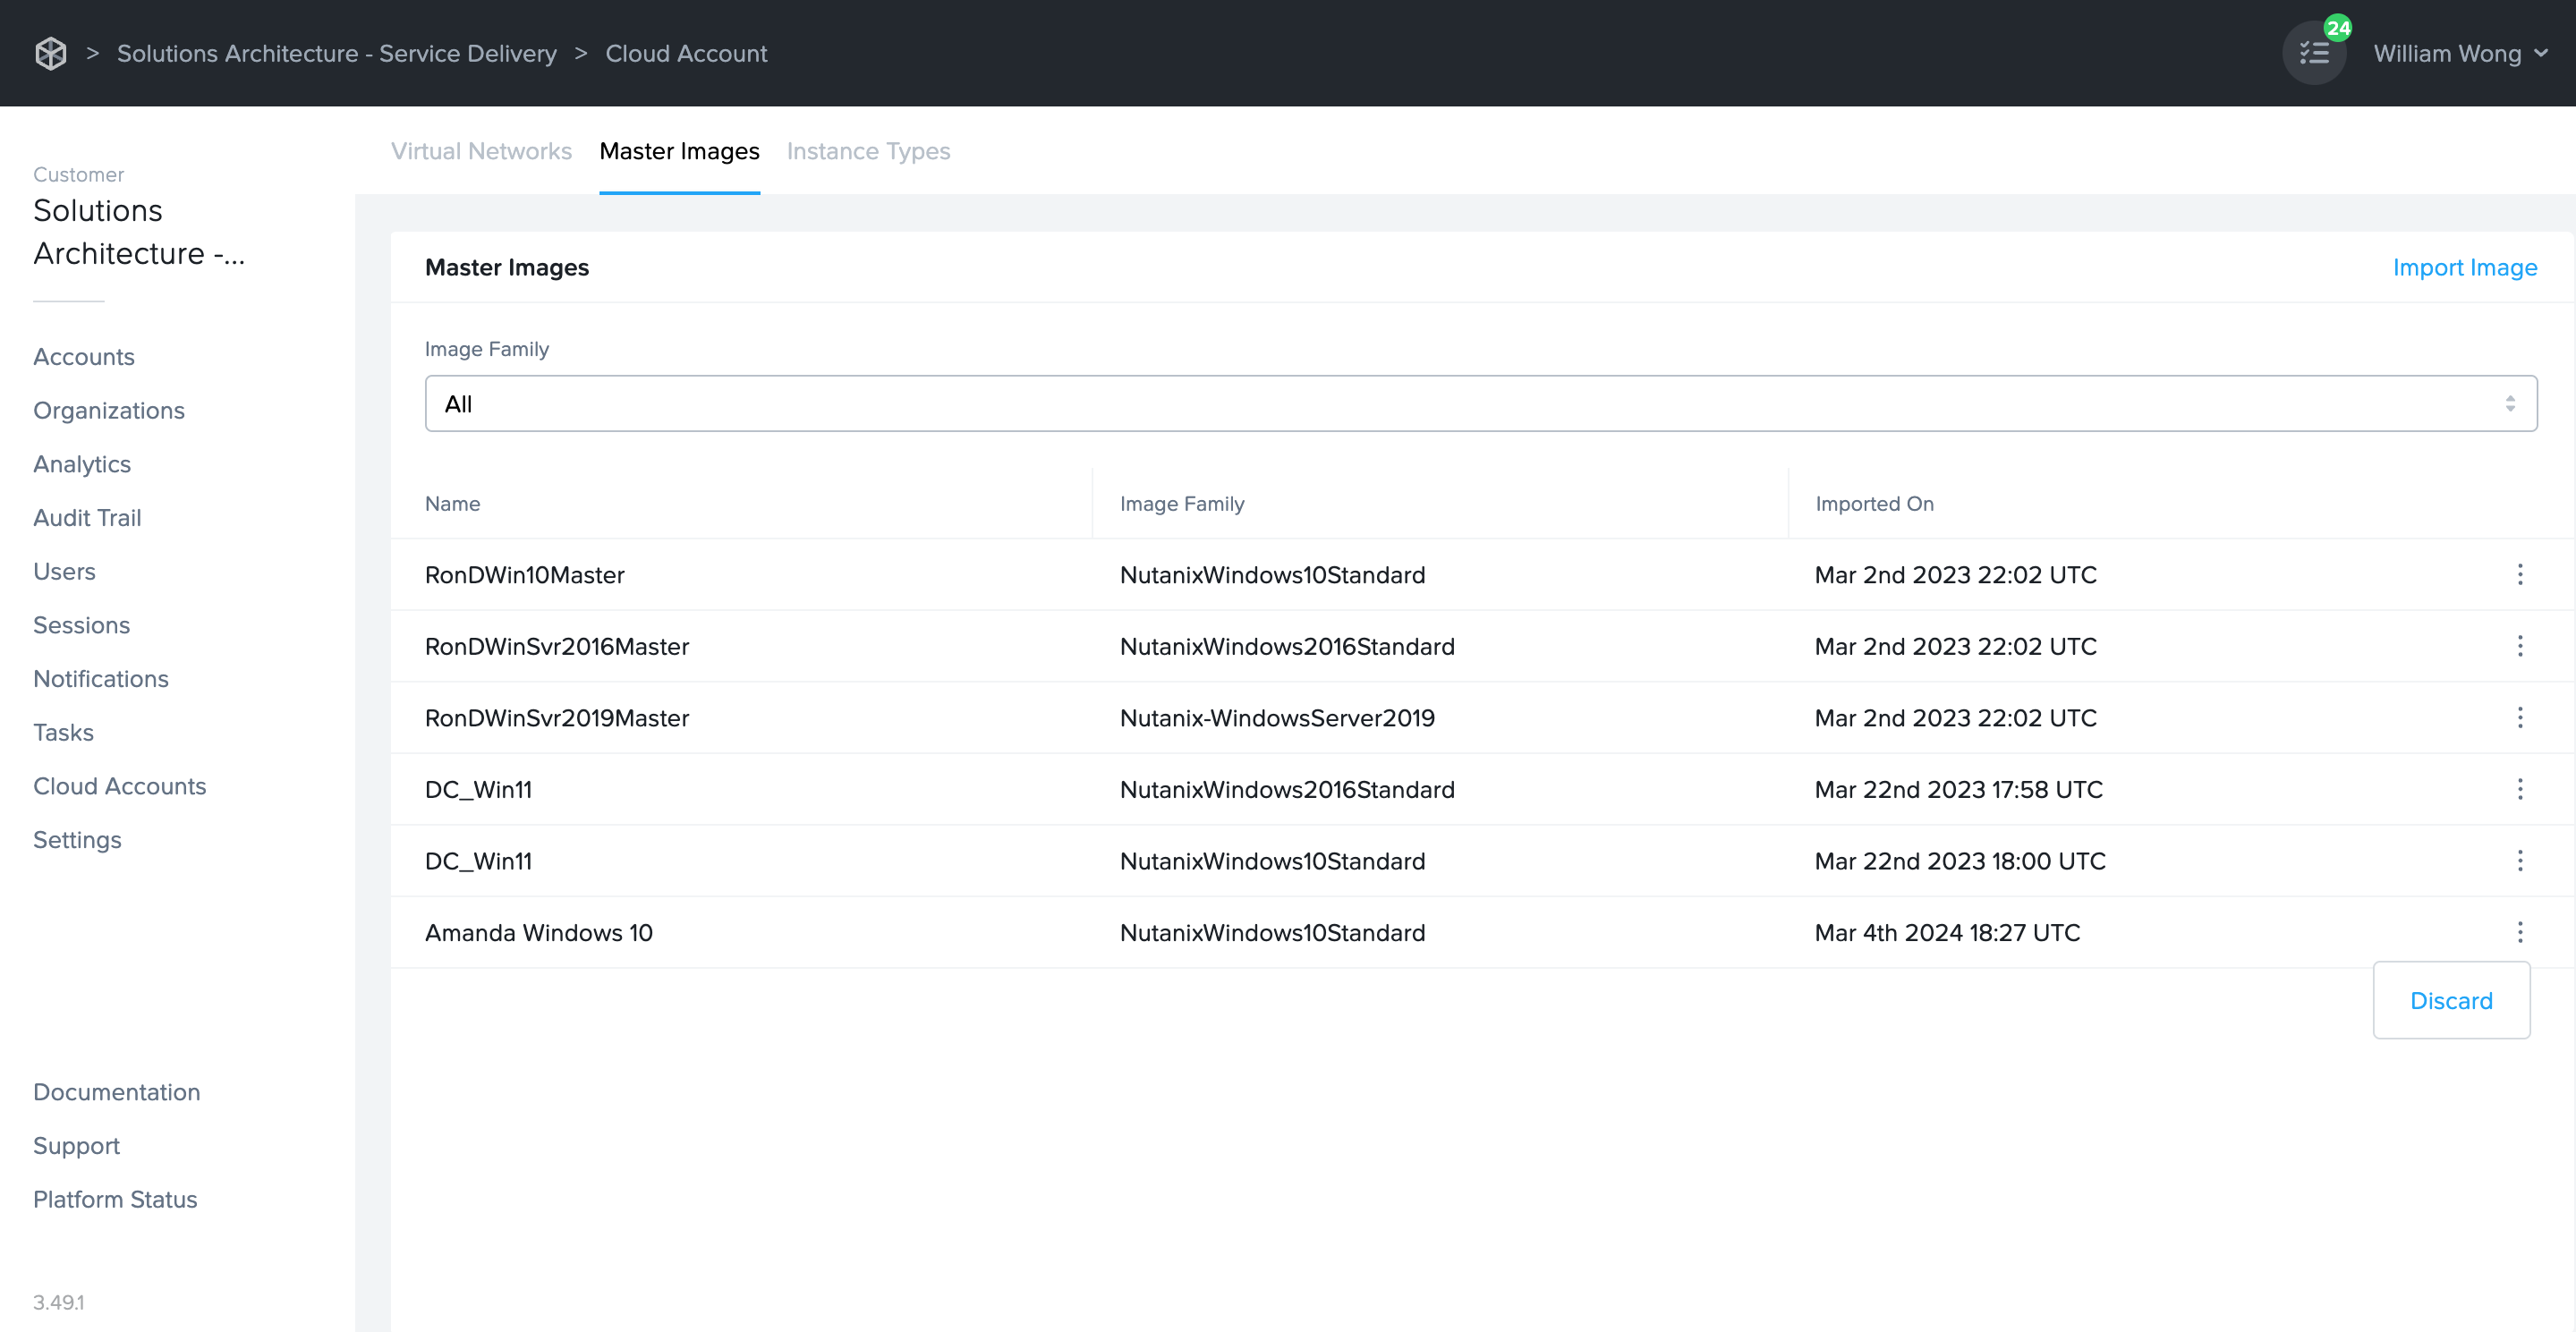
- Click on Discard and Frame Platform will remove the imported template image from your cloud account.
Shared VPCs (GCP only)
Frame supports the ability for customers to use Google Cloud Platform's Shared VPCs, where a Google Host Project owns a VPC with specific subnets shared with other Google Service Projects. Once the GCP administrator has configured the GCP Host and Service Projects, the Frame administrators can follow the procedure below to set up the GCP Cloud Accounts in Frame to create Frame accounts in a Google Service Project.
Prerequisites
Before the Frame administrator can specify within Frame Console the Shared VPC subnets to use in a Google Service Project, the following conditions must be satisfied:
- The GCP Host Project has been configured in GCP to have shared one or more subnets in the Shared VPC with the GCP Service Project.
- The GCP Host and Service Projects are registered in Frame as separate GCP Cloud Accounts at the same level in the Frame Platform Hierarchy.
Share a Subnet
Once the two projects are registered in Frame, the Frame administrator can share the subnet(s) from the Shared VPC in the Google Host Project by doing the following:
- Navigate to the Customer or Organization Dashboard where the two GCP Cloud Accounts are registered.
- Select Cloud Accounts in the lefthand menu.
- Click on the kebab menu for the GCP Host Cloud Account and click on Update.
- Select the Shared VPCs tab.
- Click Share Subnet in the upper right corner of the Shared VPCs page.
- In the Share Subnets configuration window, specify the GCP Service Cloud Account in the Destination Cloud Service pick list that will have access to the Shared VPC subnet(s).
- Specify one or more Shared VPC subnets which are to be accessible to the GCP Service Cloud Account within Frame.
- Click Share Subnets button to save the configuration.
A new entry in the Shared Subnets list will appear. These Shared VPC subnets are now visible in the Account Creation workflow when you create the Frame Account using the Destination GCP Cloud Account and customer-managed networking.
Revoke a Shared Subnet
If you wish to stop using a shared subnet, you will need to ensure that the shared subnet is no longer has Frame-managed workload VMs (e.g,. terminate Frame accounts using that shared subnet) and then:
- Navigate to the Customer or Organization Dashboard where the two GCP Cloud Accounts are registered.
- Select Cloud Accounts in the lefthand menu.
- Click on the kebab menu for the GCP Host Cloud Account and click on Update.
- Select the Shared VPCs tab.
- Under the Shared Subnets list, click on the kebab menu for the Destination Cloud Service/Subnet combination you want to revoke.
- Confirm you wish to revoke the access to the Shared VPC subnet by the GCP Service Cloud Account.
Add a Cloud Account Region
Administrators can add additional regions after their cloud account has been setup using the Add Regions function.
- Navigate to the Customer or Organization Dashboard in the Admin Console where the cloud account is registered.
- Select Cloud Accounts in the left-hand menu.
- Find the cloud account where you want to add a new cloud region. Click on the adjacent kebab menu and select Add regions.
Administrators should ensure they have sufficient resource limits in the regions they decide to add before adding them through the Frame Console.
- A new window will appear. You have two options to choose from:
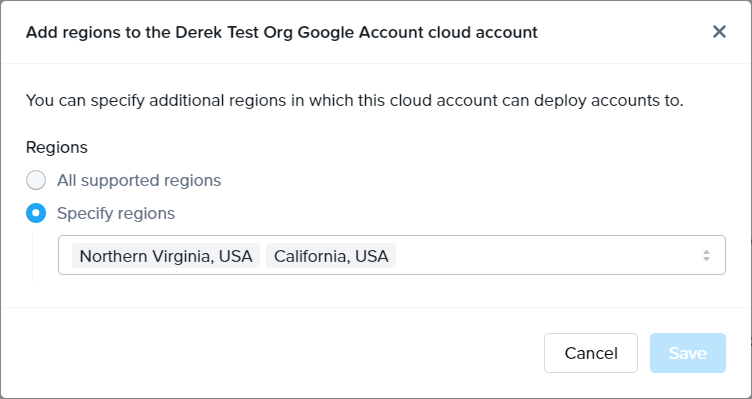
- All supported regions: Select this option if you would like to add all other supported regions aside from the ones you have already specified.
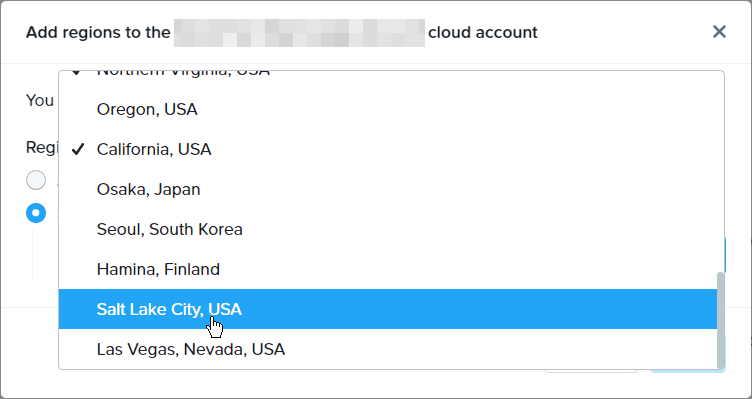
- Specify regions: Select this option if you would like to add just a few additional supported regions to your cloud account. Simply click inside the regions field and select as many regions as you wish from the drop-down menu.
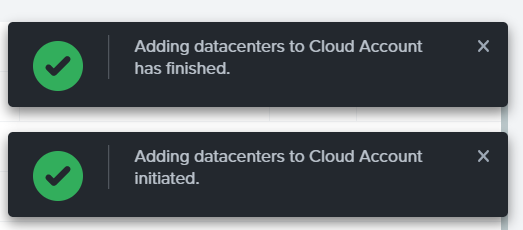
- Once you have made your selection, click Save in the bottom right corner of the window. You will receive updates in your notification center regarding the status.
Deactivate a Cloud Account
Frame administrators can deactivate a cloud account from Frame when they wish to de-register a cloud account from their Customer or Organization entity. Once the cloud account is deactivated, the cloud administrator can terminate the corresponding resources that are not managed by Frame.
A cloud account that has existing Frame accounts cannot be deactivated. You must terminate all Frame accounts using the cloud account resources first.
- Navigate to the Customer or Organization Dashboard in the Admin Console where the cloud account is registered.
- Select Cloud Accounts in the left-hand menu.
- Find the cloud account where you want to deactivate. Click on the adjacent kebab menu and select Deactivate.
For AHV, once the AHV Cloud Account is deactivated, the Cloud Connector Appliance (CCA) VM(s) and Streaming Gateway Appliance (SGA) VMs can be terminated in Prism Element and categories removed from Prism Central.
Reconnect Cloud Account
When the Frame control plane is unable to communicate with the cloud account infrastructure, the status for the cloud account in the Cloud Accounts list will be displayed as "U" for Unavailable (instead of "R" for Ready). The administrator will need to correct the issue and may need to manually trigger a reconnection of the cloud account.
Common reasons for an unavailable cloud account are:
- AHV:
- Prism Element service account username/password was changed or expired
- Cloud Connector Appliance (CCA) VMs are unresponsive or powered off
- Cloud Connector Appliance (CCA) is unable to connect to the Frame control plane (cch.console.nutanix.com)
- Public cloud:
- Azure shared secret expired
- Required IAM roles/permissions were removed from AWS IAM role or GCP service account
To reconnect an unavailable cloud account after the issues have been addressed:
- Navigate to the Customer or Organization Dashboard in the Admin Console where the cloud account is registered.
- Select Cloud Accounts in the left-hand menu.
- Find the cloud account you want to reconnect. Click on the adjacent kebab menu and select Reconnect.
- If the underlying issue(s) were addressed and Frame control plane is able to communicate with the cloud account infrastructure, the account status will change to "R".
When a Cloud Account becomes unavailable, Frame will not reboot any workload VM if that workload has an active user session once the Cloud Account becomes available. Frame will also queue any session close requests when Cloud Account is unavailable and process those requests once the Cloud Account becomes available. This behavior ensures sessions will not be left incorrectly in an active state.
Update Prism Central/Prism Element Credentials (AHV only)
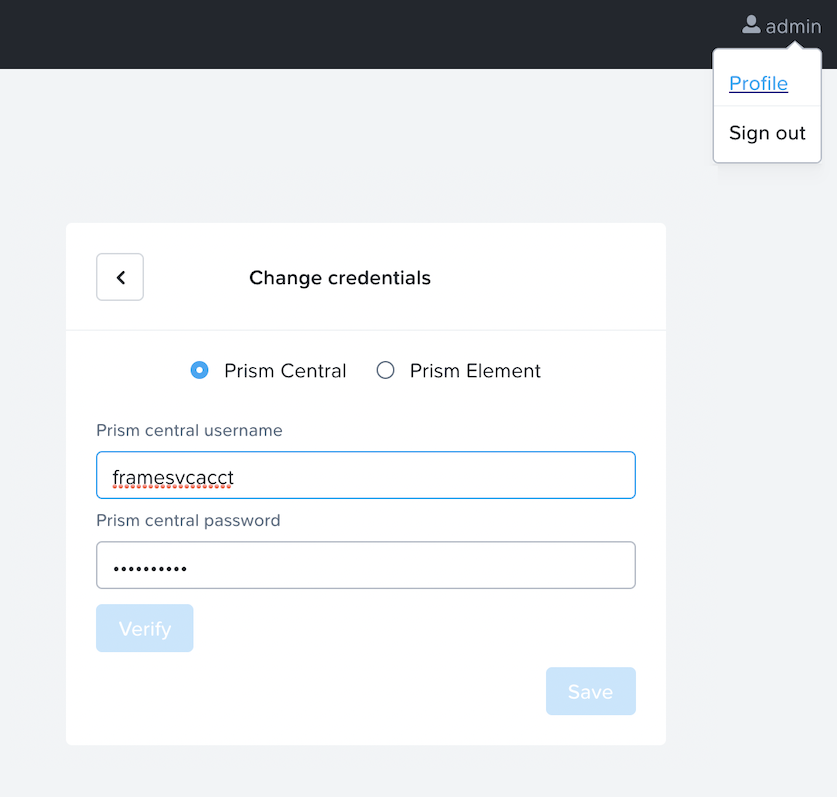
If you need to update your Prism Central or Prism Element credentials, you will need to:
Go to the CCA Dashboard by specifying in your browser:
https://<CCA VM IP address>/Log in with your current Prism Central credentials.
Click Profile in the top right menu and launch the update password wizard. The CCA wizard allows you to change either Prism Central or Prism Element username and password. You can also update both usernames/passwords at the same time.