Microsoft Azure
Requirements
In order to register your Azure account with Frame, ensure that you have the met the following requirements before proceeding:
Microsoft Azure account with a valid Azure subscription
Permissions to add and modify role assignments for the Azure Subscription ID.
The Azure subscription has the following Resource Providers registered.
- Microsoft.Compute
- Microsoft.Network
- Microsoft.Storage
Costs (e.g., storage) may begin to accrue immediately after completing the registration of your Azure account on your Frame Customer or Organization entity.
Preparation
Before your Azure account can be registered with Frame, you will need to complete two tasks:
- Create an Azure application registration
- Add Azure subscription owner permissions to your Azure application registration
Create an Azure Application Registration
You will need to create an Azure app registration for Frame. The app registration is the mechanism by which you'll give Frame access to create and manage network, virtual machines, and storage resources in your Azure subscription.
Open the Microsoft Entra ID (formerly Azure Active Directory) option and App registration section. From there, click on the "Add" button and select "App registration” to create a new app.
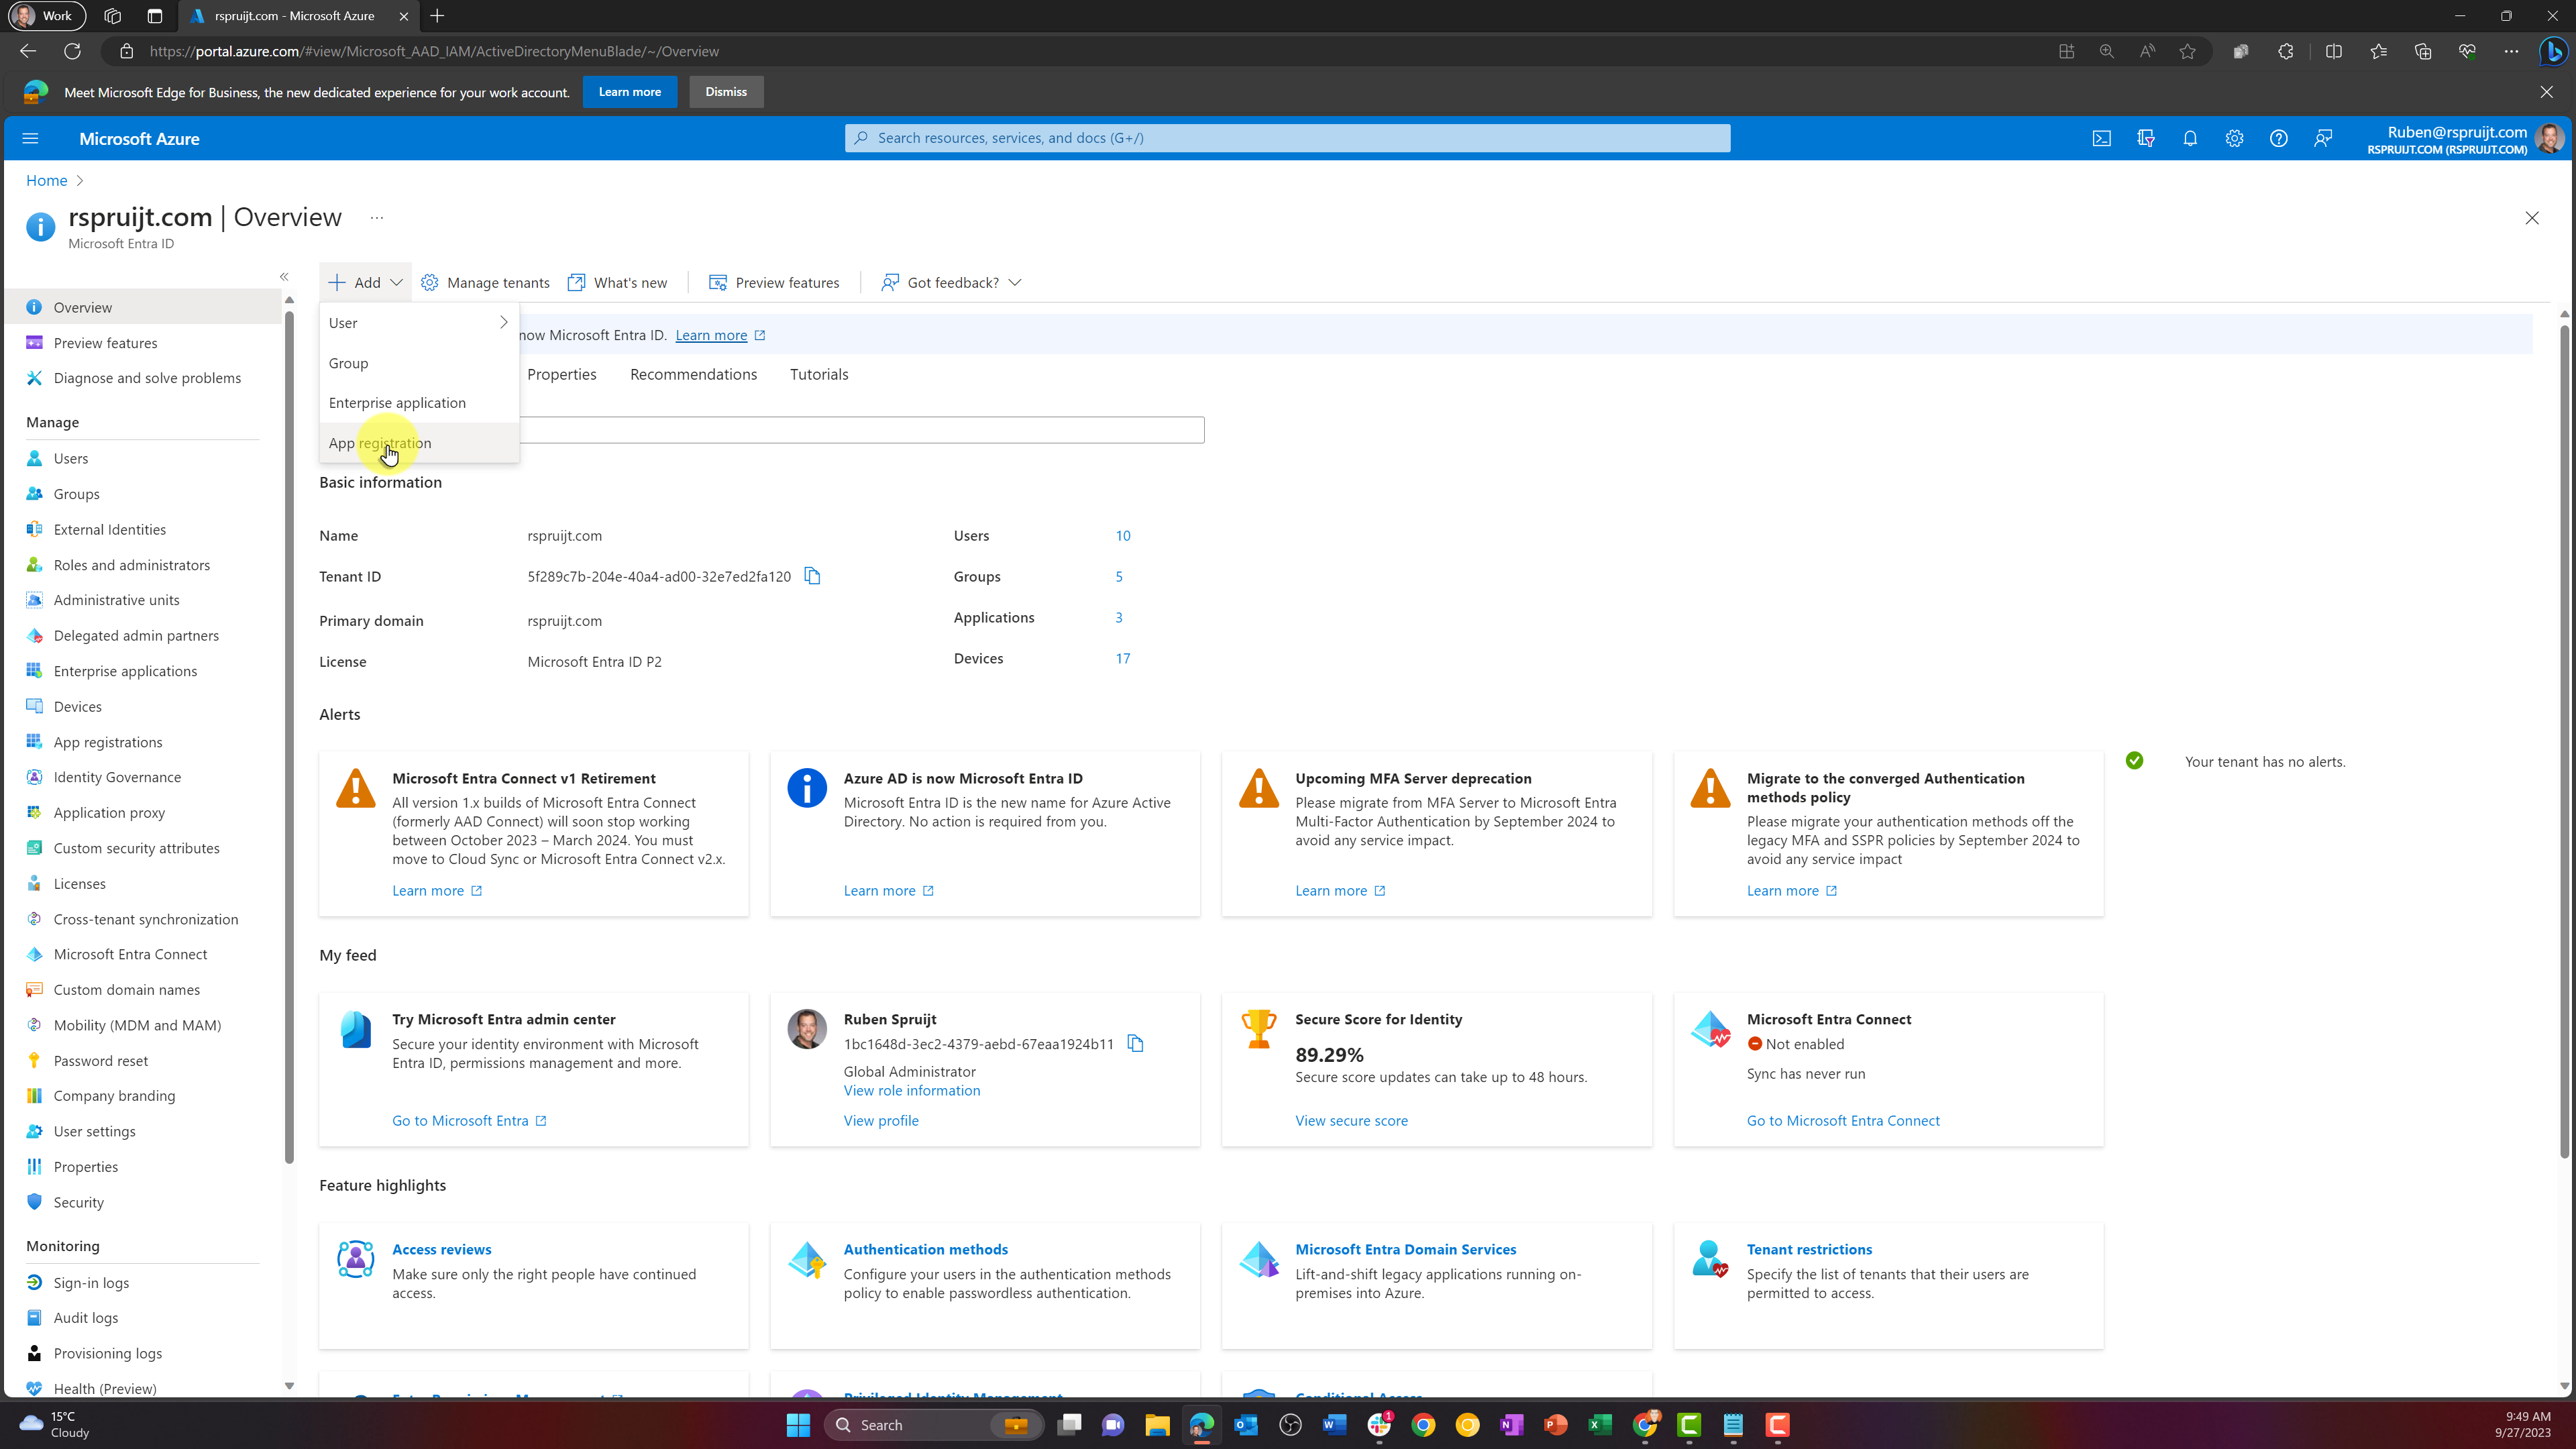
Azure Portal - Create App Registration You'll see a panel titled “Register an application.” You'll be asked for the following information:
- Name: you can choose any name. Some customers simply use the name "Frame". Others will append some identifying information for internal reporting purposes to "Frame". This name will appear in the list of Application Registrations.
- Supported account types: Specify who has access to the application. "Accounts in this organization directory only" is the standard selection for customers.
- Redirect URI (Optional): This value can be left blank.
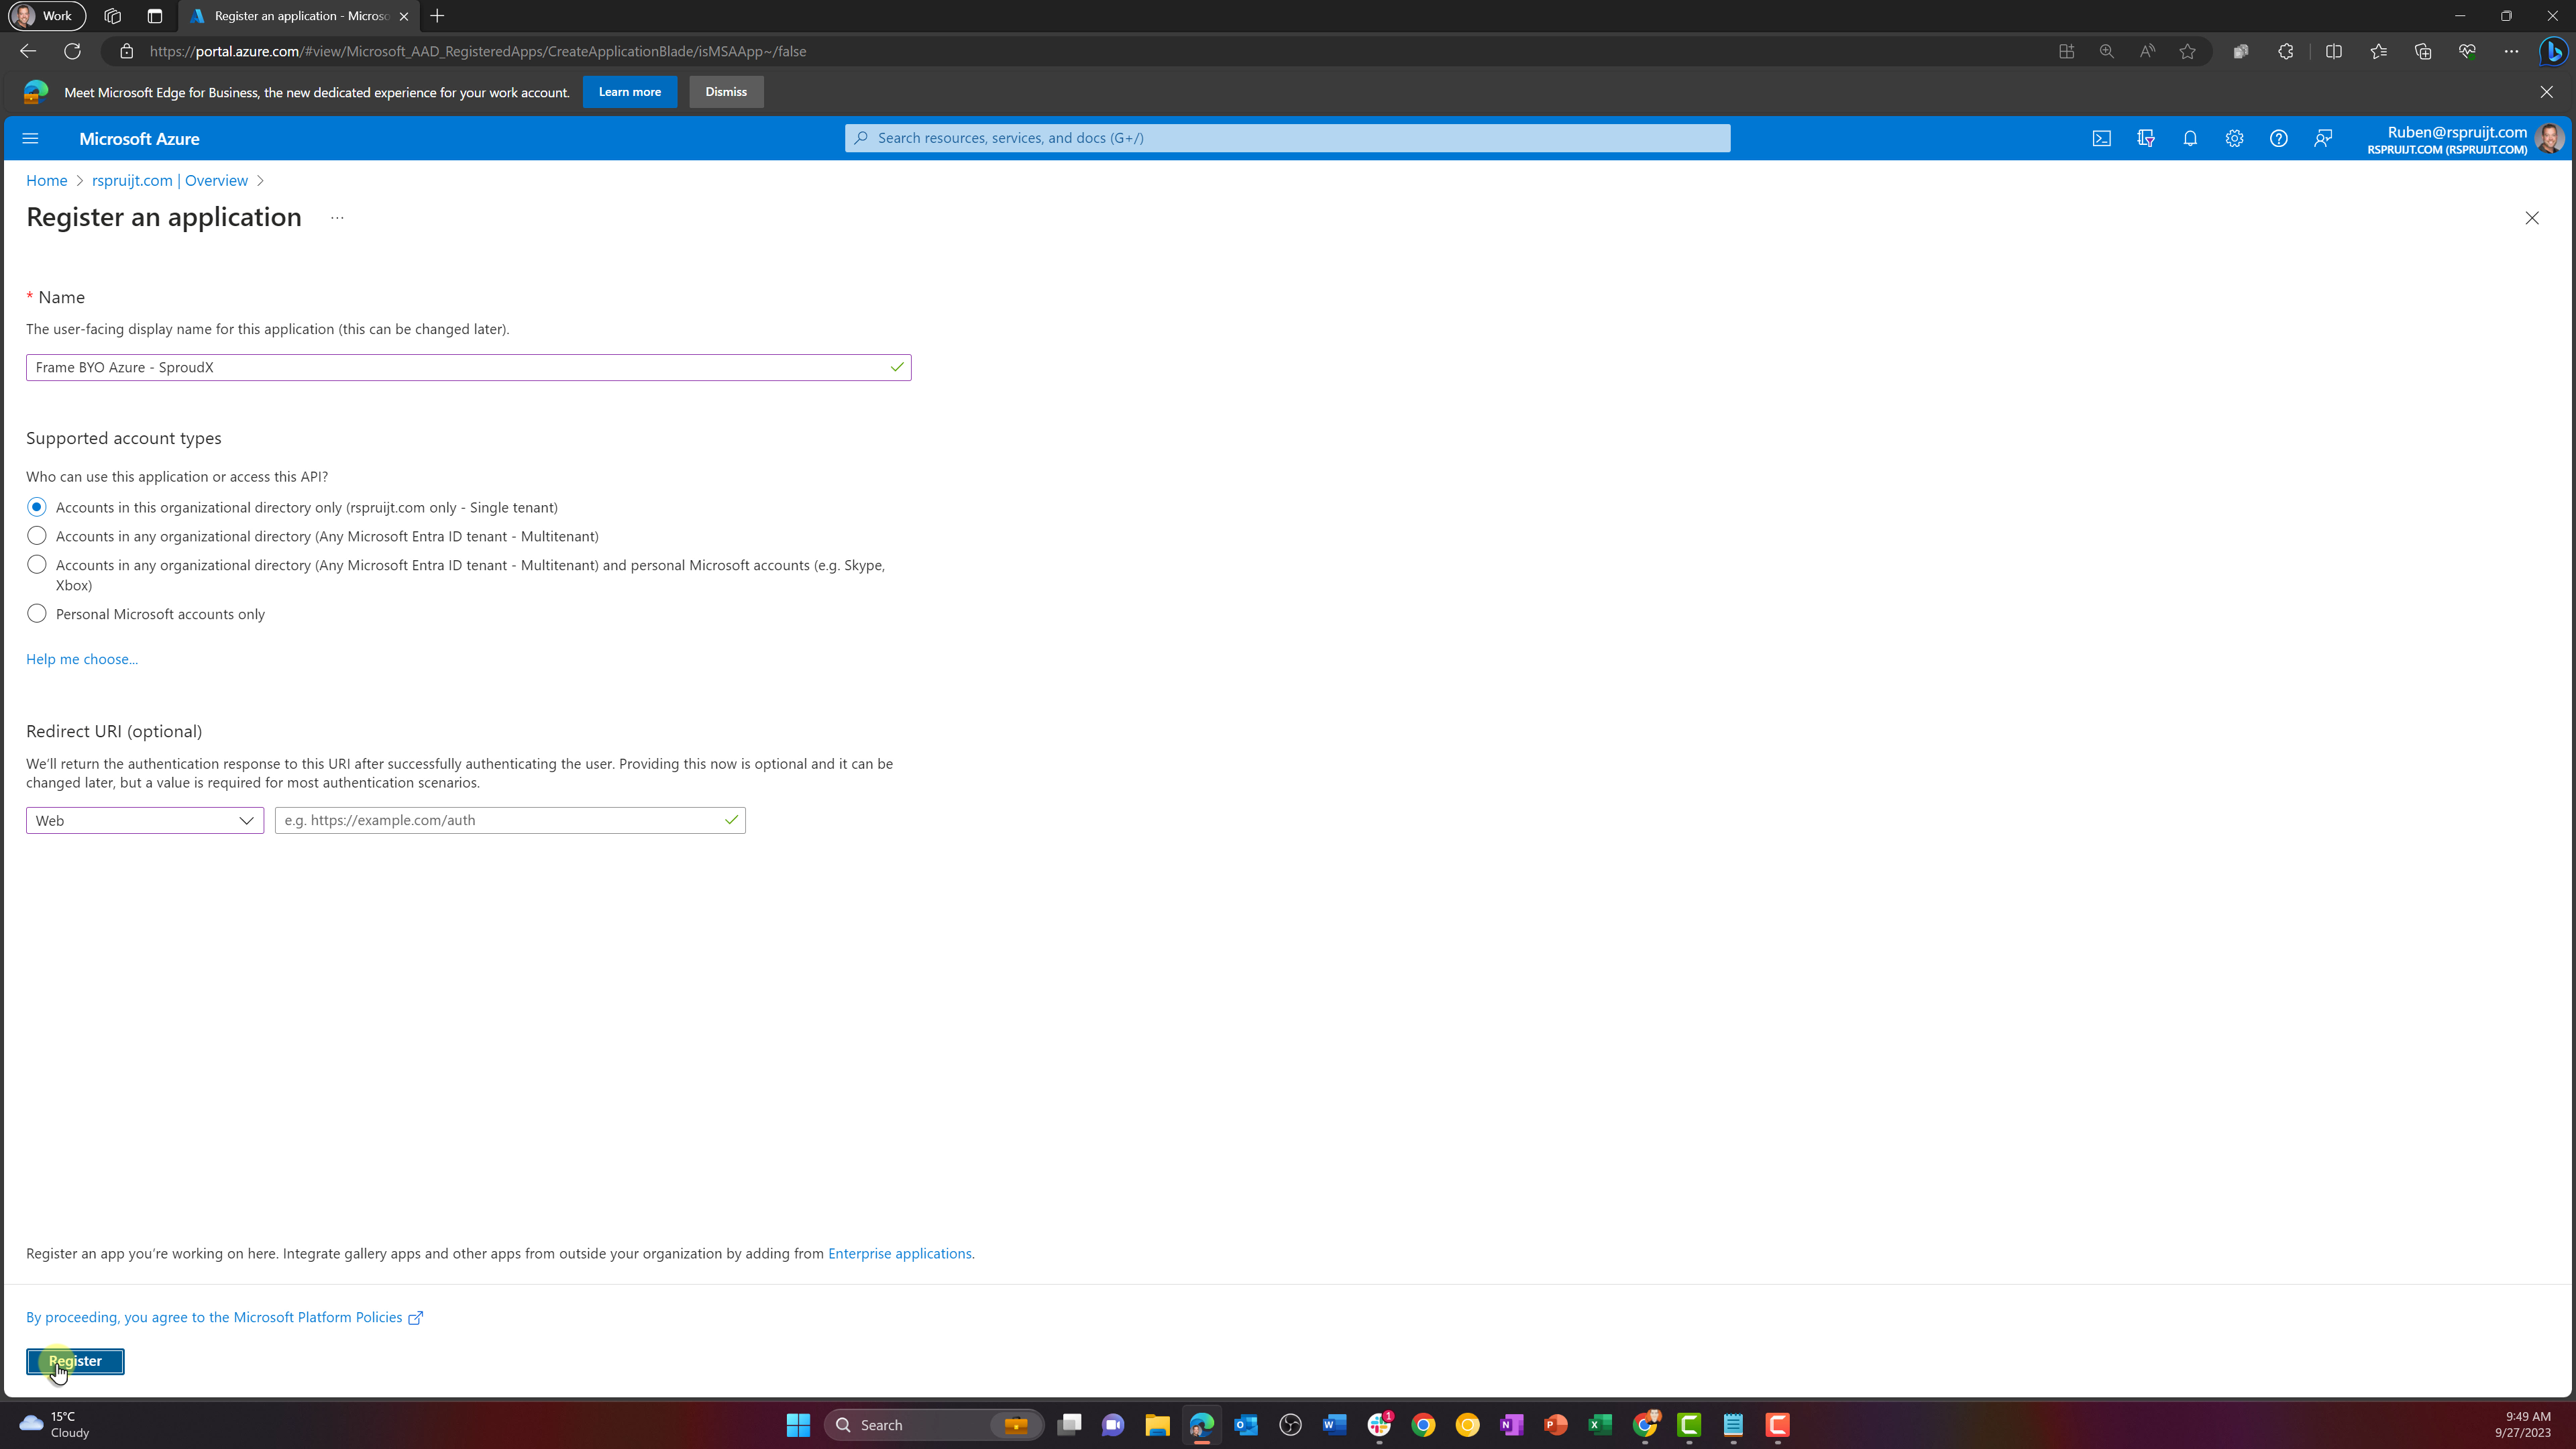
Azure Portal - Register an Application Click “Register” at the bottom of the "Register an Application" page.
A notification will appear informing you that your application has been created successfully. It should now be available in your “App registrations” list.
Next, select your new application from the list and copy or write down the values for the “Application (client) ID” and “Directory (tenant) ID.” These IDs are two of the four values you will need for setting up your Frame integration (note that you do NOT need the “Object ID”).
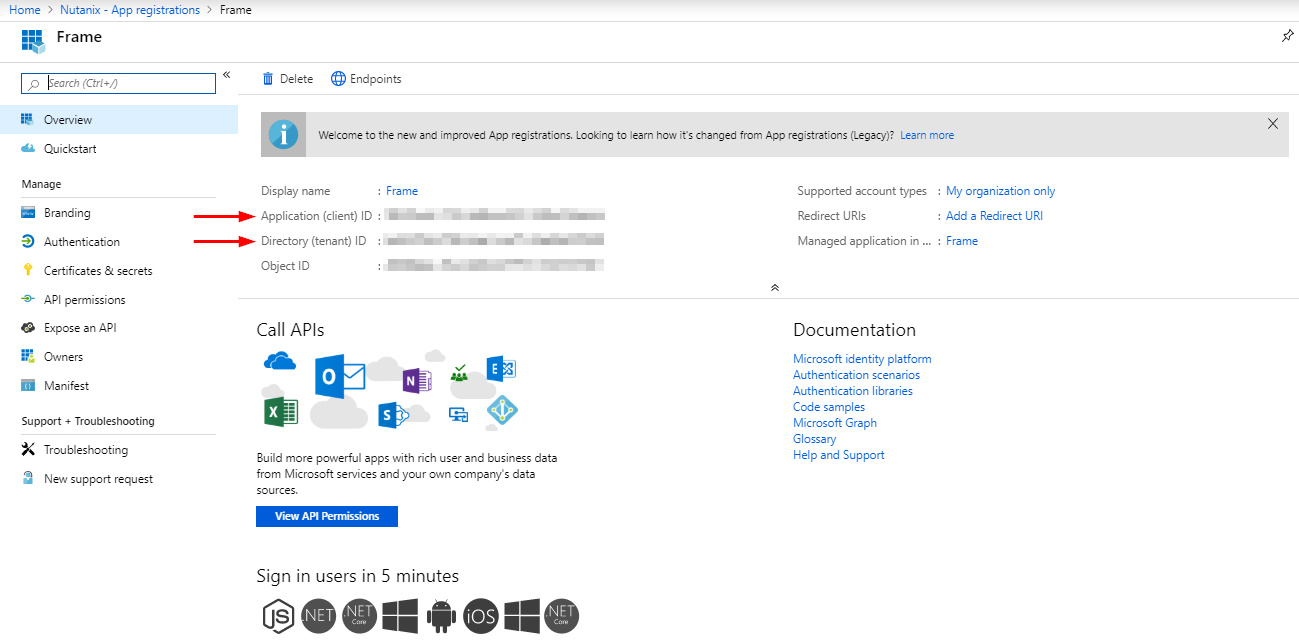
Azure Portal - Application and Directory IDs Once you have written down the Application (client) ID, navigate to the “Branding” page listed in the menu on the left side of your Azure portal.
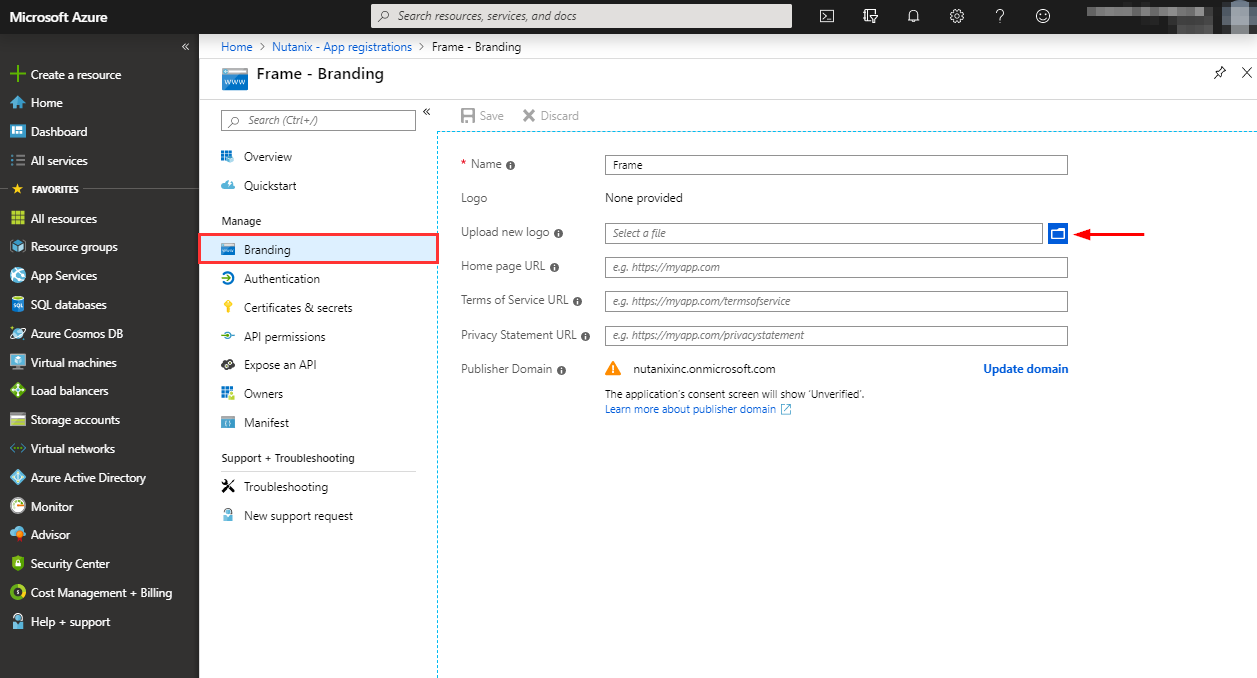
Azure Portal - Branding Download the application icon shown below and upload the Frame logo file to Azure by clicking on the folder browser icon to the right of Upload new logo and selecting the Frame logo file you downloaded. Click “Save” to save the Frame logo for your App Registration.

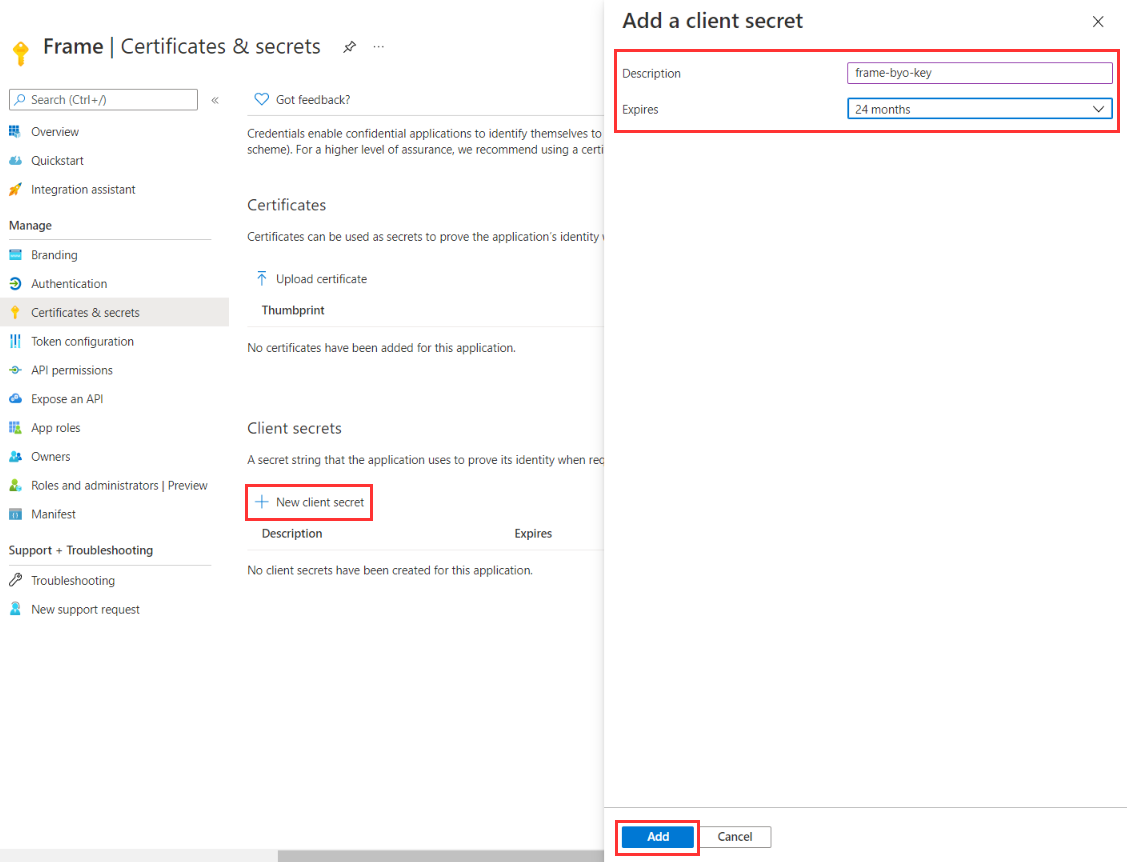
Azure Portal - Frame Logo Next, you'll need to create a “Client Secret” for Frame to use as a password to manage your Azure resources. Click “Certificates & secrets” under your application's management options. Click the “New client secret” button under “Client secrets”.
You will be prompted to add a new client secret. Simply add a description and select the desired expiration duration from the drop-down menu next to “Expires.” Click “Add.”
Azure Portal - Certificates & secrets On the “Client secrets” page, copy your newly-created client secret. Your client secret can only be copied right after the secret is created. You will need this value when you add your Azure subscription to Frame.
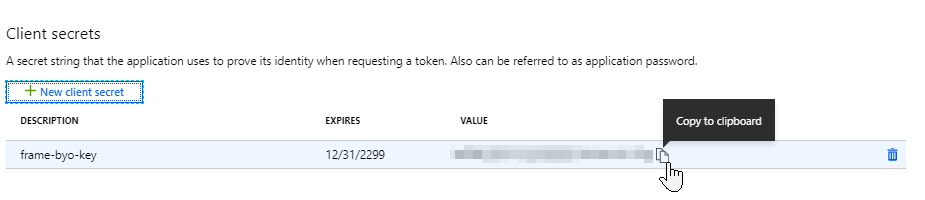
Azure Portal - Client secrets cautionThe client secret is used by Frame to manage your BYO Azure account. Microsoft Azure has a maximum expiration date of 2 years from the client secret creation date. If you fail to update your client secret before it expires, Frame will no longer be able to manage the resources in your Azure account and you will likely experience a service outage.
Before your client secret expires, you will need to generate a new client secret (following Steps 9 and 10 above) and re-enter your cloud account secret in the Configuration tab of your Azure Cloud Account.
Configuring your Azure Subscription
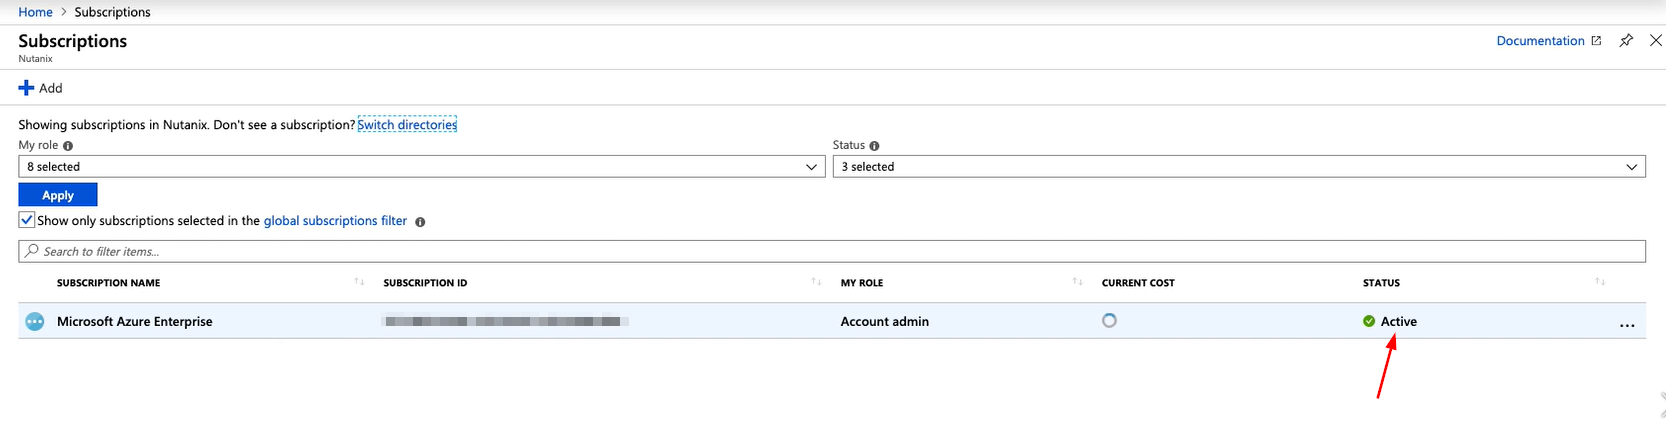
This section assumes that you already have an active Azure account with a subscription wthat can be used for Frame workloads. At this point, you should have also set the resource limits for your subscription to levels high enough to accommodate your expected loads. To confirm your subscription status, login to the Azure web portal, navigate to your subscription, and confirm that its status is “active”:
Before registering your Azure account with Frame, you will grant owner permissions to your new Azure App Registration.
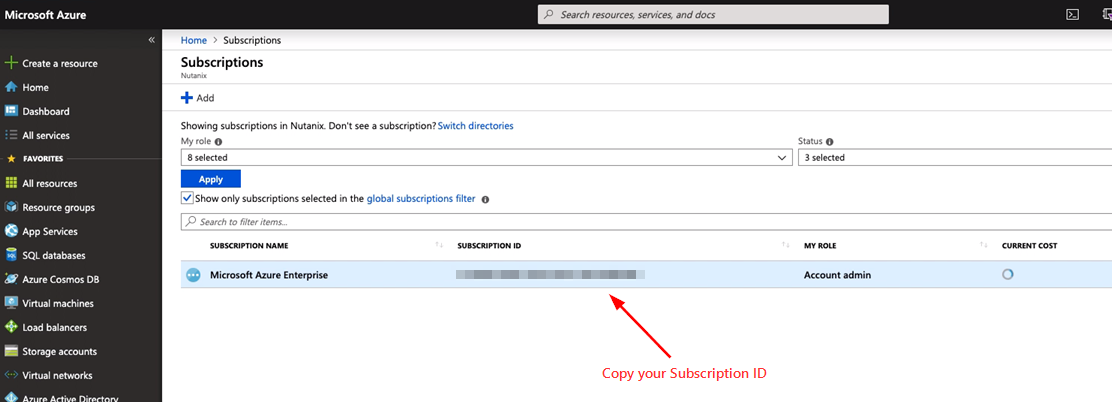
At the top of your Azure portal, search for “Subscriptions” and click on the first option that appears.
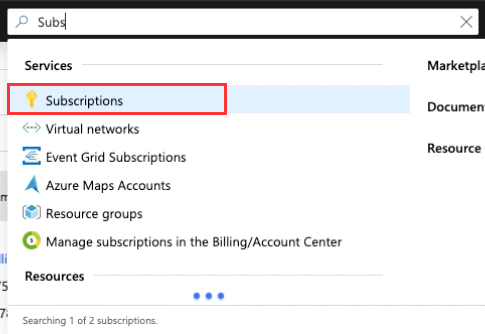
Azure Portal - Subscriptions Find the subscription that you will use with Frame. Copy the Subscription ID and set it aside to be used in the final steps of this guide.
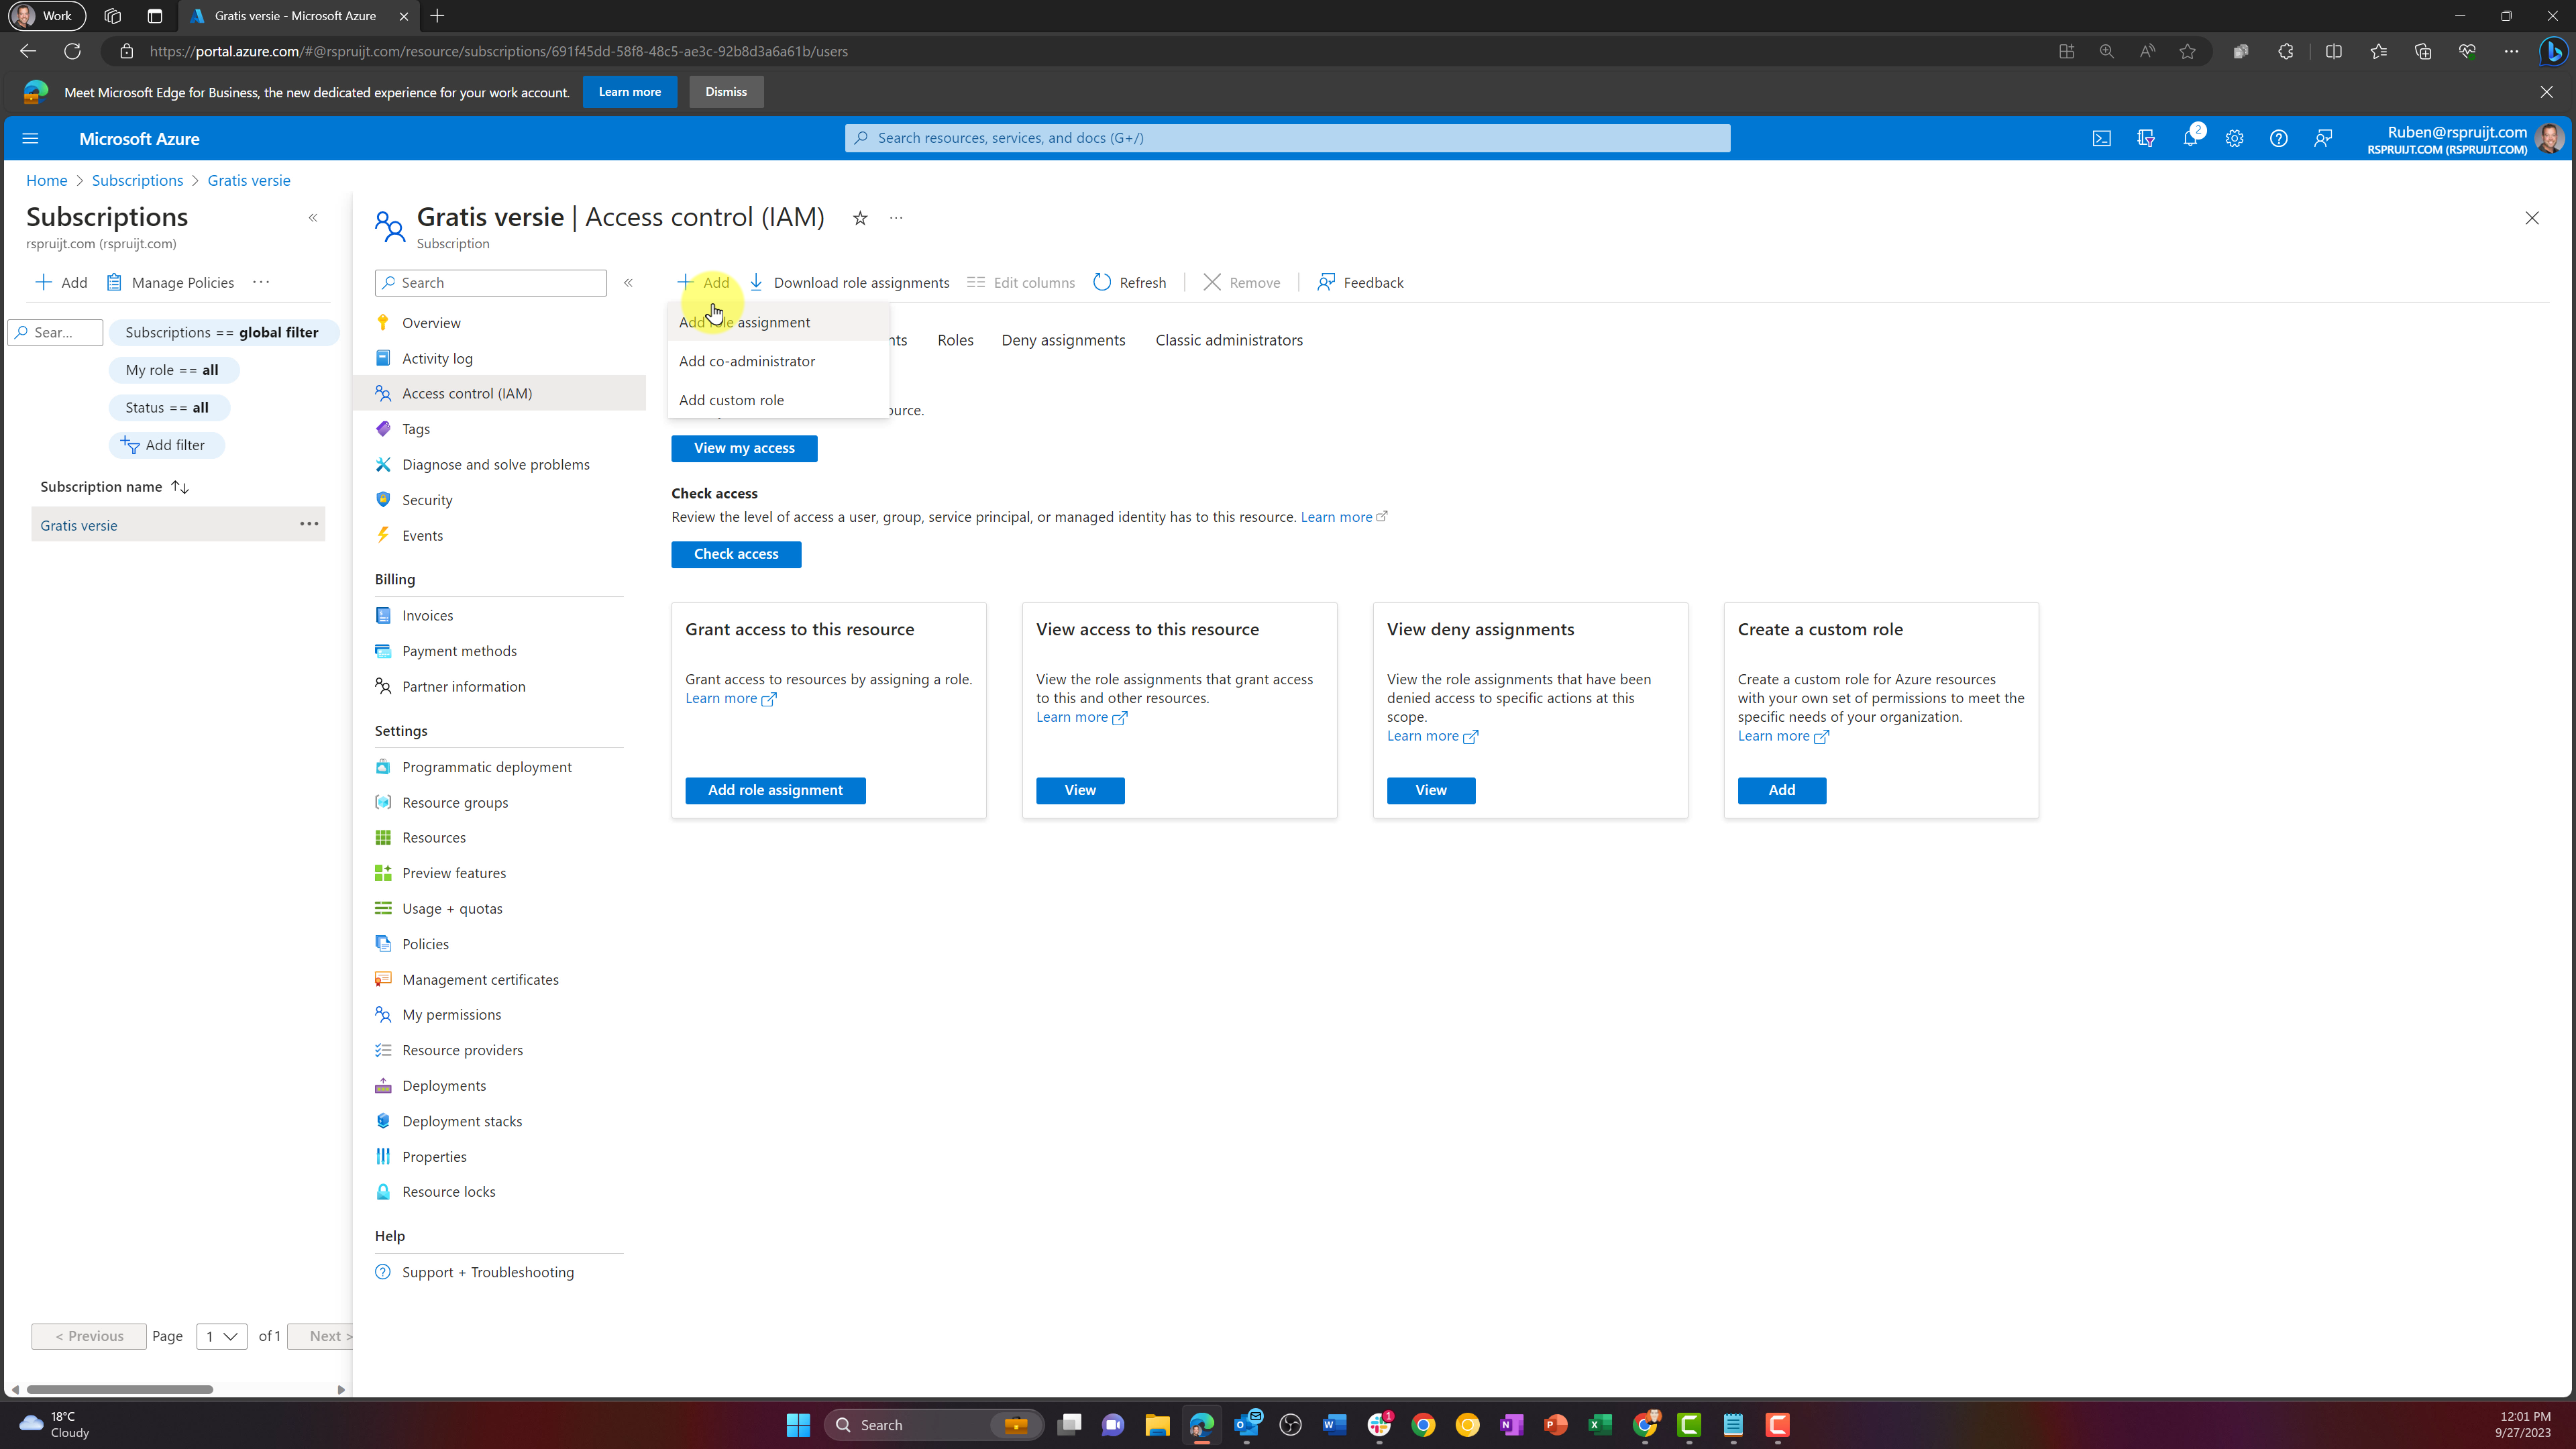
Azure Portal - Subscription ID Now, click on the subscription to open its properties. Click on the "Access Control (IAM)" page, and then click the "Add" button on the top of the Access Control panel. Select "Add role assignment."
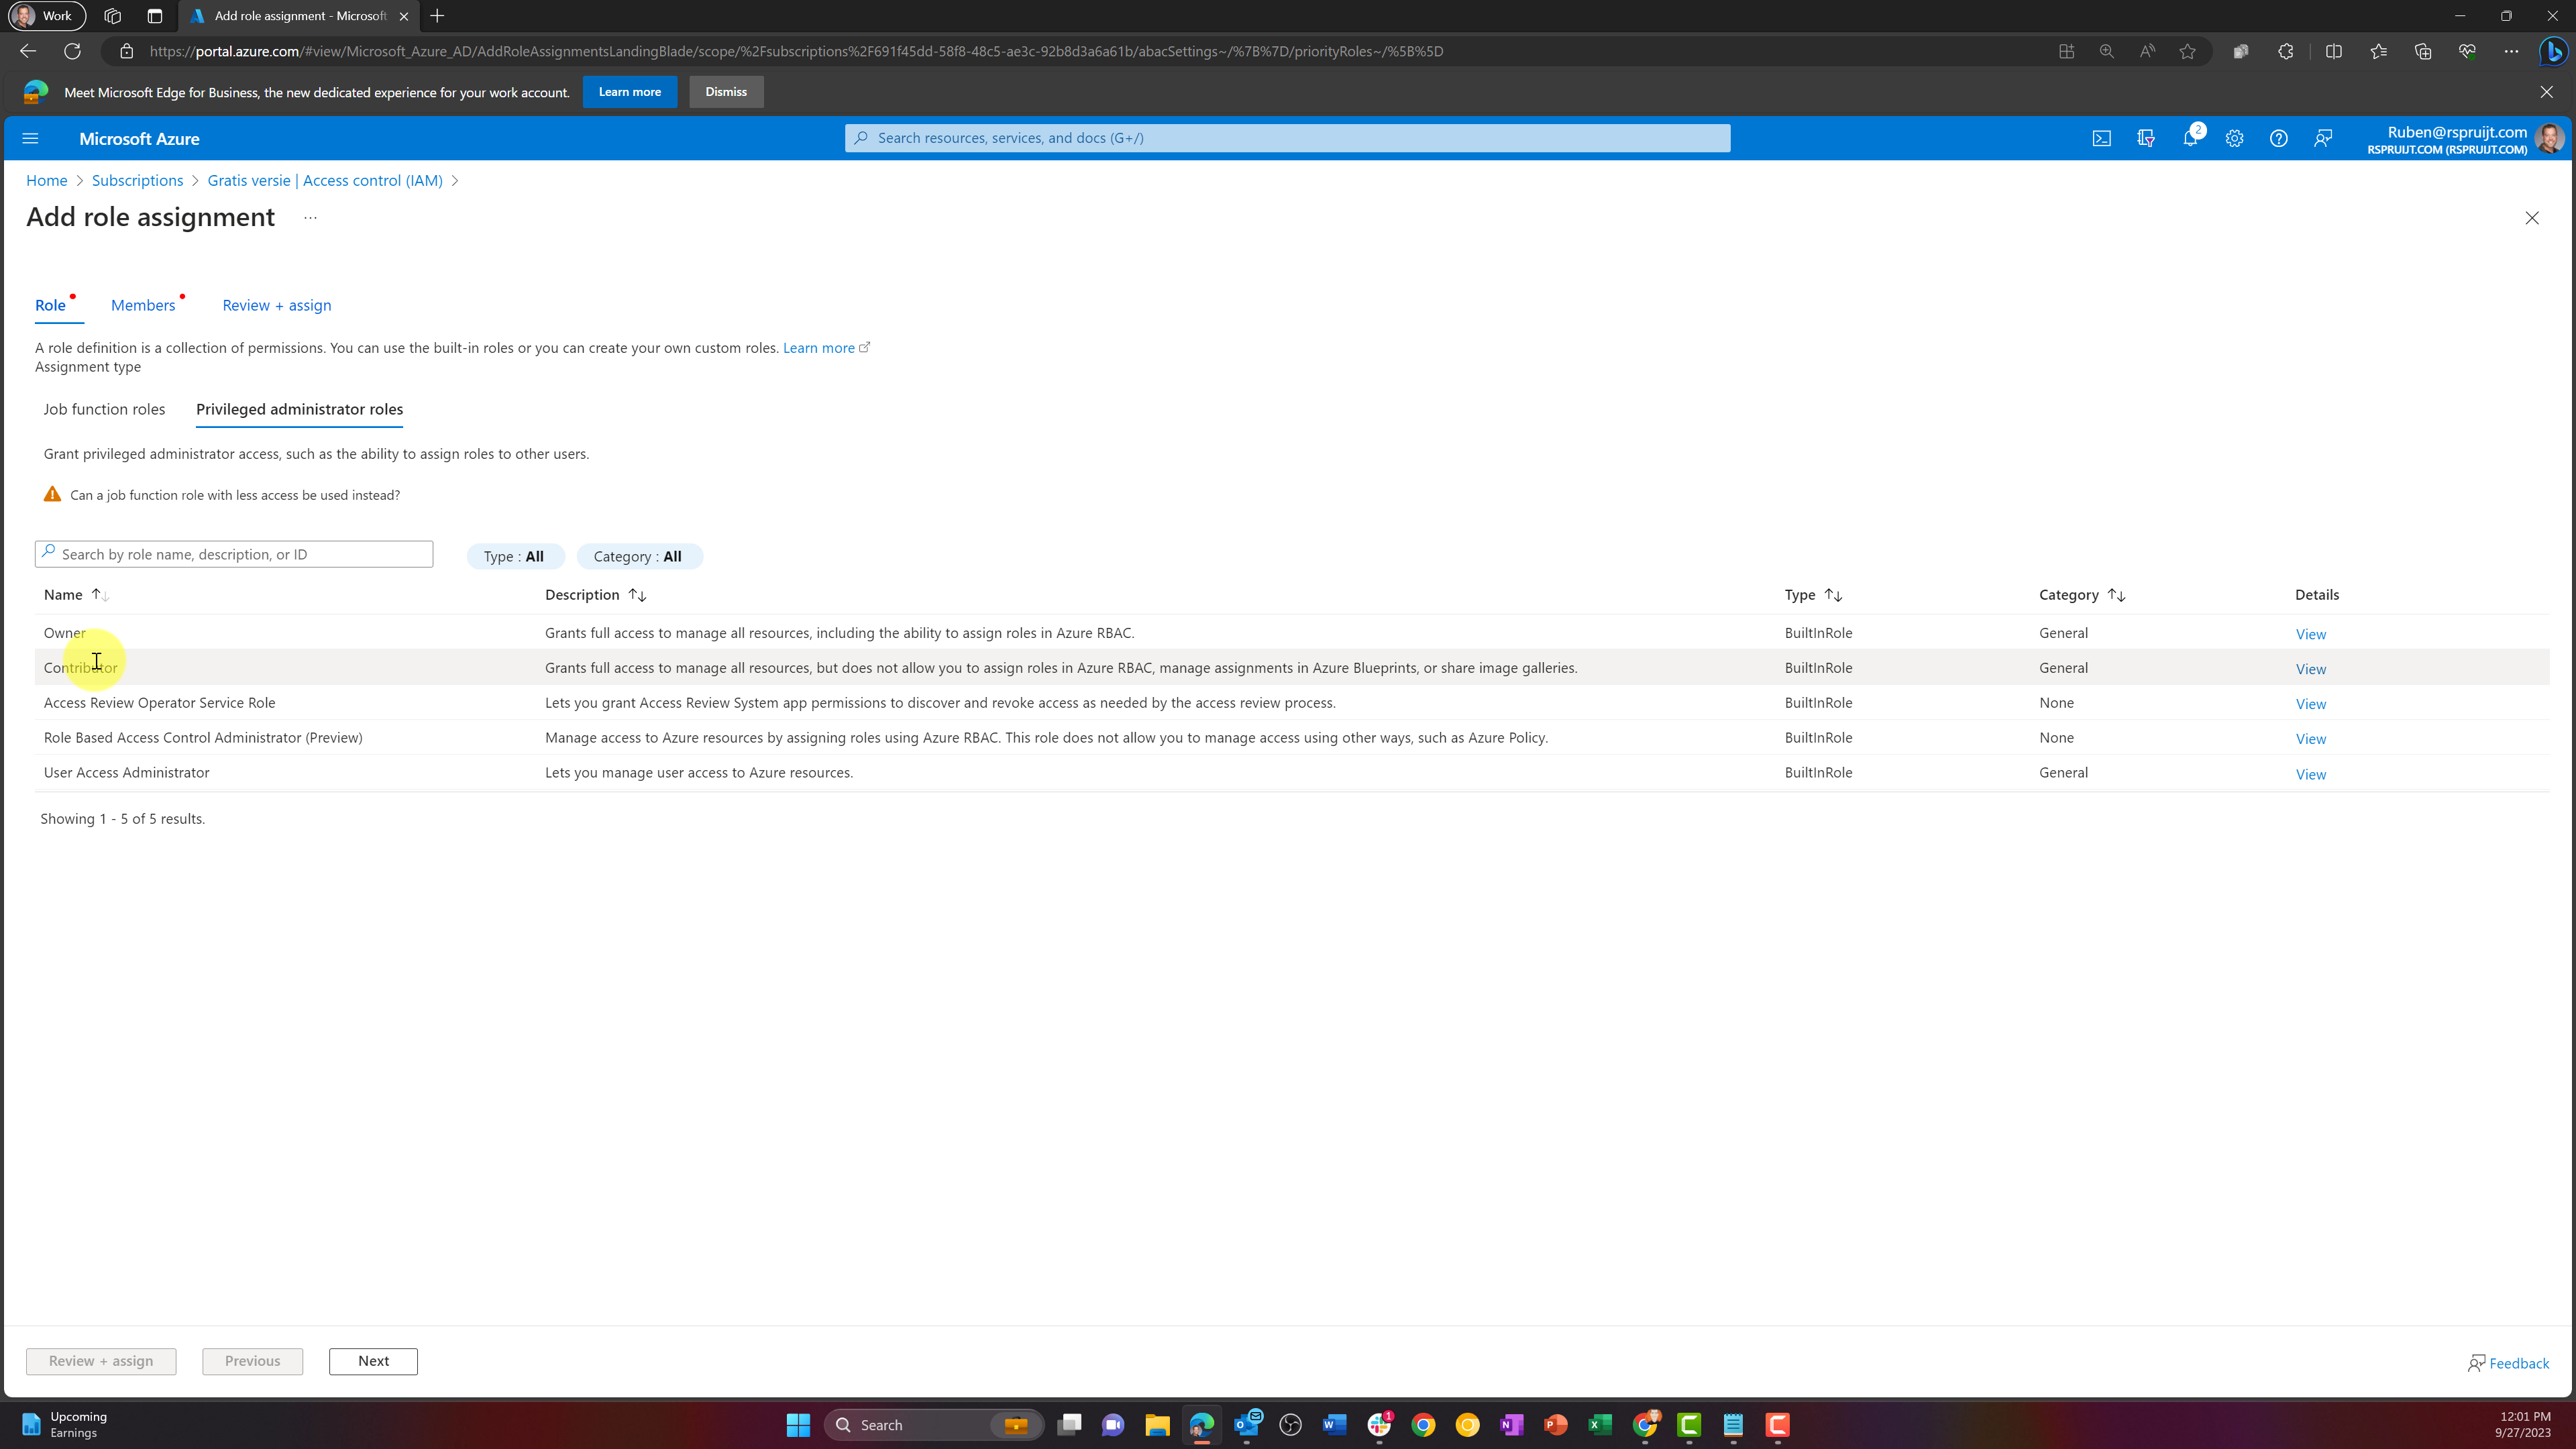
Azure Portal - Specify Role Assignment A new window will appear. On the Role tab, select “Owner” or “Contributor” from the Privileged administrator roles tab.
Azure Portal - Specify Role Go to the Members tab.

Azure Portal - Specify Members - Assign access to: Select "User, groups or service principals"
- Members: Click on "+Select members", search for the name of app registration (in this example, it starts with Frame), and then select the app registration and click on the Select button.
Go to Review + assign tab and finish the process of assigning role to app registration by clicking on the "Review + assign" button.
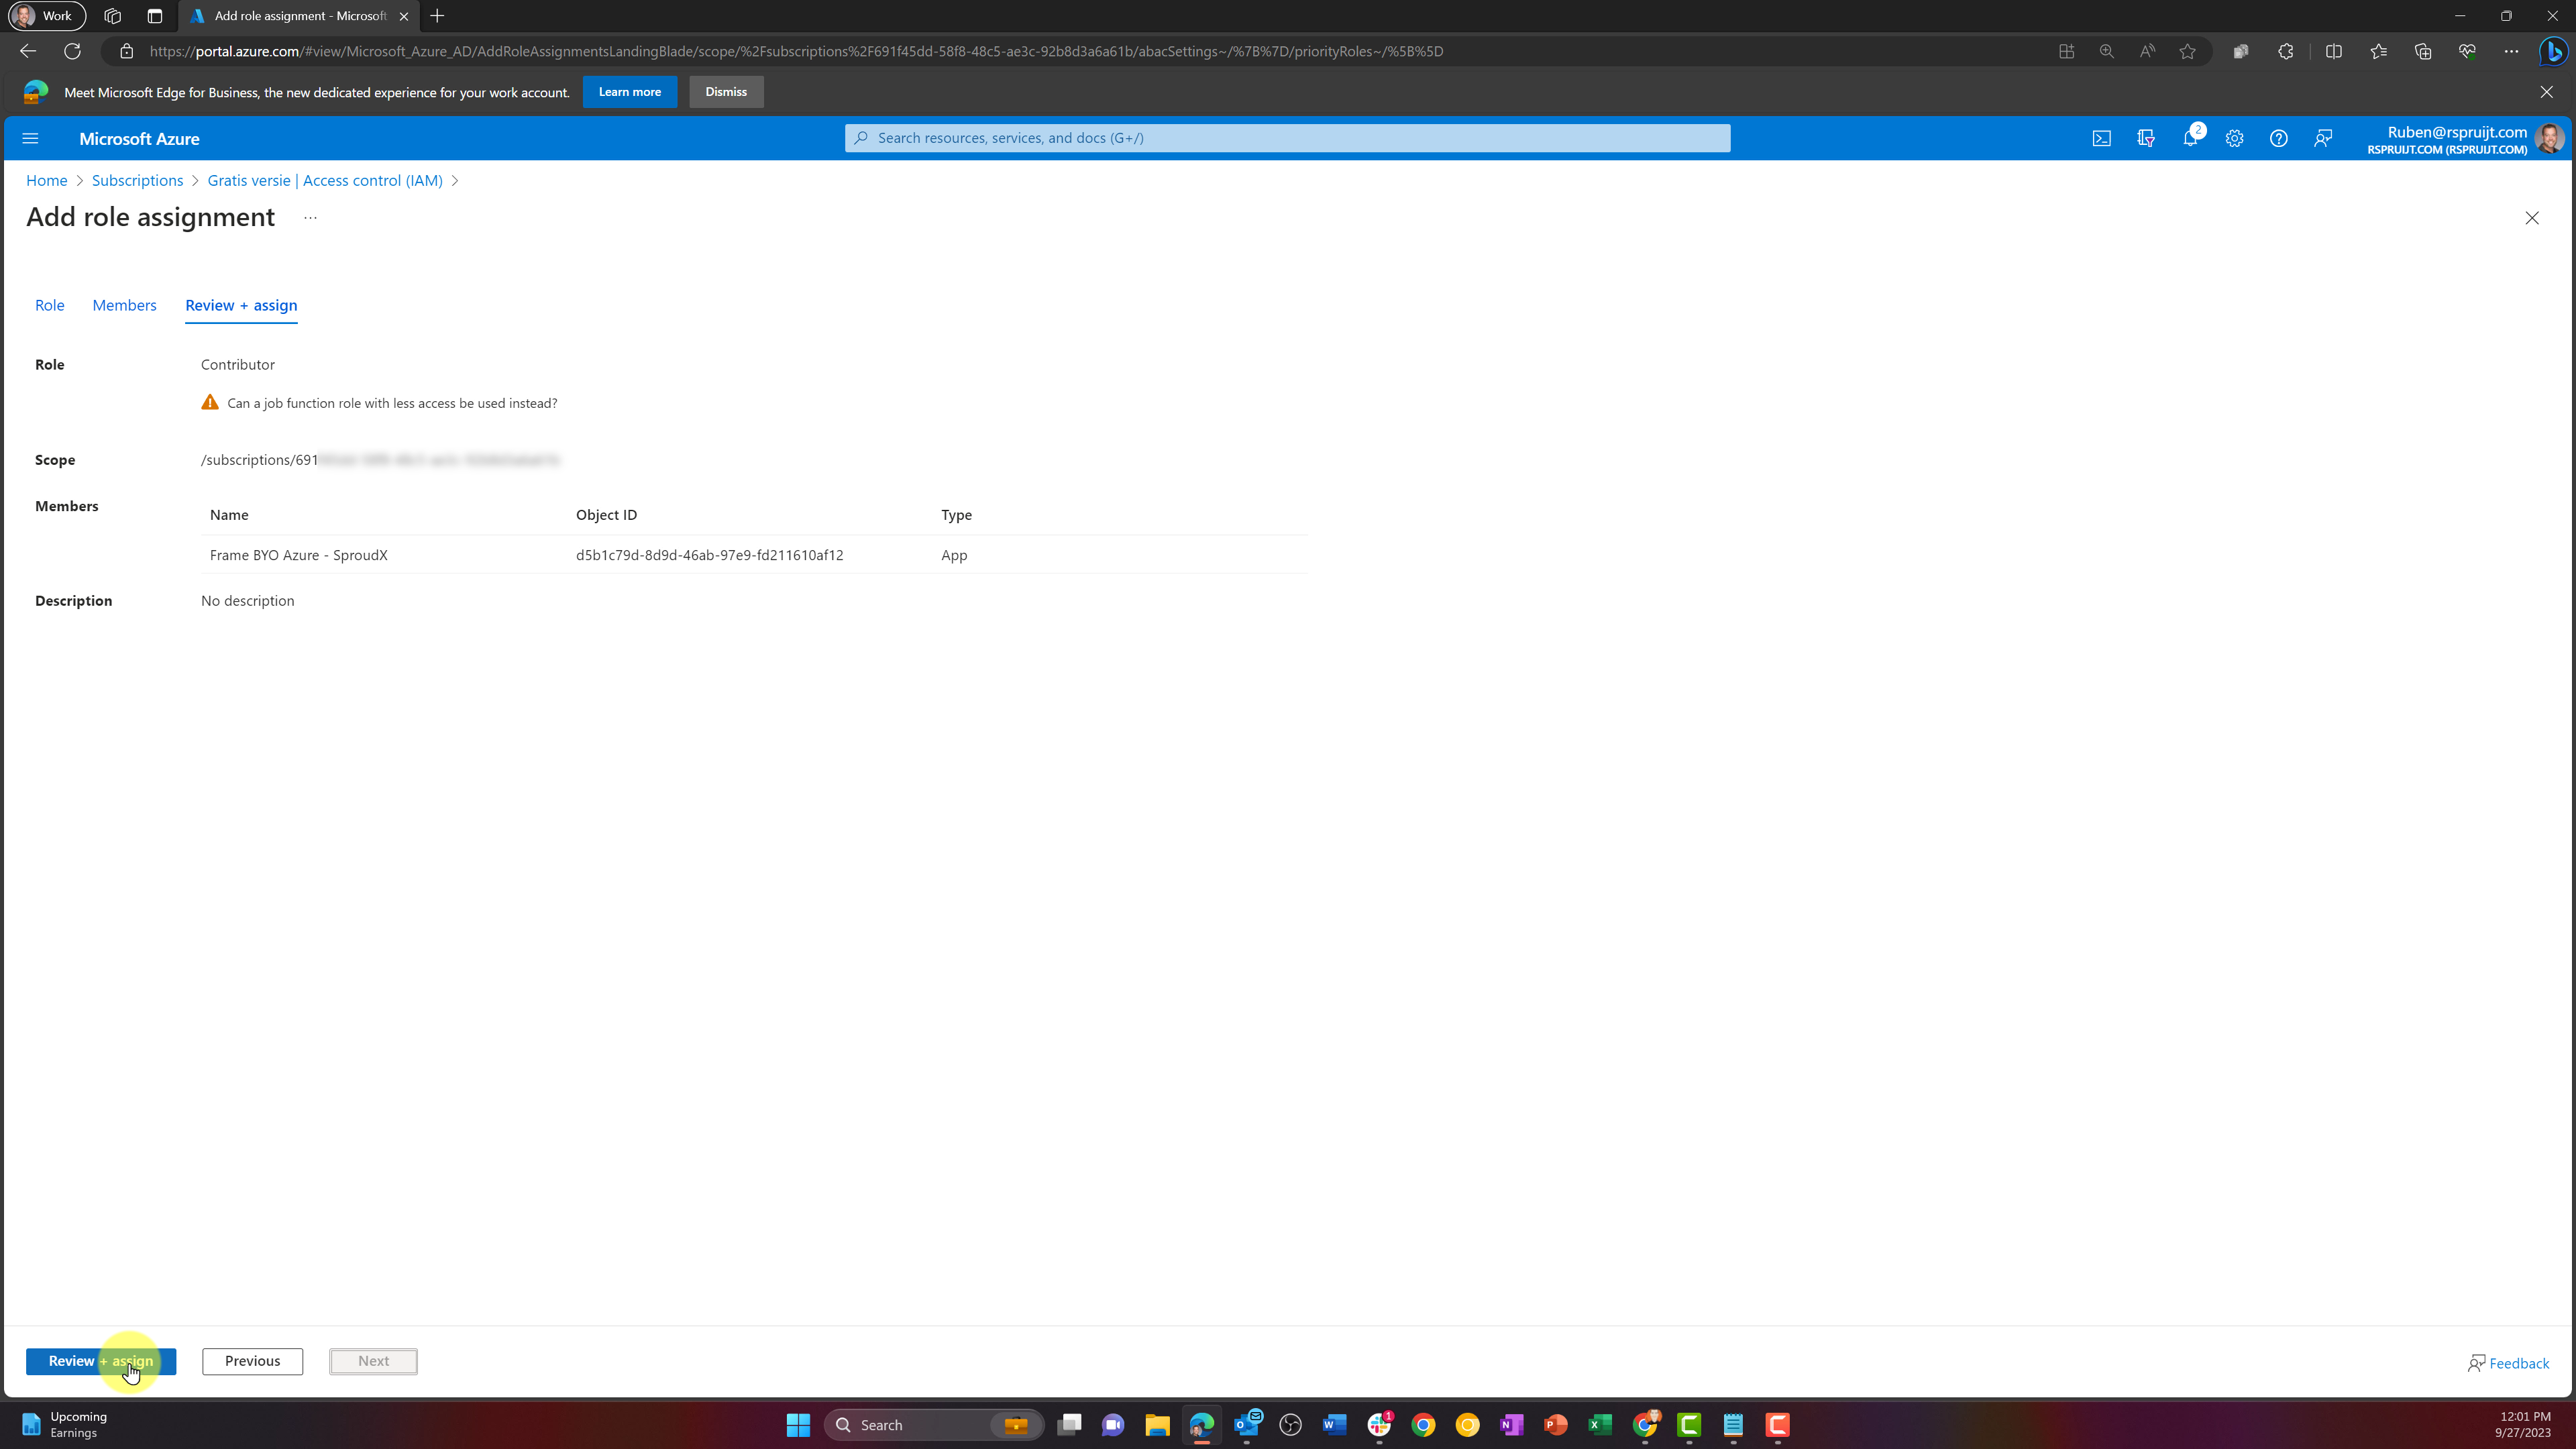
Azure Portal - Review and Assign Before moving on, ensure you have obtained the following values.
- Azure Application ID
- Azure Directory ID
- Azure Subscription ID
- Azure Client Secret
You will use these values for the Frame setup below.
Adding your Cloud Acount
Procedure
Go to your Frame Admin Console.
Navigate to the Customer or the Organization page (depending on where you wish to add the cloud account).
Click on Cloud Accounts in the left-hand menu.
Click the Add Cloud Account button on the top-right corner of the page.
A new window will appear prompting you for the following information:
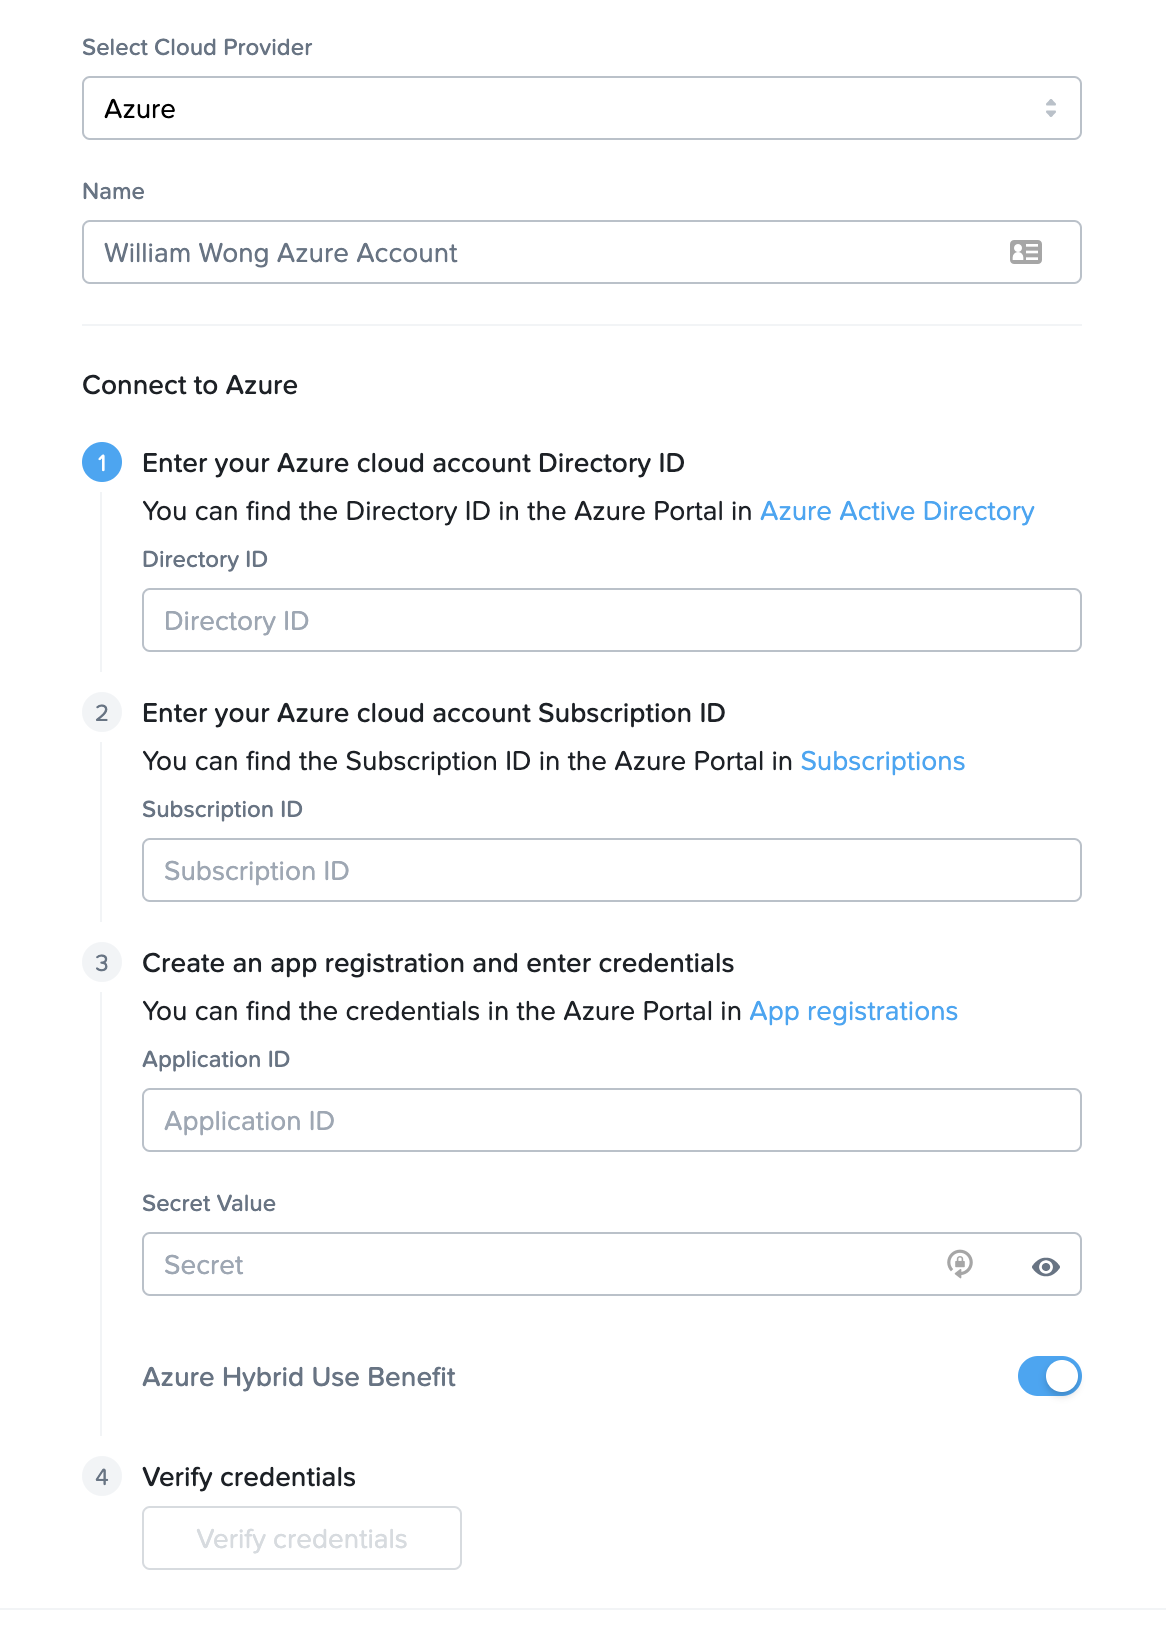
Frame Console - Add Cloud Account - Cloud Provider: Select Azure.
- Name: Enter the desired name of your cloud service. This will be the name of the Cloud Account in Frame Console.
- Directory ID: Enter the Azure Directory ID.
- Subscription ID: Enter the Azure Subscription ID.
- Application ID: Enter the Azure Application ID.
- Secret: Enter the Azure Secret key value.
- Azure Hybrid Use Benefit: Enable if your Microsoft Azure Agreement entitles you to have Azure Hybrid Use Benefit.
Once you have entered the information, click the “Verify credentials” button.
Once your credentials are verified, you can select the data centers (Azure regions) for your Frame accounts. You may add additional data centers in the future.
Check the box at the bottom informing you of possible resource usage on your Azure cloud infrastructure and then click "Add Account". After a few minutes, you will see your Azure Cloud Account listed as "Ready".
Now that your Azure Cloud Account is created and accessible within Frame, you will be able to create Frame accounts using this BYO cloud account. Be aware that the first Frame account created in an Azure datacenter region may take 30+ minutes as Frame Platform must copy the Nutanix-provided OS images to the Azure datacenter before the Frame account is created.
Subscription Configurations
Resources Created During BYO Azure Cloud Account Creation
Frame provisions a single storage account for every datacenter region selected upon cloud account creation. The Frame-provided OS master images (Windows 10, Windows Server 2016, Windows Server 2019, Ubuntu 20.04, etc.) are copied to each storage account and will be used when the first Frame account is created in that region.
Service Limits
By default, a newly created Azure account will impose certain service limits on available resources. Depending on the number of the Frame workload VMs required of a given machine family (e.g., number of concurrent users on NV6), how the Frame account is created (e.g., Frame networking with or without an SGA), and whether you use Publish or Quick Publish, you will likely need to adjust the default limits imposed by Microsoft on the Azure account. If these limits are set to values that are lower than what is required by the Frame platform, you can expect certain functions to either fail, or be substantially delayed. The requirements by Frame for these service limits depends on the desired workload and required resources. The recommended service limit increases include the following:
| Azure Resource | Recommendation |
|---|---|
| Virtual Machines-Family vCPUs (CPU-only and GPU instance types) | Azure has quotas on the total number of vCPUs and the total number of family-specific vCPUs, on a per-location basis. We recommend you first determine the expected max number of instances by instance type (per Frame account) for your needs. Next, calculate the number of vCPUs and family-specific vCPUs based on the expected max number of instances and the required number of vCPUs per instance type (for that family). If you use Publish, set your vCPU quota to 2.2 times the required number of vCPUs and specific family-specific vCPUs quotas to 2.2 times your expected max number of instances. The additional 20% will accommodate any additional resources such as Sandboxes, Utility servers, etc. If you use Quick Publish, you can use a minimum factor of 1.X times to calculate the required number of vCPUs and family-specific vCPUs. X is computed as the “Number of production instances created on publish” divided by expected max instances. By default, the “Number of production instances created on publish” value is configured to be 10 VMs. A factor of 1.3-1.5 should be sufficient to account for typical Quick Publishes and overhead. |
| Azure Managed Disks | Typically, this resource quota does not need to be modified. To estimate total disk storage consumption, multiply the total number of VMs you expect to provision by the size of the Sandbox VM (e.g., Windows 10 images 128 GiB; Windows Server images 64 GiB) across all Frame accounts you plan to provision. Number and size of any utility servers, number of Sandbox image backups, number and size of personal drives, and number and size of enterprise profile disks would be additional storage to consider. |
| Public IPs | If a Frame account is created with Frame public networking, each workload VM will have both a public and private IP address. If the Frame account is created using Frame private networking, all workload VMs will only have private IP addresses. If the Frame account is created using Frame private networking with Streaming Gateway Appliance (SGA), then you will need 1 public IP address for each SGA VM (and 1 public IP address for the load balancer in front of the SGA VMs). All of the workload VMs will only have private IP addresses. You will also need to account for the temporary increase of public IP addresses during a Publish or Quick Publish when the new production VMs are created and before the old production VMs are terminated. |
| VNets | If Frame public networking or Frame private networking is used to create Frame accounts, the number of VNets equals the number of Frame accounts. If Frame private networking with SGA is used to create Frame accounts, the required number of VNets is two times the number of Frame accounts. For BYO networking, no new networks are created. |
Service limit increases may not be necessary for smaller production environments or trial accounts.
Instance Types
Each IaaS provider has a unique naming scheme for their instance types. Azure names their instance types based on the "virtual machine type" Microsoft has created for specific workload use cases. More information about virtual machine types can be found in Microsoft's official documentation.
For the latest Azure instances supported by Frame, refer to the Dizzion Pricing Page.
Promotional instances provided by Microsoft by default are not supported by Frame. If you wish to use an account with an existing promotion, you will need to either exhaust promotional hours first or contact Azure support to remove those instances.
Resource Naming
Frame provisions the resources below based on a specific naming convention. The resource name value is also saved as value for the tag Name.
| Resource | Resource Name | Example |
|---|---|---|
| Vendor resource group | azr-prod-v{vendor_id}-instances-{3_digits} | azr-prod-v53273-instances-001 |
| Workload VM | azr-prod-v{server.vendor_id}-s{server.id} | azr-prod-v53209-s8059811 |
| Workload VM root volume | azr-prod-v{server.vendor_id}-s{server.id}-root | azr-prod-v53209-s8059811-root |
| User Volume | azr-prod-v{server.vendor_id}-d{disk.id}-{random 5 characters}-{disk_type} | azr-prod-v53273-d170923-857e4-profile |
| User Volume backup (Snapshot) | azr-prod-v{vendor_id}-{user_volume_id}-{snapshot_type}-{random 5 characters} | azr-prod-v53273-6f4ee921-profile-d1101 |
| Image (Snapshot) | azr-prod-v{vendor_id}-s{server_id}-{random 5 characters}-{snapshot_type} | azr-prod-v53273-s8066212-6afc7-publish |
| Master Image | azr-prod-v{vendor_id}-s{server_id}-{random 5 characters}-{snapshot_type} | azr-prod-v53273-s8066212-6afc7-publish |
| VNET | azr-prod-v{vendor_id}-vnet-{random 5 characters} | azr-prod-v53273-vnet-c56be |
| VNET resource group | prod-vnets-{azure_region} | prod-vnets-eastus |
| Subnet | azr-prod-v{vendor_id}-sn-{random 5 characters} | azr-prod-v53273-sn-42423 |
| Security group | azr-prod-v{vendor_id}-sn-{random 5 characters} | azr-prod-v53273-sg-da34f |
| SGA resource group | azr-prod-sga-{random 4 characters} | azr-prod-sga-2431 |
| SGA availability set | sga-availability-set-c{streaming_configuration_id} | sga-availability-set-c2431 |
| SGA load balancer | azr-prod-sga-{streaming_configuration_id}-lb | azr-prod-sga-2431-lb |
| SGA load balancer public IP | azr-prod-sga-{streaming_configuration_id}-lb-ip | azr-prod-sga-2431-lb-ip |
| SGA VNET | azr-prod-sga-{streaming_configuration_id}-vpc | azr-prod-sga-2431-vpc |
| SGA security group | azr-prod-sga-{streaming_configuration_id}-vpc-sg-default | azr-prod-sga-2431-vpc-sg-default |
| SGA VM | azr-prod-sga-{workload_streaming_configuration_id}-s{random 8 characters} | azr-prod-sga-2431-s0f532a75 |
| SGA VM root disk | azr-prod-sga-{workload_streaming_configuration_id}-s{random 8 characters} | azr-prod-sga-2431-s0f532a75 |
{snapshot_type} can be one of the following values:
manual- for manual backupspublish- for backups created for publishing purposetest_publish- for backups created for test publishauto- for scheduled backupssystem- for backups created internally in various processes (e.g. cloning, generalization)master- from a master image
{disk_type} can be one of the following values:
profile- Enterprise profile diskpersonal- Personal drive
The Streaming Gateway Appliance (SGA) resource naming applies only to Frame-provisioned and managed SGAs.
Disk Options
Frame supports two types of Azure-managed disk types. By default, Frame provisions Standard SSD-managed disks for VM boot disks and user volumes.
If a customer needs higher performing, low-latency disks for a given Frame account, the customer can contact Support and request that the Frame account be re-configured to use Premium SSD managed disks for VM boot disks and user volumes. Azure Premium SSDs do cost more than Standard SSDs.
Disks of a particular type that were provisioned prior to the disk type configuration change will remain as they were provisioned. Therefore, customers are advised to create the Frame account, request Support update the disk type to the desired disk type, and terminate the Sandbox, in order for the Sandbox disk to be re-created with the newly-configured disk type. Then, verify the Sandbox disk was provisioned with the desired disk type before continuing on to configure the Frame account, including installing applications in the Sandbox and publishing.