Nutanix AHV
Requirements
In order to register your AHV cluster with Frame, you need to ensure that you have addressed the following before proceeding:
The Nutanix hyperconverged cluster must have:
- Acropolis Operating System (AOS) 5.15 LTS (minimum), 5.20.1 LTS (recommended) or newer
- Acropolis Hypervisor (AHV) compatible with the cluster hardware and AOS version
- Prism Central 2021.9 or newer, with your Prism Central VM configured with at least 26 GB of RAM
For further details on the supported combinations of AOS, AHV, and Prism Central for a given Ubuntu or Windows guest OS, consult with Nutanix's AOS Software Interoperability Matrix and AHV Guest OS Compatability and Interoperability Matrix.
noteFrame, unlike other Nutanix services hosted on a Prism Central-managed cluster, does not require any additional compute resources for Prism Central. Frame uses:
- Prism Central APIs to query categories, obtain the list of template images tagged with Frame-specific categories, and query for the list of available VLANs in the AHV cluster.
- Prism Element APIs to manage AHV cluster-based resources (e.g., provision/deprovision VMs/storage, power on/off VMs, attach/detach disks, replicate backups, etc.)
For sizing the Prism Central VM, consider your specific number of virtual machines across your AHV cluster(s). Refer to the Nutanix KB article as a reference for right sizing your Prism Central VM.
If vGPUs are to be used, then the following NVIDIA components must be installed, as documented in the Nutanix AHV Administration Guide:
- NVIDIA vGPU Software License Server with the necessary NVIDIA license file
- NVIDIA GRID vGPU Host drivers
- NVIDIA GRID vGPU Guest OS drivers
AHV-compatible host drivers are available for download from Nutanix Portal. All other NVIDIA components are obtained via NVIDIA Licensing Software Downloads site.
Network has been configured for the AHV cluster to communicate with the Frame control plane and for users to access the workload VMs on the AHV cluster following one of two network deployment models, as described in Private Networking or Private Networking with SGA.
DHCP must be available for the Frame workload VMs.
At least one template OS image installed with Frame Guest Agent.
Supported NVIDIA GPUs
Frame supports the following NVIDIA GPUs with Nutanix AHV.
- M10
- M60
- P4
- P40
- P100
- T4
- RTX 6000
- RTX 8000
- A16
- A40
Depending on the specific HCI hardware model and the Nutanix AHV/AOS version to be used, the hardware and/or AHV version may or may not support all of the GPU cards above.
Preparation
Adding your AHV cluster to your Frame customer or organization entity in order for you to create Frame account(s) on your AHV cluster requires the following 3 tasks:
- Preparing your Nutanix AHV cluster
- Preparing at least one template image
- Connecting your AHV cluster to Frame
This section discusses the two preparation tasks that are required before you can connect your AHV cluster to Frame.
Nutanix Cluster
You will start by creating one (1) Prism Element user account and one (1) Prism Central user account to be used by Frame for provisioning and infrastructure management.
Prism Element service user
You will need to create a new user account from the Prism Element of the Nutanix AHV cluster which will be used for Frame desktops and applications. Log in to your Prism Element Management Console and access the Prism Element settings by clicking on the gear menu in the top right corner of the management console.
Click on "Local User Management" from the menu on the left-hand side. Click the “New User” button.
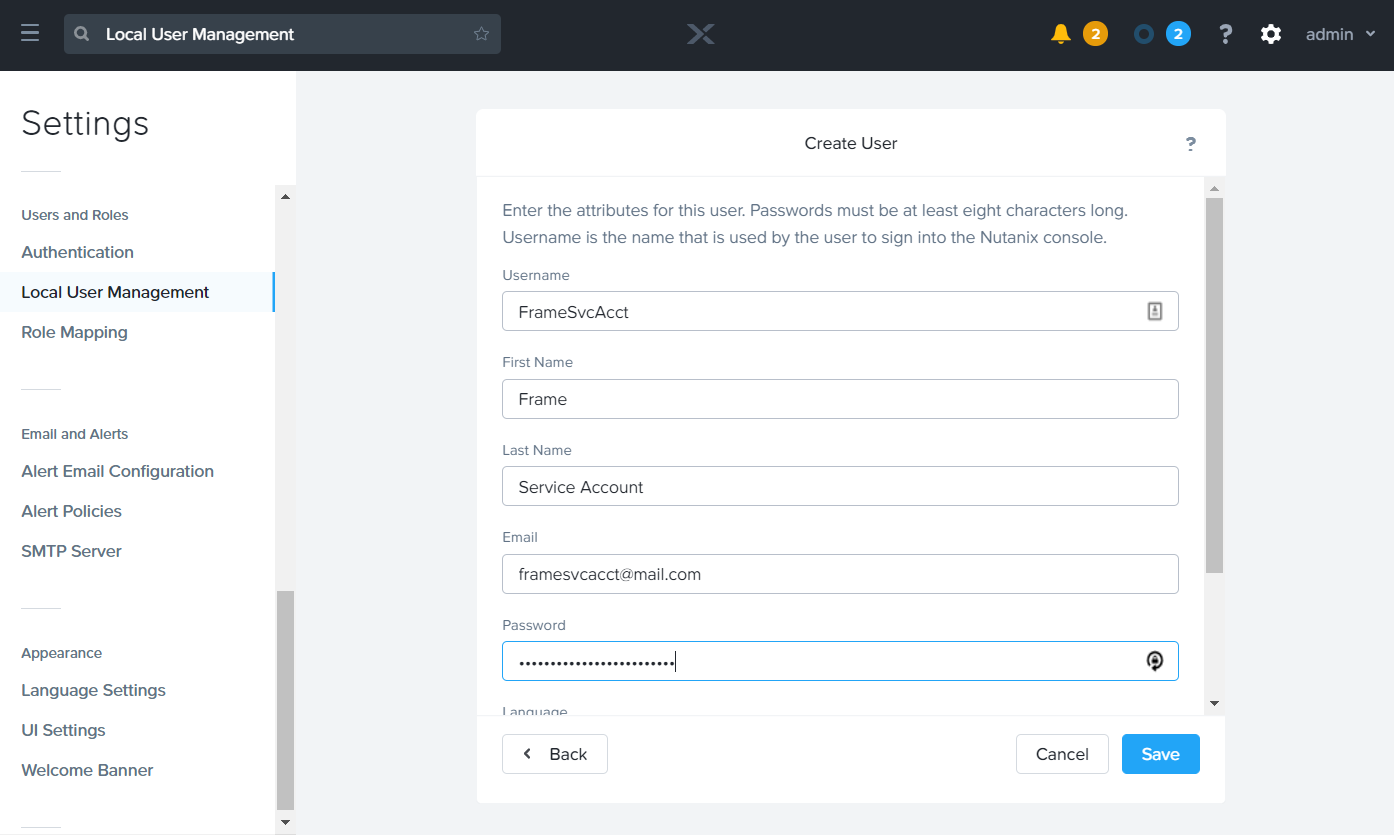
Prism Element - Create User Fill out the "Create User" form that appears.
Ensure that both "User Admin" and "Cluster Admin" boxes are checked before submitting the information.
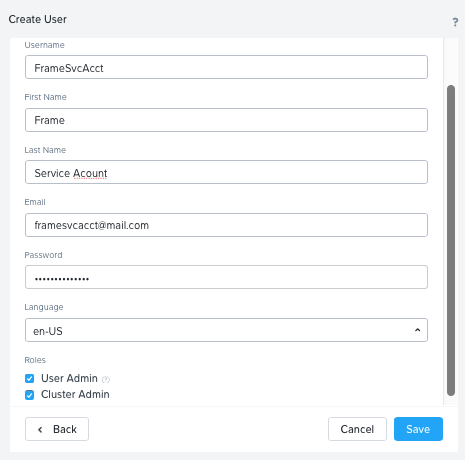
Prism Element - Enable User Roles Save your Prism Element user name and password. You will need this Prism Element user name and password later on in the process.
Prism Central service user
Log in to your Prism Central Management Console and go to your Prism Central settings by clicking on the gear menu in the top right corner of the management console.
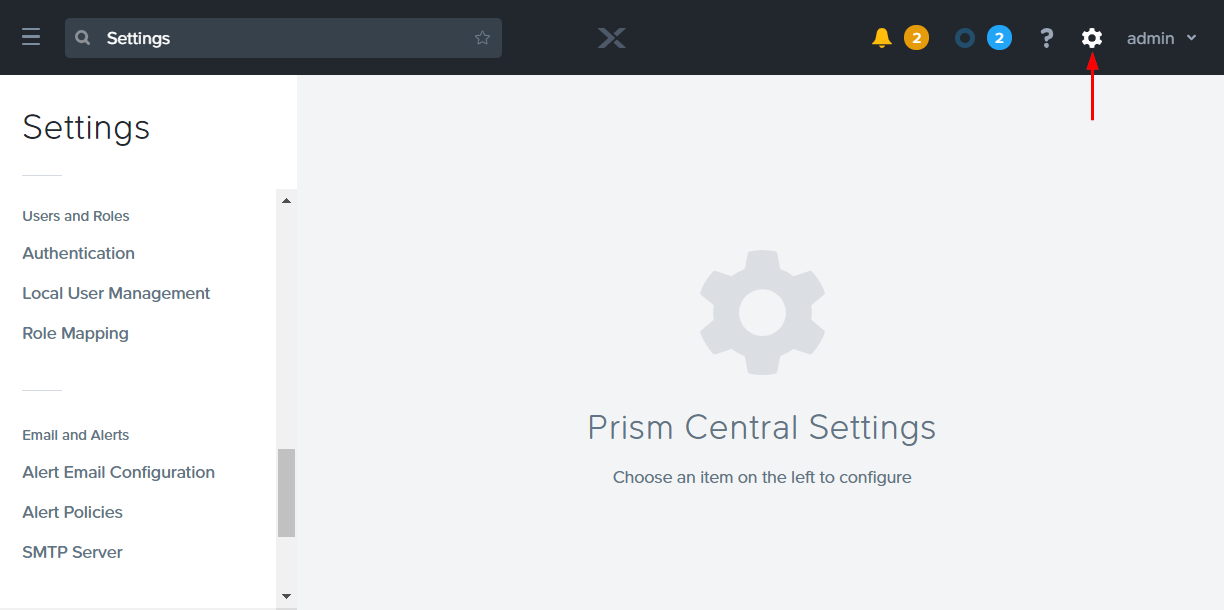
Prism Central - Settings Click on “Local User Management” from the menu on the left-hand side. Click the “New User” button.
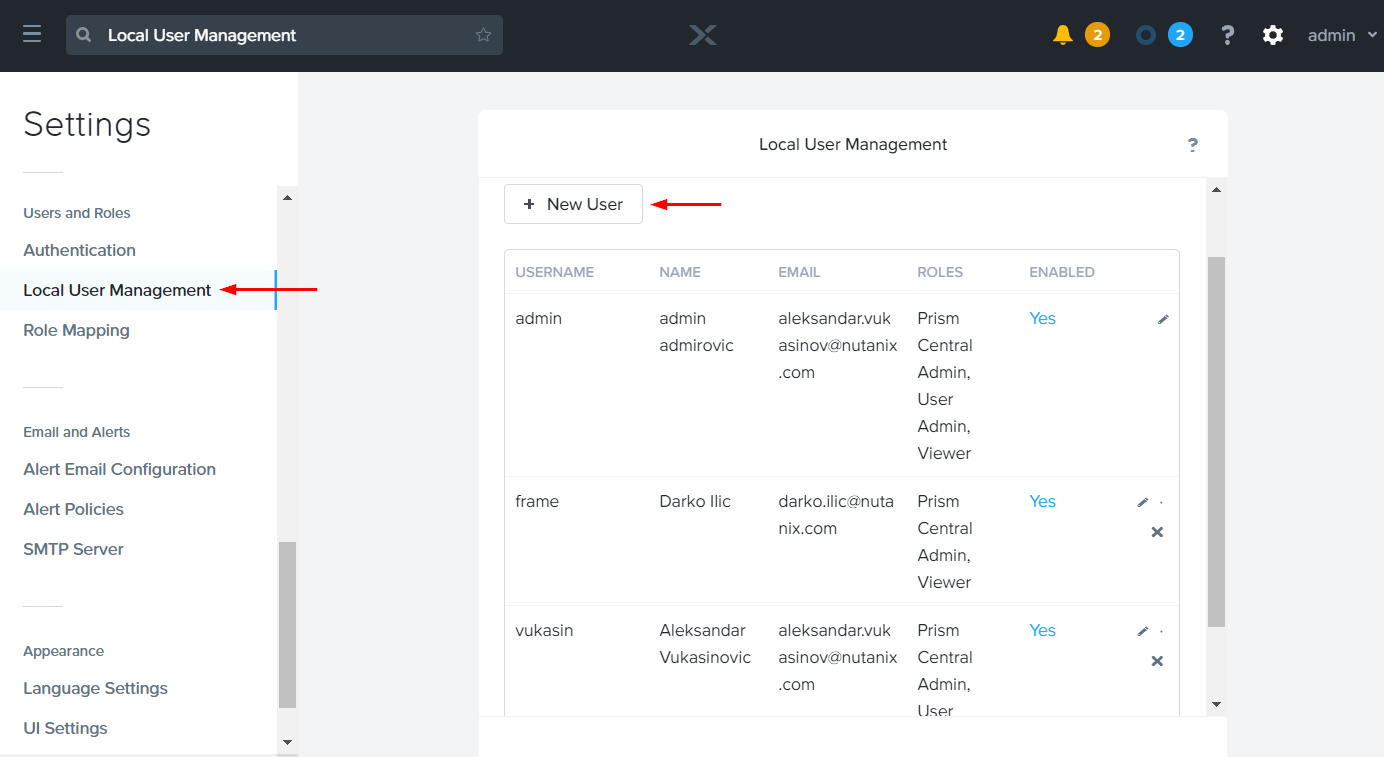
Prism Central - Local User Management Fill out the “Create User” form that appears.

Prism Central - Create User Ensure that both "User Admin" and "Prism Central Admin" boxes are checked before submitting the information.
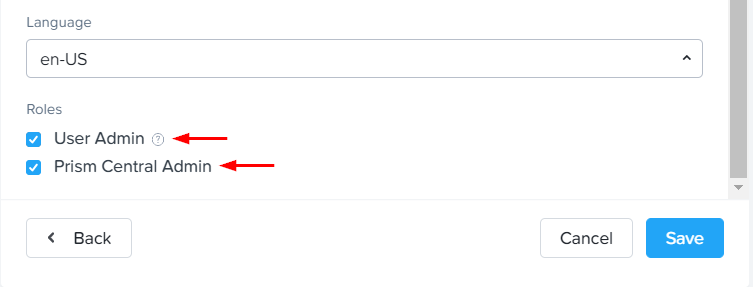
Prism Central - Enable User Roles Save your Prism Central user name and password. You will need this Prism Central user name and password later on in the process.
Prism Central Categories
Click on the hamburger menu icon in the upper left portion of your Prism Central interface.
Expand the "Administration" menu item and select "Categories."
Click on the "New Category" button.
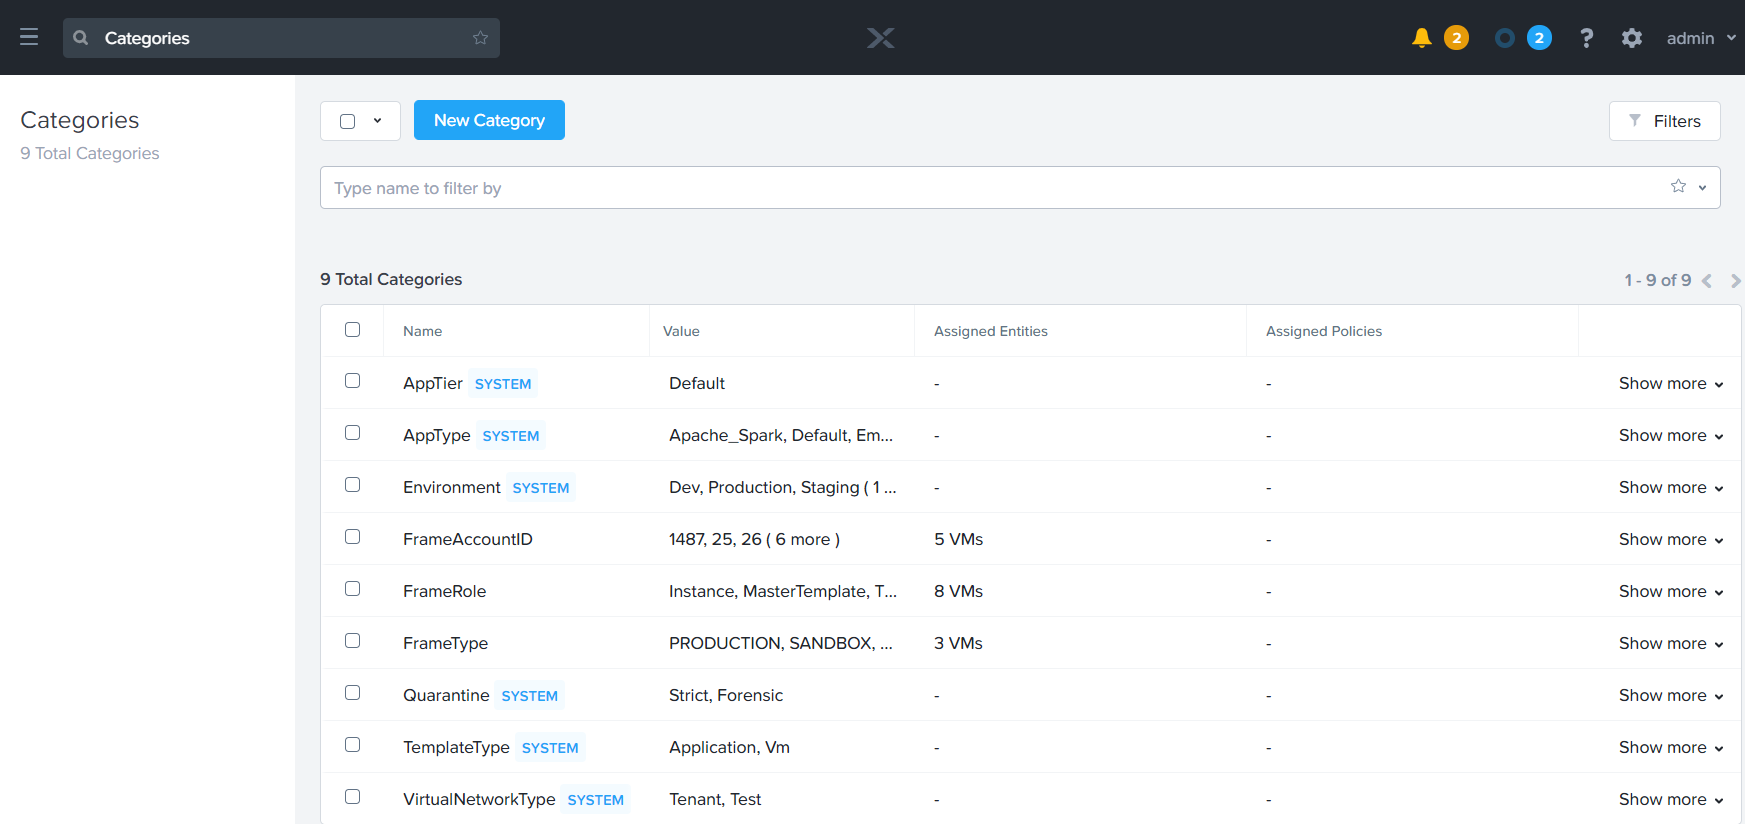
Prism Central - Categories Fill in the form with the following values:
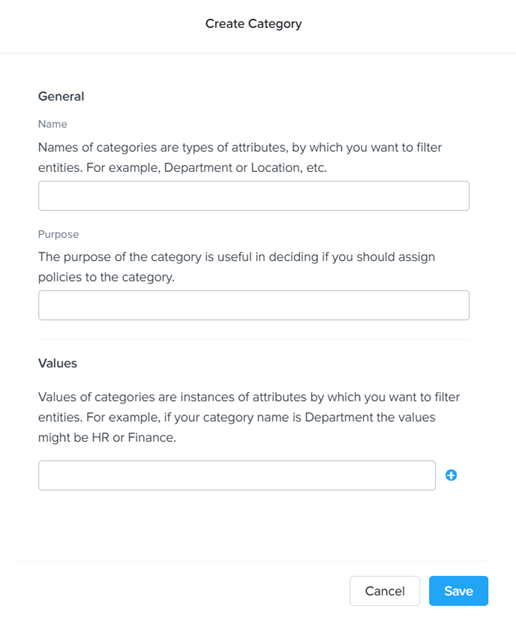
Prism Central - Create Category
- Name:
FrameRole - Purpose:
Categorizes VMs as Frame managed workload VMs - Values:
Instance,Template, andMasterTemplate- Add each value on separate lines using the plus symbol.
- Click "Save" to save your first Category defintion.
- Create a second Category with the following values:
- Name:
FrameGuestAgentKind - Purpose:
Categorizes VMs using Frame Guest Agent - Values:
fga
- Click "Save" to save your second Category defintion.
Both categories are critical to enable Frame control plane to orchestrate Frame-mananged workload VMs and to identify the template images use for creating Frame accounts on Nutanix AHV clusters. Adding your Nutanix AHV cluster to Frame will fail if these two categories are not created properly in Prism Central.
Template Image
Frame supports the use of Windows client/server operating systems and Ubuntu on Nutanix AHV. To bring a specific template OS image to Frame, refer to our BYO Image documentation for details on how to prepare one or more template OS images for Frame.
Adding your Cloud Acount
For customers who need to manually setup the Frame Cloud Connector Appliance (CCA) in your AHV cluster, refer to this guide.
Connecting your AHV Cluster to Frame
Once you have satisfied the prerequisites, you are ready to register your AHV cluster on Frame. Prism Central has a 1-click Connect to Frame feature which allows Nutanix AHV administrators to deploy one or more CCA VMs on your Nutanix AHV cluster hosting the Frame workload VMs.
Creating your Cloud Connector Appliance
Log in to Prism Central Managmeent Console. From your Prism Central drop-down menu on the left, click “Settings.”
Under the “Setup” section of the “Settings” menu, click “Connect to Frame.”
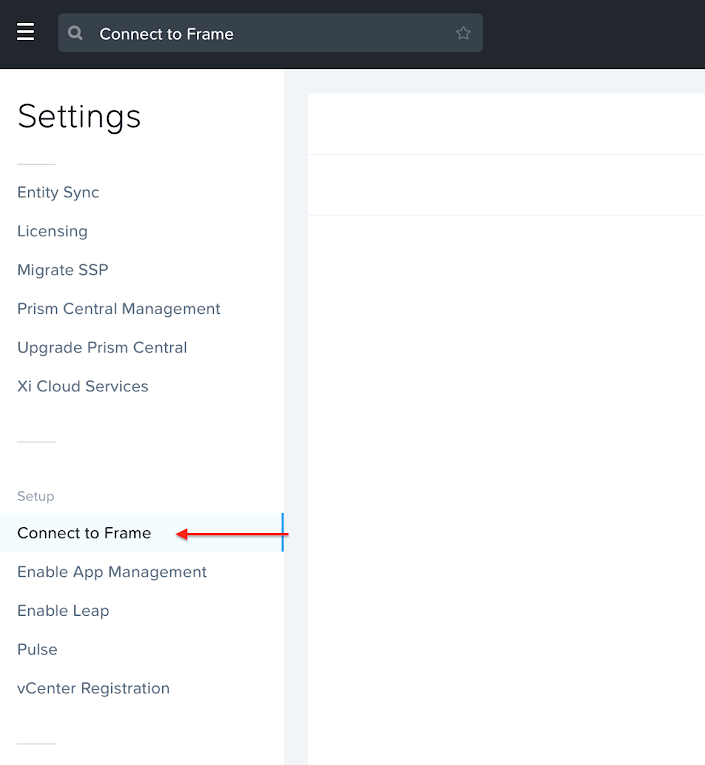
Prism Central - Settings cautionEach time "Connect to Frame" is clicked, Prism Central will attempt to provision a new CCA VM. Do not click the link more than once unless you wish to create more than one CCA VM. You can delete a CCA VM from Prism Central or Prism Element, provided:
- The AHV cluster has not yet been registered in Frame, or
- You have at least one working CCA VM after you delete a CCA VM for your AHV Cloud Account. Otherwise, you may cause a service outage with your Frame workload VMs as Frame control plane is unable to communicate with Prism Central and Prism Element through a functional CCA VM.
On this page, specify the following:
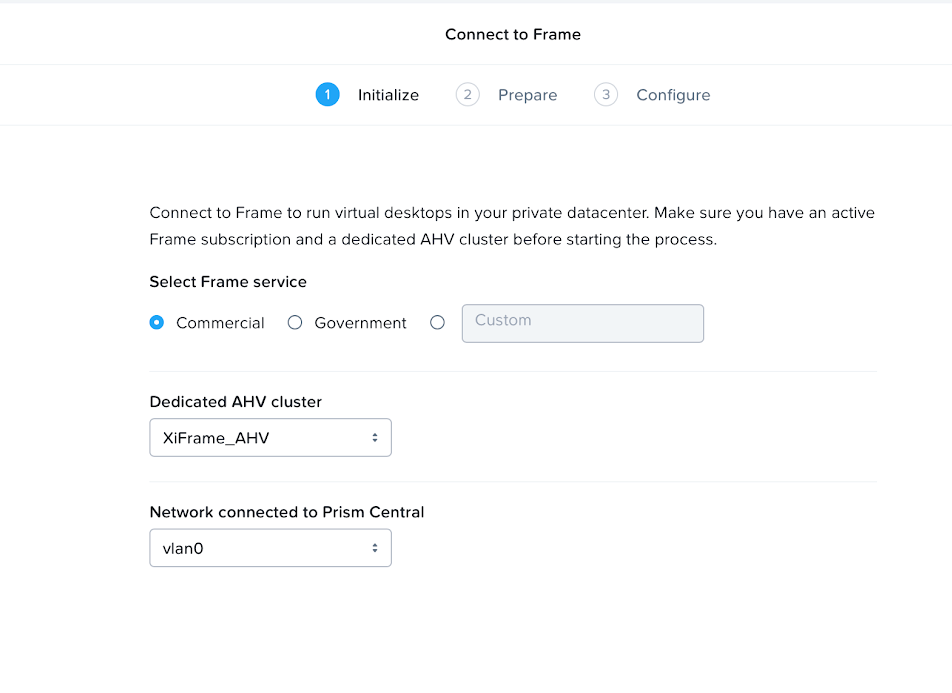
Prism Central - Connect to Frame - Select Frame Service: This is your Frame service deployment type. Most customers select "Commercial" for Frame. Select "Government" for Nutanix Government Services.
- Dedicated AHV cluster: Select the cluster where the Frame workload VMs will reside from the drop-down menu. The CCA VM will be deployed in the same cluster.
- Network connected to Prism Central: Specify the VLAN where the CCA VM will be installed from the drop-down menu. The CCA VM must be able to access both Prism Central and Prism Element VMs from this VLAN.
cautionPrism Central, Prism Element, and the CCAs should be deployed in a separate VLAN from the Frame workload VMs for network security reasons.
noteDHCP must be configured for the "Network connected to Prism Central" in order for CCA to be automatically provisioned and functional. If you do not have DHCP configured, you will need to connect to the CCA console (once the CCA VM has been configured) and configure a static IP address for the CCA. Please refer to Configuring CCA/WCCA for Static IP Addresses.
Click "Next." The image for the current CCA version will be downloaded from Nutanix and deployed on the Nutanix AHV cluster specified in the previous step. The progress can be monitored in the status bar. Once complete, click on the "Configure" button.
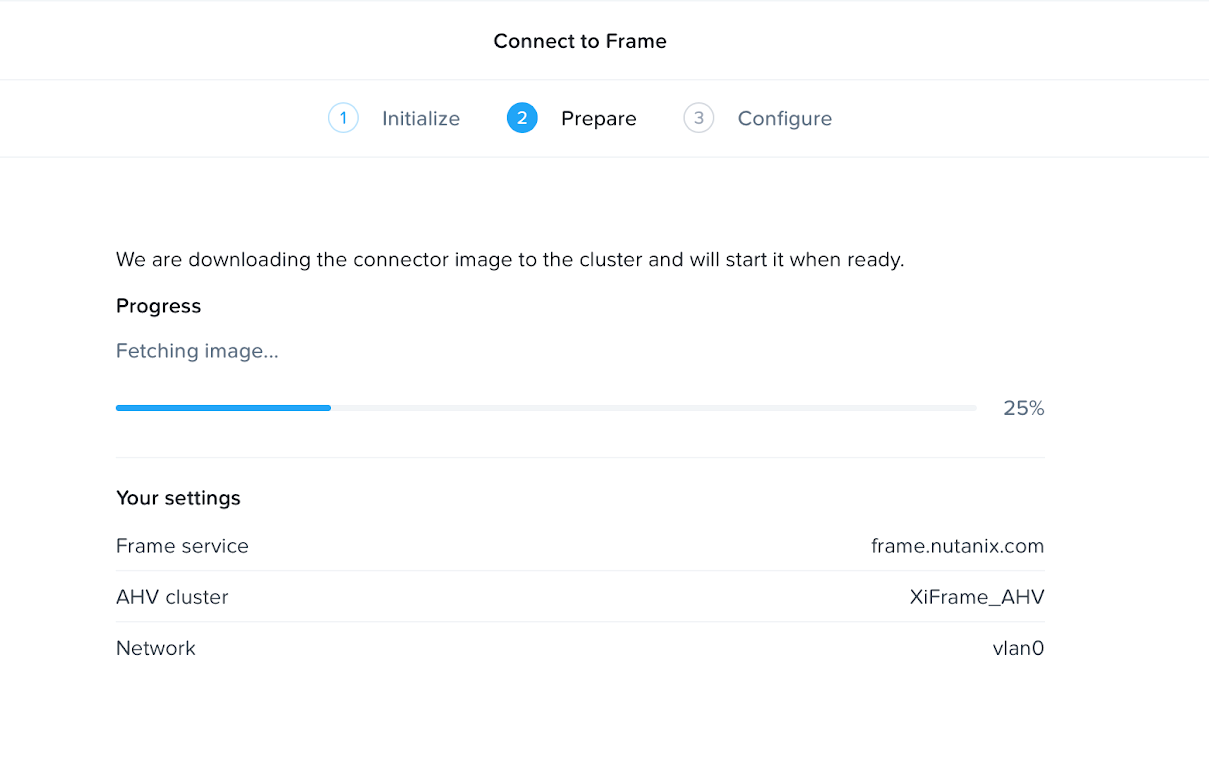
Prism Central - Installing CCA If the progress bar stops at:
- 25%: Prism Central was unable to download the CCA image. Please verify your network connectivity from Prism Central to the Internet and Frame control plane for the AHV deployment modes, as described in our network requirements documentation.
- 50%: Prism Central was unable to create the CCA VM. Check Prism Central to determine why the CCA VM was not successfully provisioned.
- 75%: The CCA VM was successfully provisioned but does not have an IP address. Verify your DHCP server for the VLAN or manually assign the CCA VM with a static IP address.
Configuring your CCA VM
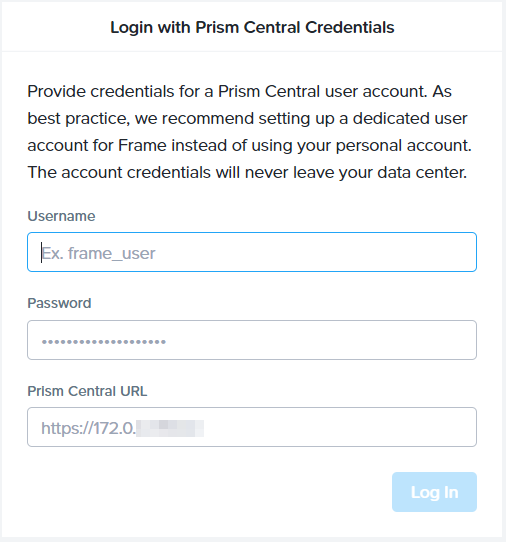
Once the CCA VM has been successfully created, use your browser to go to
https://<CCA VM IP address>/to connect to the CCA wizard.To login to the CCA wizard, use the Prism Central user credentials that you created earlier for Frame and specify the Prism Central URL.
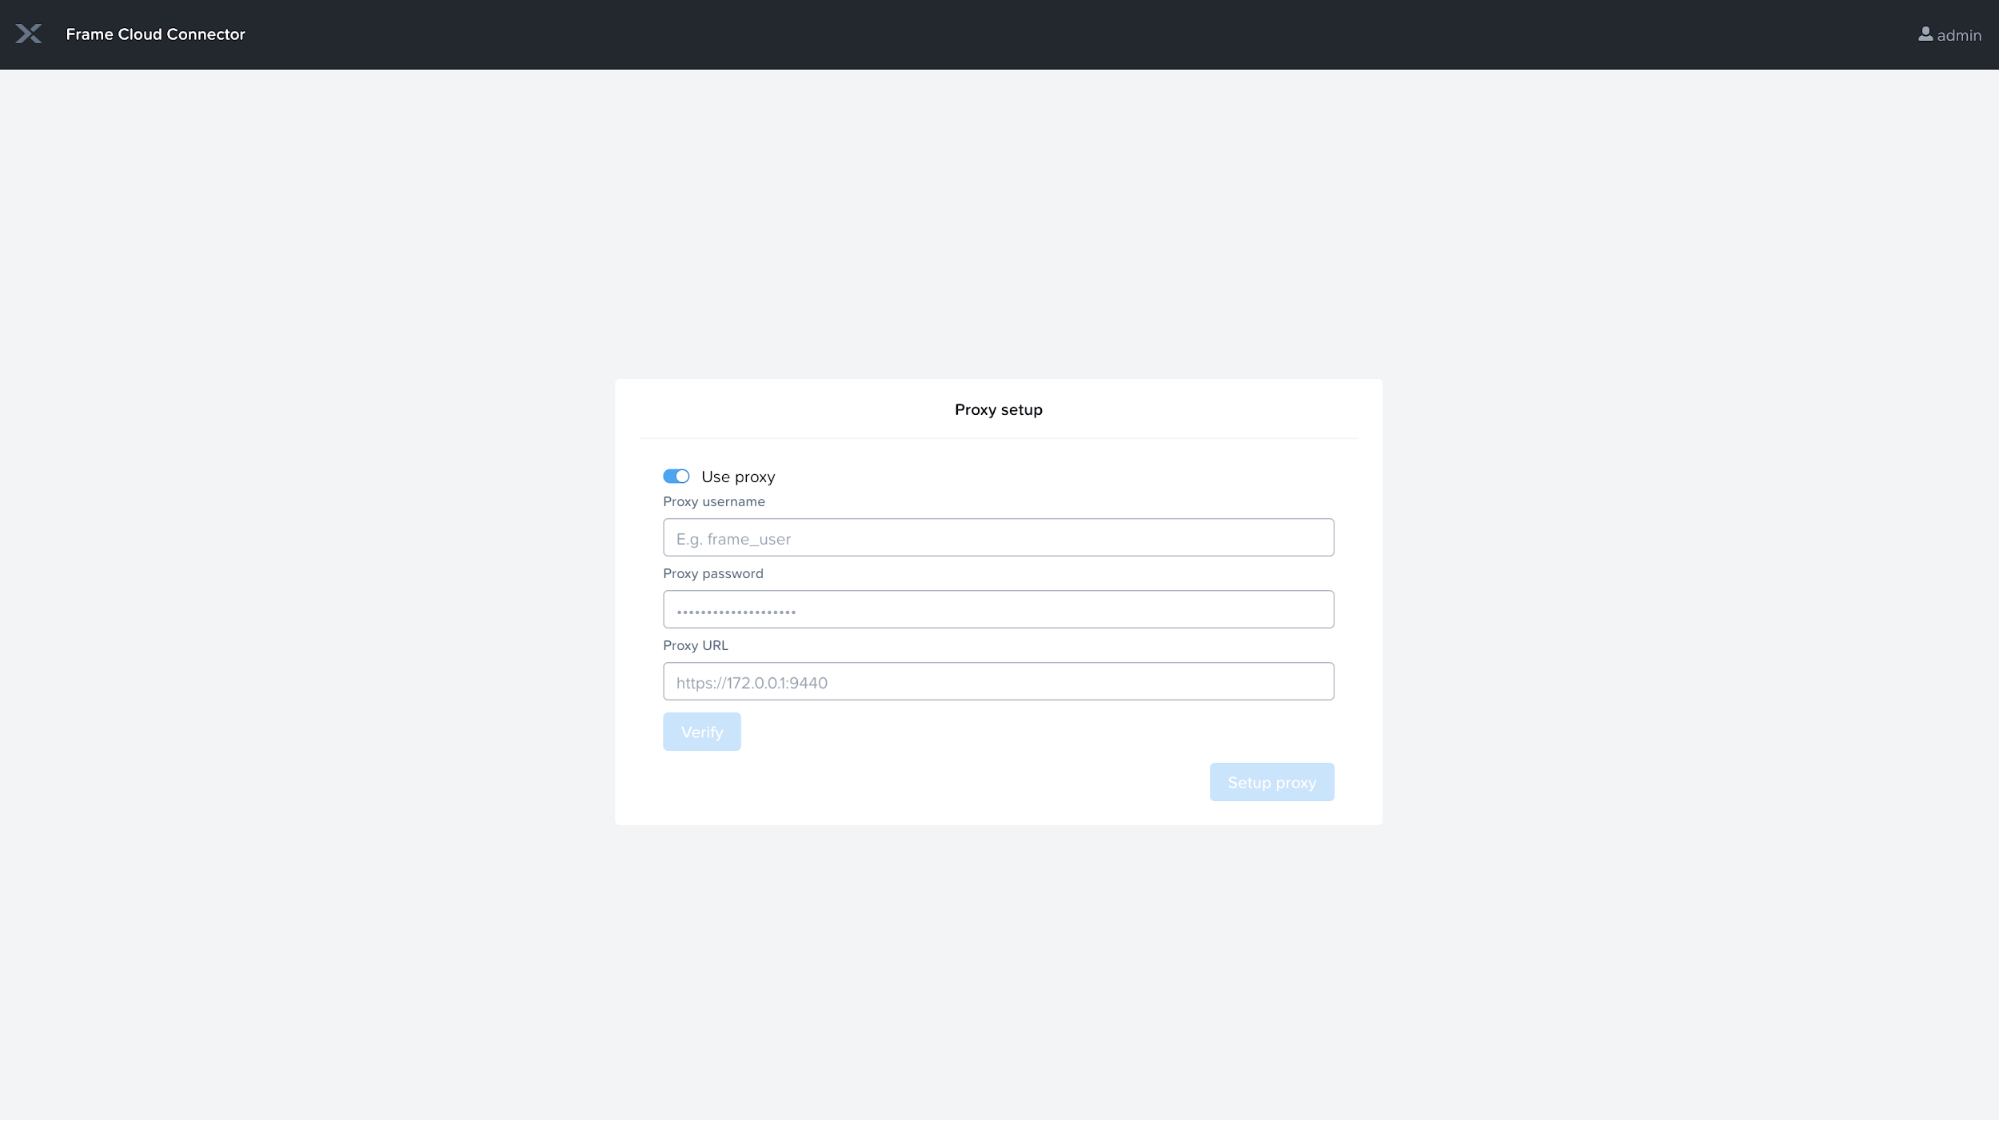
Cloud Connector Appliance - User Authentication CCA can communicate via an HTTPS proxy server to the Frame control plane. If a proxy server is not required, just click Continue. Otherwise, enable “Use proxy” slider.
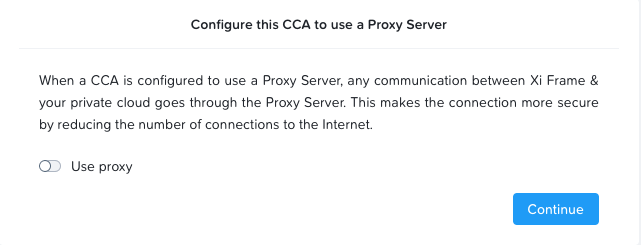
Cloud Connector Appliance - Proxy Server Option Specify the proxy server URL which the CCA will use to reach the proxy server. If the proxy server requires a service username and password, specify the service username and password required for the CCA to authenticate to the proxy server. Otherwise, leave the proxy username and password blank. Use the "Verify" button to validate your proxy server configuration.
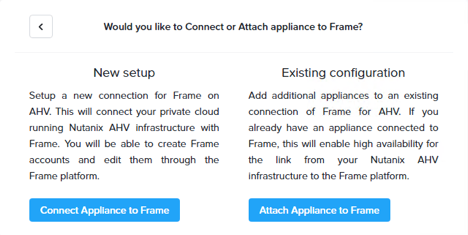
Cloud Connector Appliance - Proxy Server Configuration If you are creating a new AHV cloud account, choose the option Connect Appliance to Frame. If you have an AHV cloud account already and want to set up high availability (two or more CCA VMs) or migrate your AHV cloud account to a later CCA software version, chose the option Attach Appliance to Frame and refer to Adding the CCA to an Existing Frame AHV Cloud Account for more details.
Cloud Connector Appliance - New or Existing AHV Cloud Account Specify the AHV cluster, workload VLAN (as defined within Prism Central), cloud account name, and Prism Element service user credentials.

Cloud Connector Appliance - Cluster Configuration noteThe Cloud account name will default to the cluster name. It is important to choose a Cloud account name which is unique to easily identify the cloud account, especially if more than one cloud account will be set up in the same cluster on Frame or if you will have more than one AHV cluster on Frame.
In order to create Enterprise Profiles and/or Personal Drives, check the designated check box. Choose the storage container to store the data for Personal Drives and/or Enterprise Profiles.
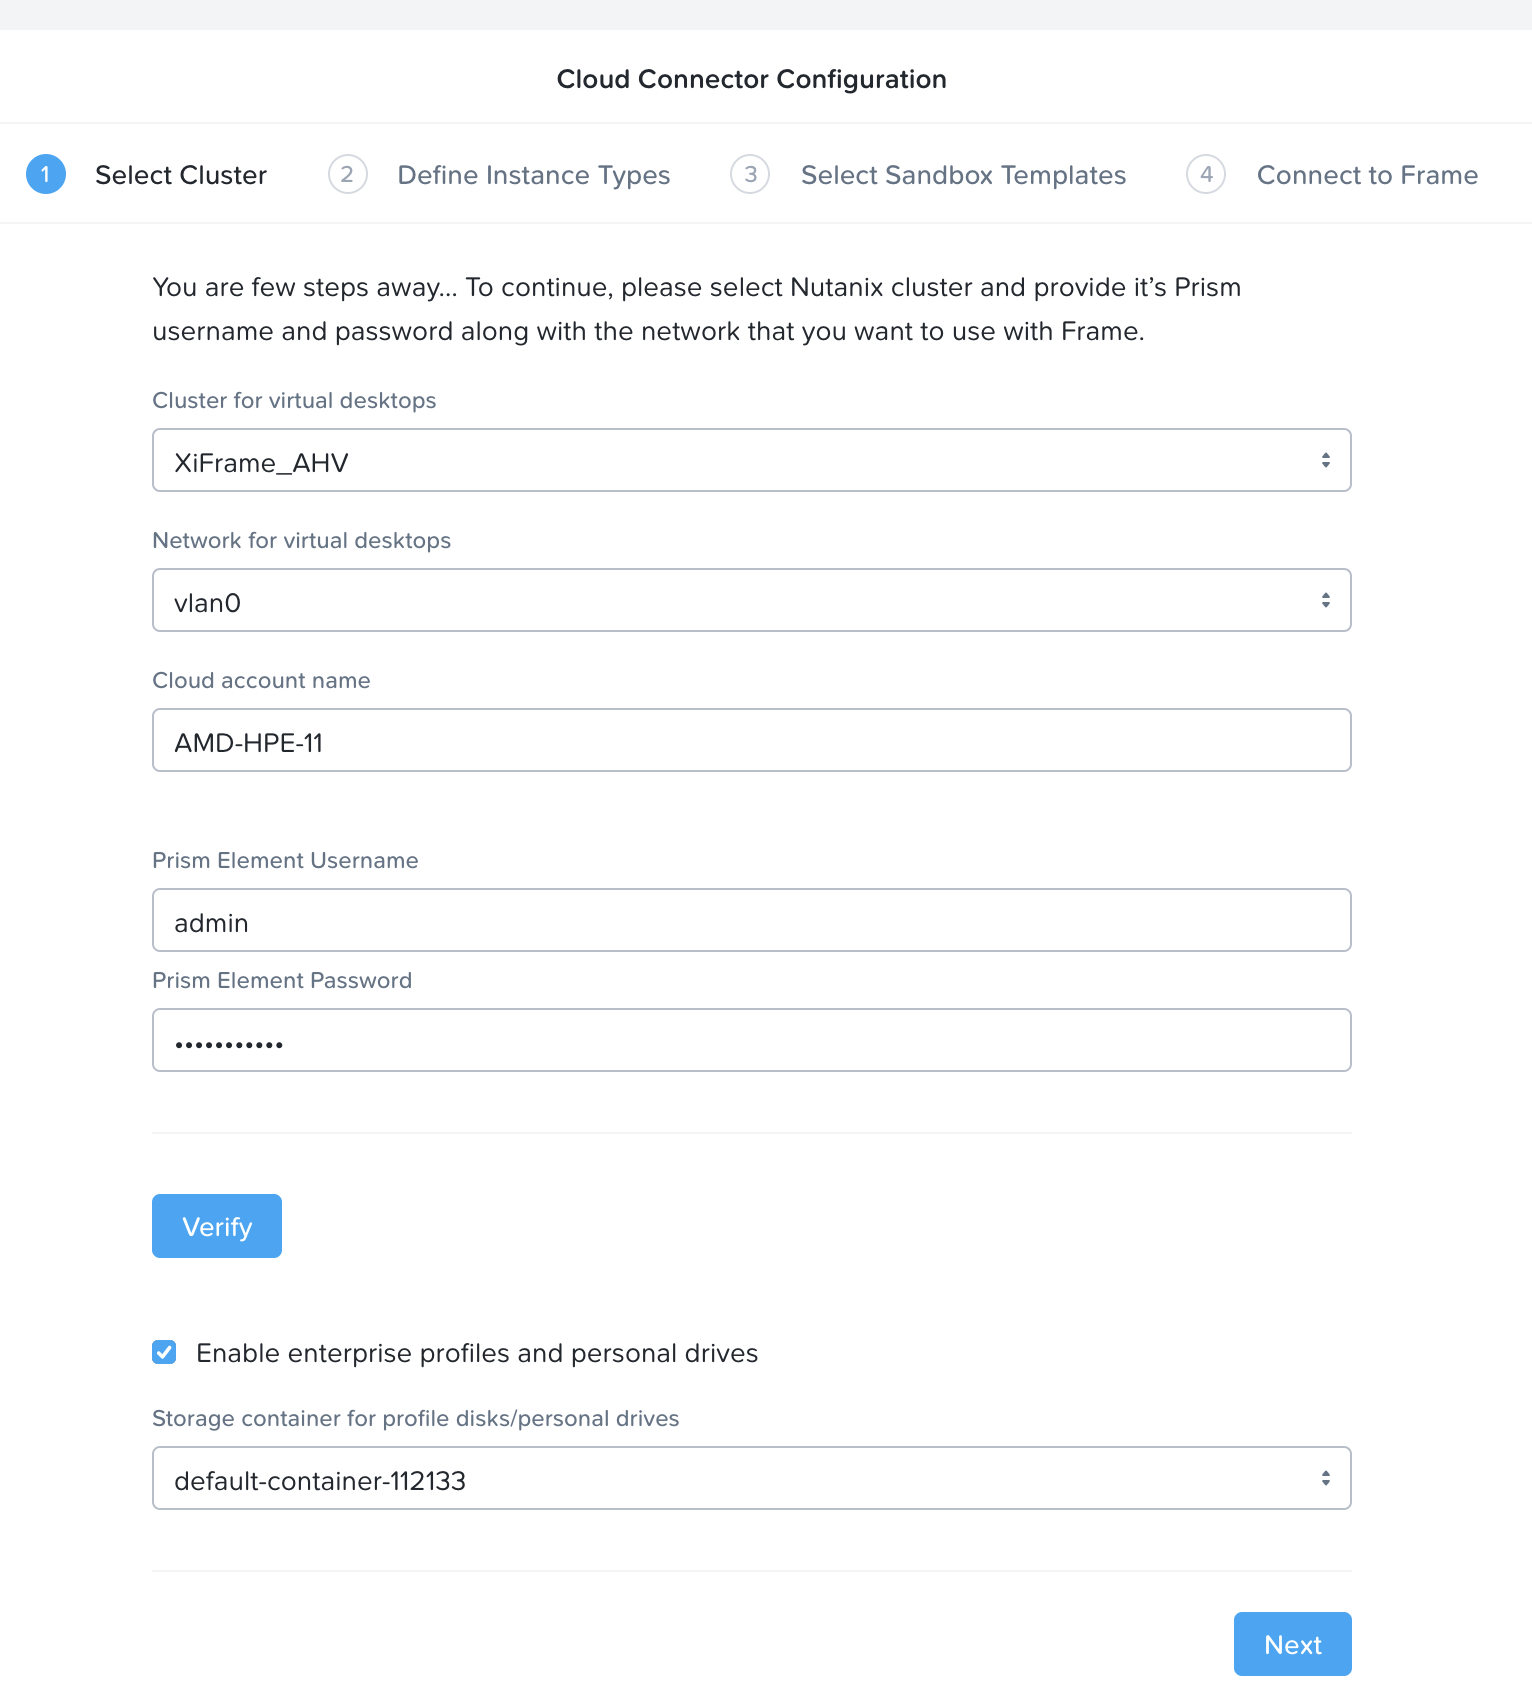
Cloud Connector Appliance - Enterprise Profiles and Personal Drives noteThe decision to use (or not use) enterprise profiles and/or personal drives can be changed by creating a new CCA VM and attaching the appliance to Frame. In addition, for persistent data like the profile disk, personal drive and persistent VMs, you should use a container that has compression and dedup enabled. For non-persistent data and VMs, choose a container with compression only and no dedup.
Click on "Add Instance Type" to define and add the VM instance types to use for your AHV-hosted Frame account. You can specify additional instance types later within Frame Console. Refer to Cloud Account Management for additional information.
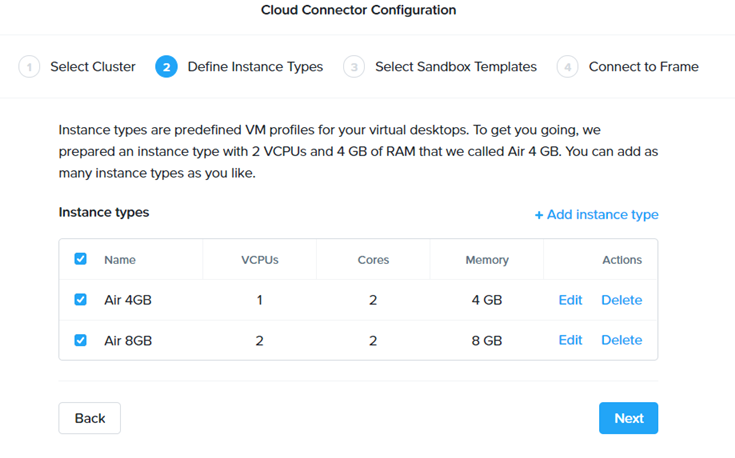
Cloud Connector Appliance - Define Instance Types Within the Edit instance type page, specify the following information:
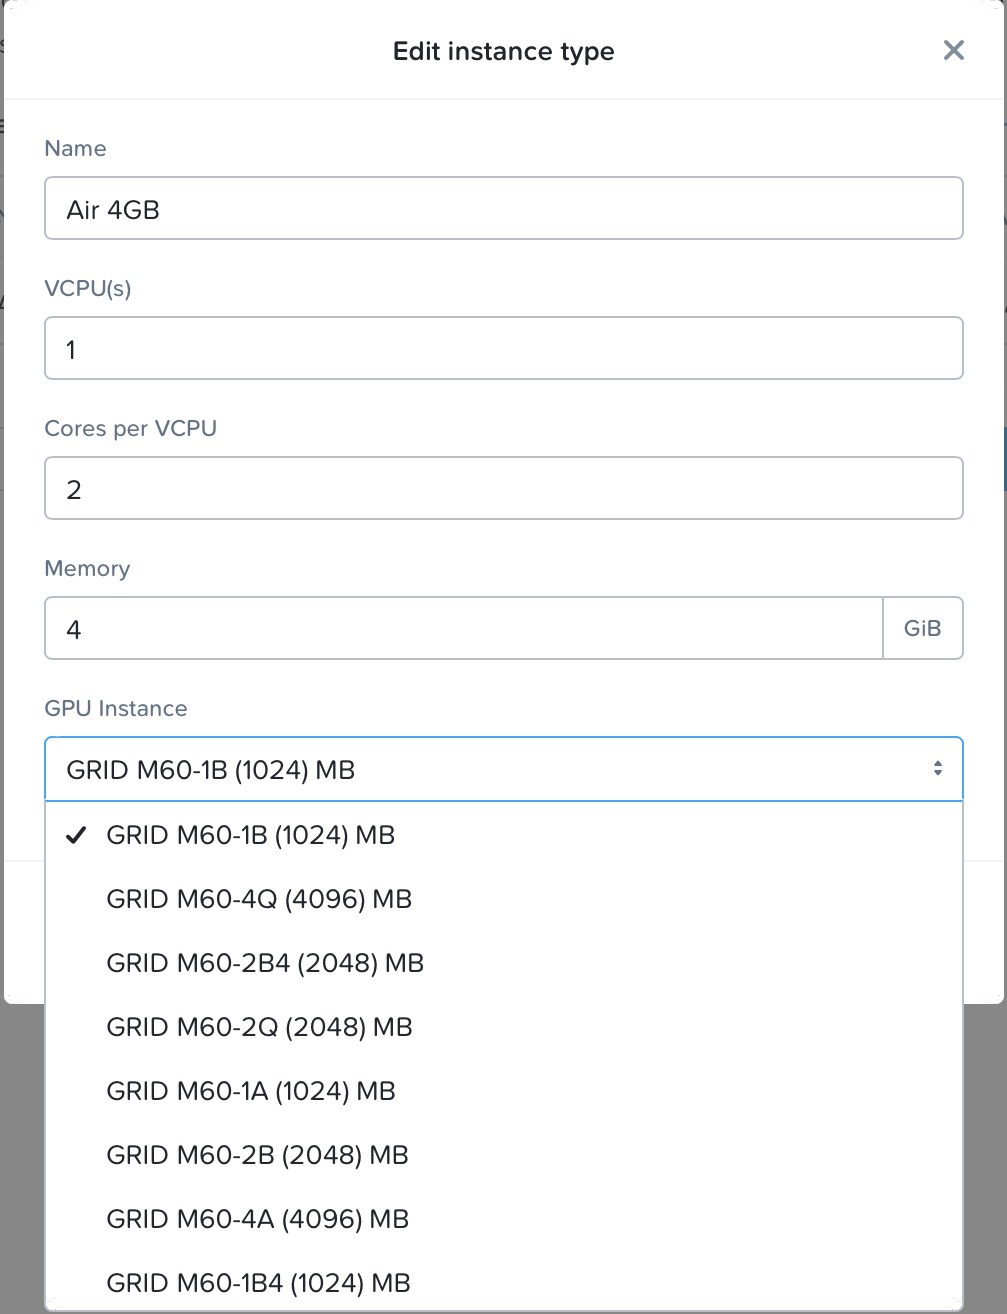
Cloud Connector Appliance - Instance Type Configuration
- Name: Name of the instance type that will appear to administrators and users within Frame Console and Launchpad, respectively.
- vCPU(s): Number of vCPUs for this instance type.
- Cores per vCPU: Number of cores for each vCPU.
- Memory: Amount of memory in GiB.
- GPU instance: If you have NVIDIA vGPUs configured in Prism, the list of vGPU profiles will be displayed. You may pick a vGPU profile if you wish for the instance type to have a vGPU when VMs of this instance type are provisioned.
After creating the desired instance type(s), you now need to choose gold images (or template images) for the Sandbox VMs that will be created when you create Frame accounts.
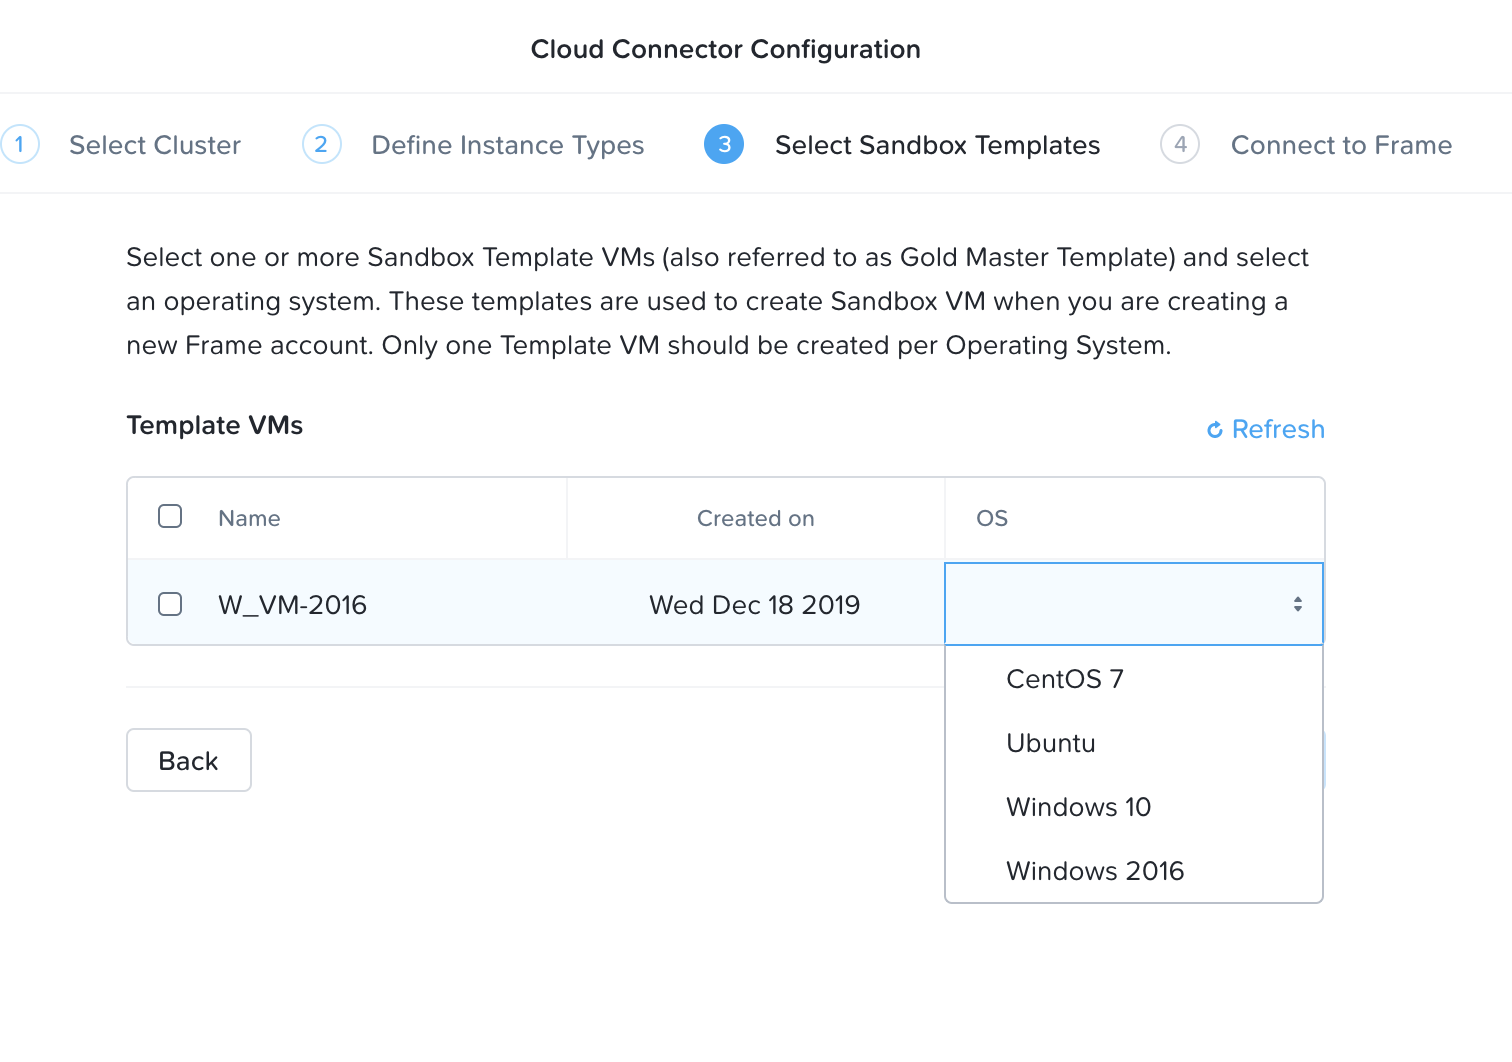
Cloud Connector Appliance - Template Images noteIf the CCA does not list the template VMs you expect, then verify that the FrameRole category and MasterTemplate value has been set on the template image VM in Prism Central. You can refresh this page once the template VMs have been properly categorized in Prism Central.
noteTo ensure a smooth setup, please make sure you logged in to your Frame customer entity or organization entity (either through “My Nutanix” or your identity provider) in a separate browser window tab before proceeding to the next step. If you do not see your Customer or Organization entity in Step 4, login to https://console.nutanix.com/ in a separate tab. Then, switch to the CCA wizard in your other browser tab, return to Step 3 using the Back button, and then go to Step 4. Your Customer or Organization entity should be visible as you have been authenticated and authorized to your Customer or Organization entity.
Select the Customer or Organization entity you want the AHV cluster to be associated with in Frame. Click "Connect".
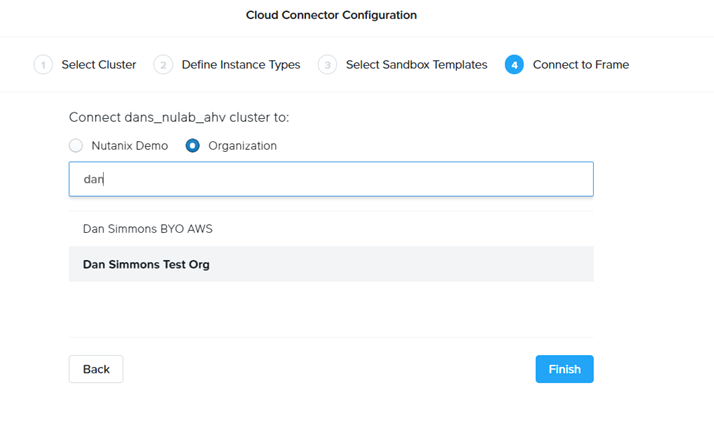
Cloud Connector Appliance - Customer or Organization The wizard should inform you that your cluster has been registered successfully on Frame.
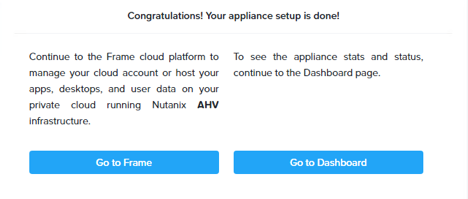
Cloud Connector Appliance - Registered Log in to your Frame account to check the cloud account creation status. The “C” status indicates that the cloud account is being configured.

Frame Console - Connecting Status noteYou may need to refresh your browser page to update the AHV Cloud Account status. If your account status hasn't changed after an hour, please create a ticket through your Frame support portal and provide your cloud account's display name. You can locate the cloud account's display name by navigating to the Customer or Organization entity's "Cloud Accounts" tab.
The account status should change from "C" (Creating) to "R" (Ready).

Frame Console - Ready Status
Manual CCA Deployment
Some customers may not be able to use the 1-click Prism Central "Connect to Frame" function and need to install CCA manually. Manual creation of a CCA VM can either be for:
- A new AHV Cloud account where there is no existing CCA VM
- An existing AHV Cloud account where one or more CCA VMs already exist
This section provides a step-by-step guide for how to create a CCA VM in Prism Central.
CCA ISO Download
To manually deploy the CCA, you must first download the Frame Cloud Connector Appliance (CCA) ISO from our Downloads page and upload it to your Prism Image Library. You will use this CCA ISO to create a CCA VM in Prism Central.
Procedure
First, in your Prism Central console, navigate to your VMs page and select "Create VM."
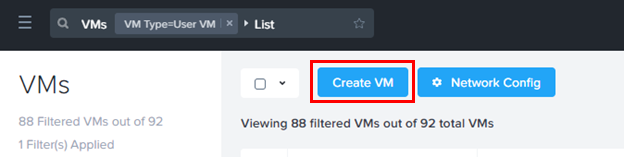
Prism Central - Create VM Create a new VM for the Frame Cloud Connector Appliance (CCA) in a VLAN that meets the network requirements, as described in Private Networking or Private Networking with SGA.
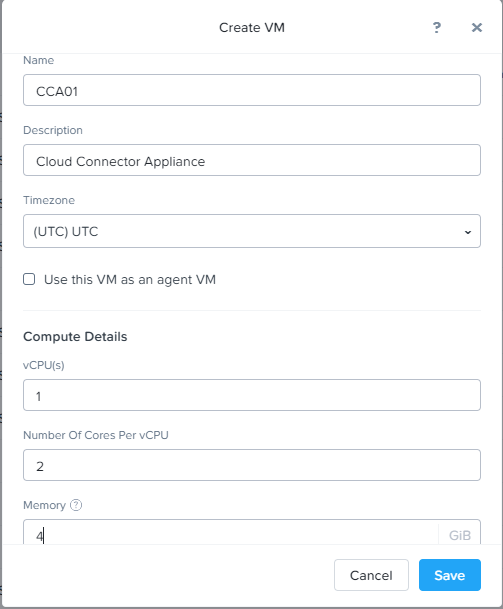
Prism Central - Specify VM Configuration noteFor use cases with up to 500 concurrent users, Frame recommends configuring your CCA with 1 vCPU, 2 cores, and 4 GB RAM.
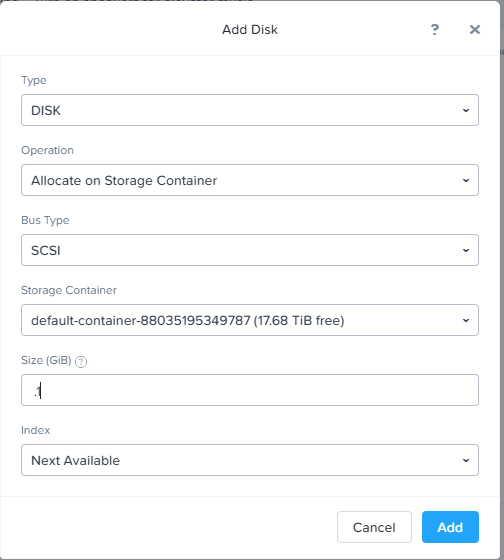
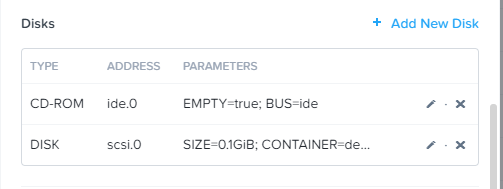
Click "+ Add New Disk" in the upper right corner of the window.
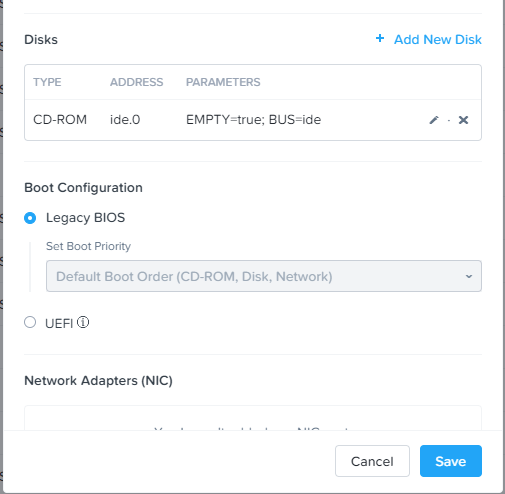
Prism Central - Add Disk Add a 0.1 GB Disk with a SCSI Bus Type and select the appropriate container. Then, click "Add."
Prism Central - Add 0.1 GiB Disk Under the "Disks" section, click on the edit (pencil) icon next to the CD-ROM entry.
Prism Central - Edit CD-ROM Select the CCA ISO you downloaded and added to your Prism Image Service previously. This will mount the CCA ISO from the "Clone from Image" operation for the VM. Verify that the Bus Type as "IDE." Click "Update."
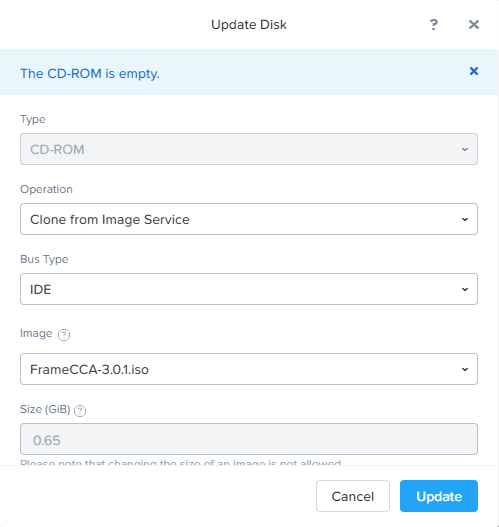
Prism Central - Update Disk The Boot Configuration should be set to "Legacy BIOS" (default).

Prism Central - Legacy BIOS Next, select "+ Add New NIC."

Prism Central - Add New NIC Select your network for the CCA VM, then click “Add.” In this example, we're using
vm_network_ipamVLAN as the network. Your network configuration may be different.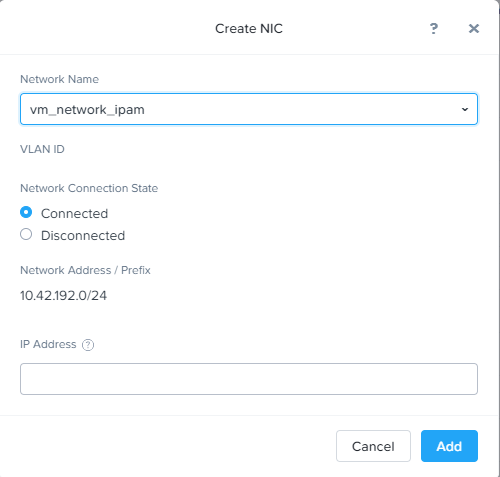
Prism Central - Create NIC Next, check the “Custom Script” check box and click on the “Type or Paste Script option.” Enter
#cloud-configas shown below. Click “Save” and close the VM.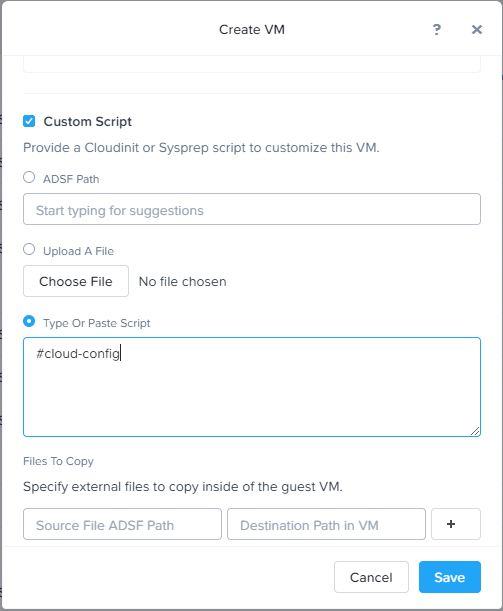
Prism Central - Add Custom Script cautionIf
#cloud-configis not entered under the script field, the “Nutanix” root level user will have no way to log in.Frame Government ServicesIf you are configuring your CCA for Frame Government Services use, paste the following script into the “Type or Paste Script” field:
#cloud-config
runcmd:
- set_cca_var CCA_SWITCHBOARD_URL cch.console.nutanix.us
- set_cca_var CCA_API_URL https://cpanel-backend.console.nutanix.us
- set_cca_var CCA_PLATFORM_URL https://console.nutanix.us
- set_cca_var CCA_REGISTRATION_URL https://gateway-external-api.console.nutanix.us
- systemctl restart cca-bridge
:::
Save the VM with the preferences specified and power it on. By default, the CCA will try to acquire an IP address from a DHCP server. To set a static IP, follow the CCA Static IP Address instructions.
Once the VM is powered on, continue with the step-by-step procedure for Configuring Your CCA VM for a new AHV Cloud Account or Adding a CCA to an Existing AHV Cloud Account.
CCA Static IP Address
By default, CCA VMs are assumed to obtain their IP address from a DHCP server provided by you. If a static IP address is required for the CCA, then the IP address of the VM will need to be manually configured.
After the CCA has been provisioned, open the console of the CCA VM from Prism Central (or Prism Element) and login as
netconfiguser (no password).Make necessary changes to the CCA VM network settings.
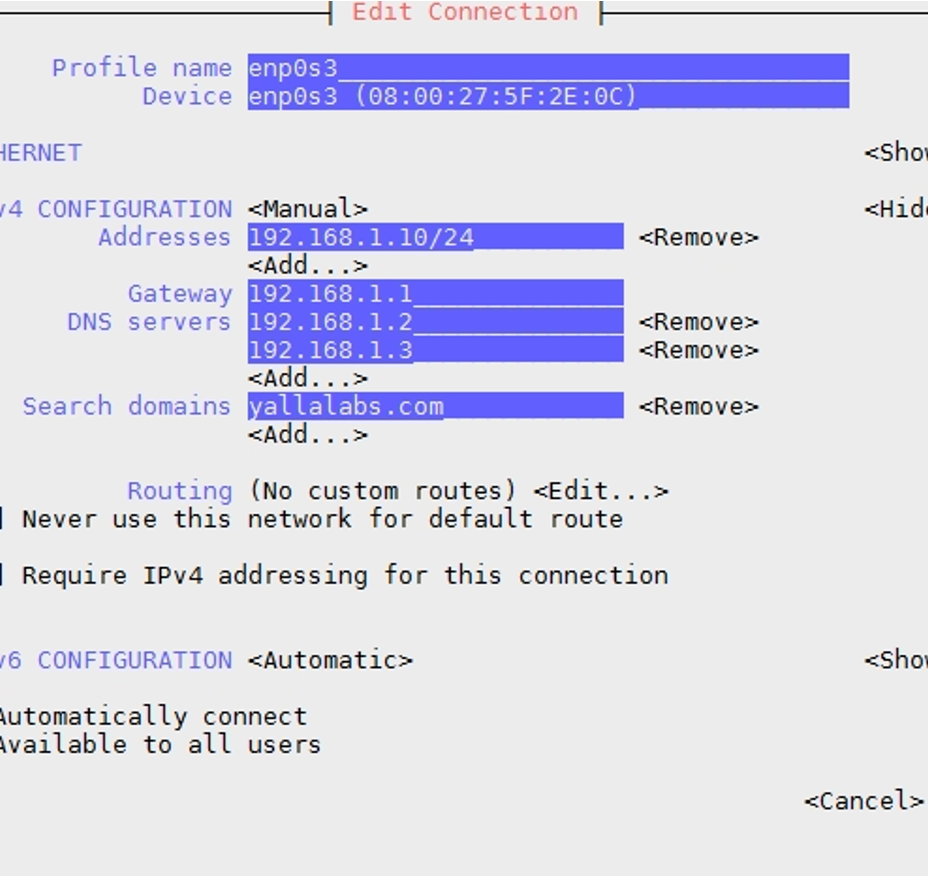
Prism Central - Network Configuration - Address: Static IP address of the CCA VM. Make sure to append the correct
/XXto the IP address. - Gateway: IP address of the gateway for the CCA VM.
- DNS servers: IP address(es) of the DNS server(s) which can resolve public DNS records, including the FQDNs for the Frame control plane.
- Address: Static IP address of the CCA VM. Make sure to append the correct
Make sure to save your setting changes.
Adding a CCA to an Existing AHV Cloud Account
This section describes the workflow if you have an existing AHV Cloud Account and would like to perform any of the following operations:
- Setup a highly available CCA configuration
- Update the version of a CCA VM
- Changed the AHV cluster's IP address and need to create a new CCA VM
- Enable Enterprise Profiles, Personal Drives, or proxy server for an existing AHV Cloud Account
- Modify settings for Enterprise Profiles, Personal Drives, or an existing proxy server configuration
You will create a new CCA VM using one of the following procedures:
- the Connect to Frame option in Prism Central, as described in Creating your Cloud Connector Appliance, Steps 1-4 or
- the Manual CCA Deployment procedure
Once your new CCA VM is powered on and you have logged in to your new CCA VM using your Prism Central user credentials, as described in Configuring your CCA VM, Steps 5-6, you can use the following workflow to update your proxy server settings (Steps 1 and 2 below) or make additional configuation changes (Steps 3 through 7).
If you want to update the CCA configuration for your existing AHV Cloud Account to use a proxy server, then click on the slider to "Use Proxy."
Cloud Connector Appliance - Proxy Server Option Specify the proxy server URL which the CCA will use to reach the proxy server. If the proxy server requires a service username and password, specify the service username and password required for the CCA to authenticate to the proxy server. Otherwise, leave the proxy username and password blank. Use the "Verify" button to validate a valid proxy server configuration.
Cloud Connector Appliance - Proxy Server Configuration Since you are adding a CCA instance to an existing AHV cloud account, choose the Attach Appliance to Frame option.
Cloud Connector Appliance - New or Existing AHV Cloud Account Confirm the AHV cluster and specify its Prism Element credentials. At this step, you can update the Enterprise Profiles and Personal Drives settings as well for the existing AHV Cloud Account.
Cloud Connector Appliance - Enterprise Profiles and Personal Drives Select the Customer or Organization entity you created earlier in the Frame account setup. Choose the AHV Cloud Account for which high availability configuration is required and Click "Attach."
Cloud Connector Appliance - Customer or Organization The wizard should inform you that your CCA VM has successfully connected to Frame control plane.
Cloud Connector Appliance - Registered Once you have attached the new version of the CCA to the AHV cloud account, you can power off the CCA VM running the older version of CCA and terminate the VM. You can perform the above steps again to add additional CCA VMs of the new version for high availability and scalability.
High-Availability CCA
If you create at least two Cloud Connector Appliance (CCA) VMs for an AHV Cluster, the CCA VMs will automatically be used in a high-availability configuration by Frame control plane. Up to 16 CCA VMs can be provisioned for an AHV Cluster.
When a CCA VM powers on, it will establish a Secure WebSocket connection to the Frame control plane and register itself. Frame control plane will then use a round-robin algorithm to send messages to one of the connected CCA VMs in the CCA VM pool. The CCA VM will forward the request, in the form of an HTTPS request, to either Prism Element (PE) or Prism Central (PC), wait for the response, and return the response back to Frame control plane.
If one of the CCA VMs loses its connection to the Frame control plane, the Frame control plane will detect the loss of connection and stop sending messages to the unconnected CCA VM.
If all CCA VMs lose their connection due to an issue with the network between the CCA VMs and Frame control plane or alL CCA VMS do not respond to Frame control plane requests, then Frame control plane will send an alert to Notification Center and update the AHV Cloud Account status as "Unavailable". Depending on the reason for the lack of communication, the AHV administrator may need to power on or reboot the CCA VMs manually in Prism Element or the Frame Administrator may need to manually reconnect the AHV Cluster in the list of cloud accounts.
Frame administrators can update the CCA pool by provisioning new CCA VMs using the image for the new CCA version, add them to an existing AHV Cloud Account, and then terminate the VMs for the previous CCA version.
Service Limits
Unlike public cloud infrastructure, Nutanix AHV clusters have no service limits. They do have resource capacity constraints, based on the hardware cluster's compute, memory, storage, and network resources.
Customers do need to monitor through Prism Central and Prism Element the overall AHV cluster health to ensure the infrastructure is performant for the end users as they work within their Frame workload VMs.
Instance Types
Nutanix AHV clusters allow customers to define their own instance types and are therefore not restricted to the instance type configurations offered by public cloud infrastructure as a service providers.
For vGPU-based instance types, you do not attach the vGPU to the template image or Sandbox in Prism Element. Frame will automatically request a vGPU from Prism when a vGPU-backed VM is provisioned.
Troubleshooting
CCA Connectivity
To troubleshoot CCA issues, administrators can review logs or access network configuration via AHV's VNC console. If the CCA page does not display the "Prism Central URL" field, verify the following:
- Ensure that there is a 0.1 GB attached disk on the CCA.
- Ensure that a “volume group” is not attached to the VM.
CCA 3.0 Dashboard can provide details on connection between CCA and Frame or CCA and Prism Central. It also shows the latest API requests to Prism Central and a summary of the Prism Central API calls since the CCA 3.0 VM was last powered on. This can be accessed by going to https://<CCA VM IP address>/ and logging in using your Prism Central service username/password.
