Microsoft OneDrive
The official Microsoft OneDrive storage solution allows users to quickly access all of their files from their OneDrive account. Integrating Frame accounts with OneDrive is simple and can be done in a matter of minutes. This guide provides detailed instructions for installing, configuring, and using OneDrive with your Frame account.
Requirements
- A Frame account
- Enterprise Profiles, Persistent Desktops, or another 3rd party method for user profile persistence must be utilized in order for the end user's OneDrive credentials to persist between sessions.
By default, this configuration will require users to log on to OneDrive each time they start a Frame session. Enterprise Profiles can be configured to avoid this issue. Once Enterprise Profiles has been enabled for the account, the end user needs only to log in to OneDrive once within the session. From that point forward, OneDrive will automatically stay logged in using the credentials stored on the user's profile disk.
Setup
In general, you would install OneDrive in your Frame account Sandbox and then publish your changes once configured.
For Windows 10, OneDrive installer is bundled with Windows 10 and is located at %WINDIR%\syswow64\onedrivesetup.exe. By default, upon each Windows user's first login, the installer for OneDrive will execute for that user, installing OneDrive in a per-user context. Therefore, identify which type of OneDrive is currently installed on your system. If OneDrive was installed as a per-user application, then uninstall OneDrive and re-install OneDrive as a per-machine application.
For Windows Server 2016/2019/2022, you may need to download OneDrive installer from Microsoft and install OneDrive as a per-machine application.
Identifying the OneDrive Install Type
The list of applications installed in an OS can be viewed through the Programs and Features applet (appwiz.cpl), but this doesn't always tell you whether or not an application is installed per-user or per-machine. Luckily there are registry locations that help you to determine more information about the application installs. There are multiple locations in the registry that help you identify not only ALL the installed applications (even those not shown in Programs and Features), but also help you identify machine vs. user installations as well as 32-bit vs 64-bit installations. These registry locations are:
| Registry Path | Discernable OneDrive version |
|---|---|
HKLM:\SOFTWARE\Microsoft\Windows\CurrentVersion\Uninstall | 64-bit per-machine installation |
HKLM:\SOFTWARE\WOW6432Node\Windows\CurrentVersion\Uninstall | 32-bit per-machine installation |
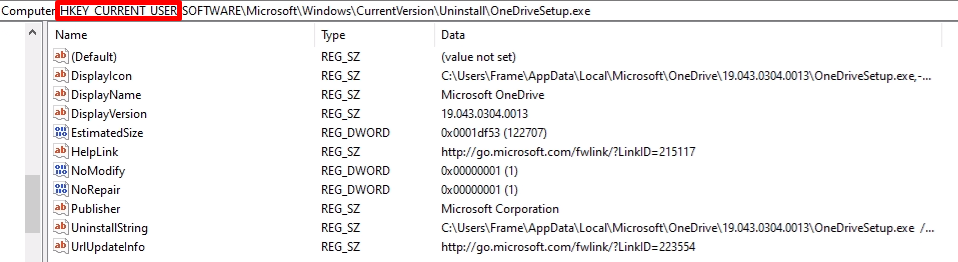
HKCU:\SOFTWARE\Microsoft\Windows\CurrentVersion\Uninstall | 64-bit & 32-bit per-user installation |
Using the above information, if you look at HKCU:\SOFTWARE\Microsoft\Windows\CurrentVersion\Uninstall and see a subkey called OneDriveSetup.exe, then your OneDrive installation is per-user.
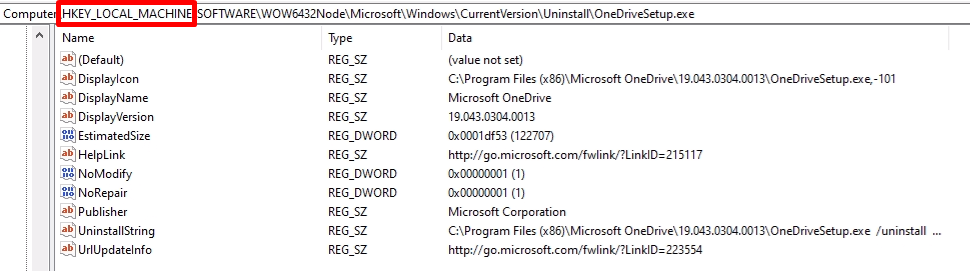
If you look at HKLM:\SOFTWARE\WOW6432Node\Microsoft\Windows\CurrentVersion\Uninstall and see a subkey called OneDriveSetup.exe, then your OneDrive installation is per-machine.
Remove per-user in favor of per-machine:
Open an elevated PowerShell.
Go to
C:\Windows\SysWOW64(cd $env:windir\syswow64).Run
.\onedrivesetup.exe /uninstall. This command will have no output. Verify uninstallation is complete via the Programs and Features applet (appwiz.cpl).Run
.\onedrivesetup.exe /allusers. This command will also have no output in PowerShell, but the OneDrive installer window will be visible during the installation.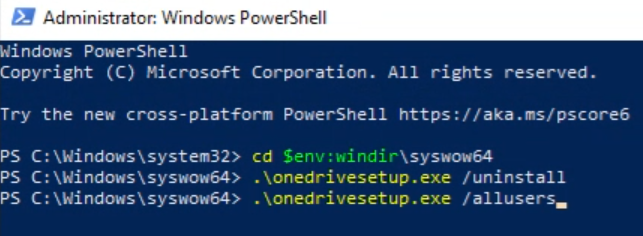
Open regedit.
Browse to
HKLM:\Software\Microsoft\OneDrive. If the OneDrive key doesn't exist, you will need to create aDWORDregistry value calledAllUsersInstallwith a value of1.
Customizing OneDrive
Microsoft OneDrive can be customized for a specific end user experience. In scenarios where group policies aren't available, the customizations described below can be implemented in the Sandbox.
If you want the OneDrive application to start for all users, after the user has logged in, execute in the Sandbox:
Set-ItemProperty -Path "HKLM:\SOFTWARE\Microsoft\Windows\CurrentVersion\Run" -Name "OneDrive" -Value '"C:\Program Files (x86)\Microsoft OneDrive\OneDrive.exe /background"'For non-persistent Frame accounts, best practice is to configure OneDrive for Files On-Demand:
Set-ItemProperty -Path "HKLM:\Software\Policies\Microsoft\OneDrive" -Name "FilesOnDemandEnabled" -Type DWord -Value 1To redirect “Windows Known Folders” to OneDrive using the Known Folders Move capability. This command supersedes the specific folders denoted further below:
Set-ItemProperty -Path "HKLM:\Software\Policies\Microsoft\OneDrive" -Name "KFMSilentOptIn" -Type String -Value "<your-AzureAdTenantID>"If you want to redirect only the user’s Desktop folder to OneDrive:
Set-ItemProperty -Path "HKLM:\Software\Policies\Microsoft\OneDrive" -Name "KFMSilentOptInDesktop" -Type DWord -Value 1If you want to redirect only the user’s Documents folder to OneDrive:
Set-ItemProperty -Path "HKLM:\Software\Policies\Microsoft\OneDrive" -Name "KFMSilentOptInDocuments" -Type DWord -Value 1If you want to redirect only the user’s Pictures folder to OneDrive:
Set-ItemProperty -Path "HKLM:\Software\Policies\Microsoft\OneDrive" -Name "KFMSilentOptInPictures" -Type DWord -Value 1To Disable the Tutorial that appears at the end of the OneDrive setup process:
Set-ItemProperty -Path "HKLM:\Software\Policies\Microsoft\OneDrive" -Name “DisableTutorial” -Type DWORD -Value “1”
- For further information regarding Microsoft OneDrive in a VDI context, refer to Install Office on a master VHD image.
- Looking for more? Read our comprehensive Microsoft OneDrive solutions guide.